> ## Documentation Index
> Fetch the complete documentation index at: https://sitespeak.ai/docs/llms.txt
> Use this file to discover all available pages before exploring further.

# How to add a ChatGPT AI support agent to W3Schools Spaces

> How to add your custom ChatGPT trained AI support agent to your W3Schools Spaces website.

You want to embed your custom trained AI support agent in your **W3Schools Spaces** website page. Here's how to add an AI support agent to W3Schools Spaces with SiteSpeakAI.

**W3Schools Spaces** is a collaborative workspace designed for learning and community engagement. It’s a platform built by the creators of W3Schools, offering a space for users to connect, share knowledge, and participate in discussions related to web development and related topics.

You can find more information here: [W3Schools Spaces](https://www.w3schools.com/spaces/)

## Add your AI support agent to your **W3Schools Spaces** website

### In SiteSpeakAI

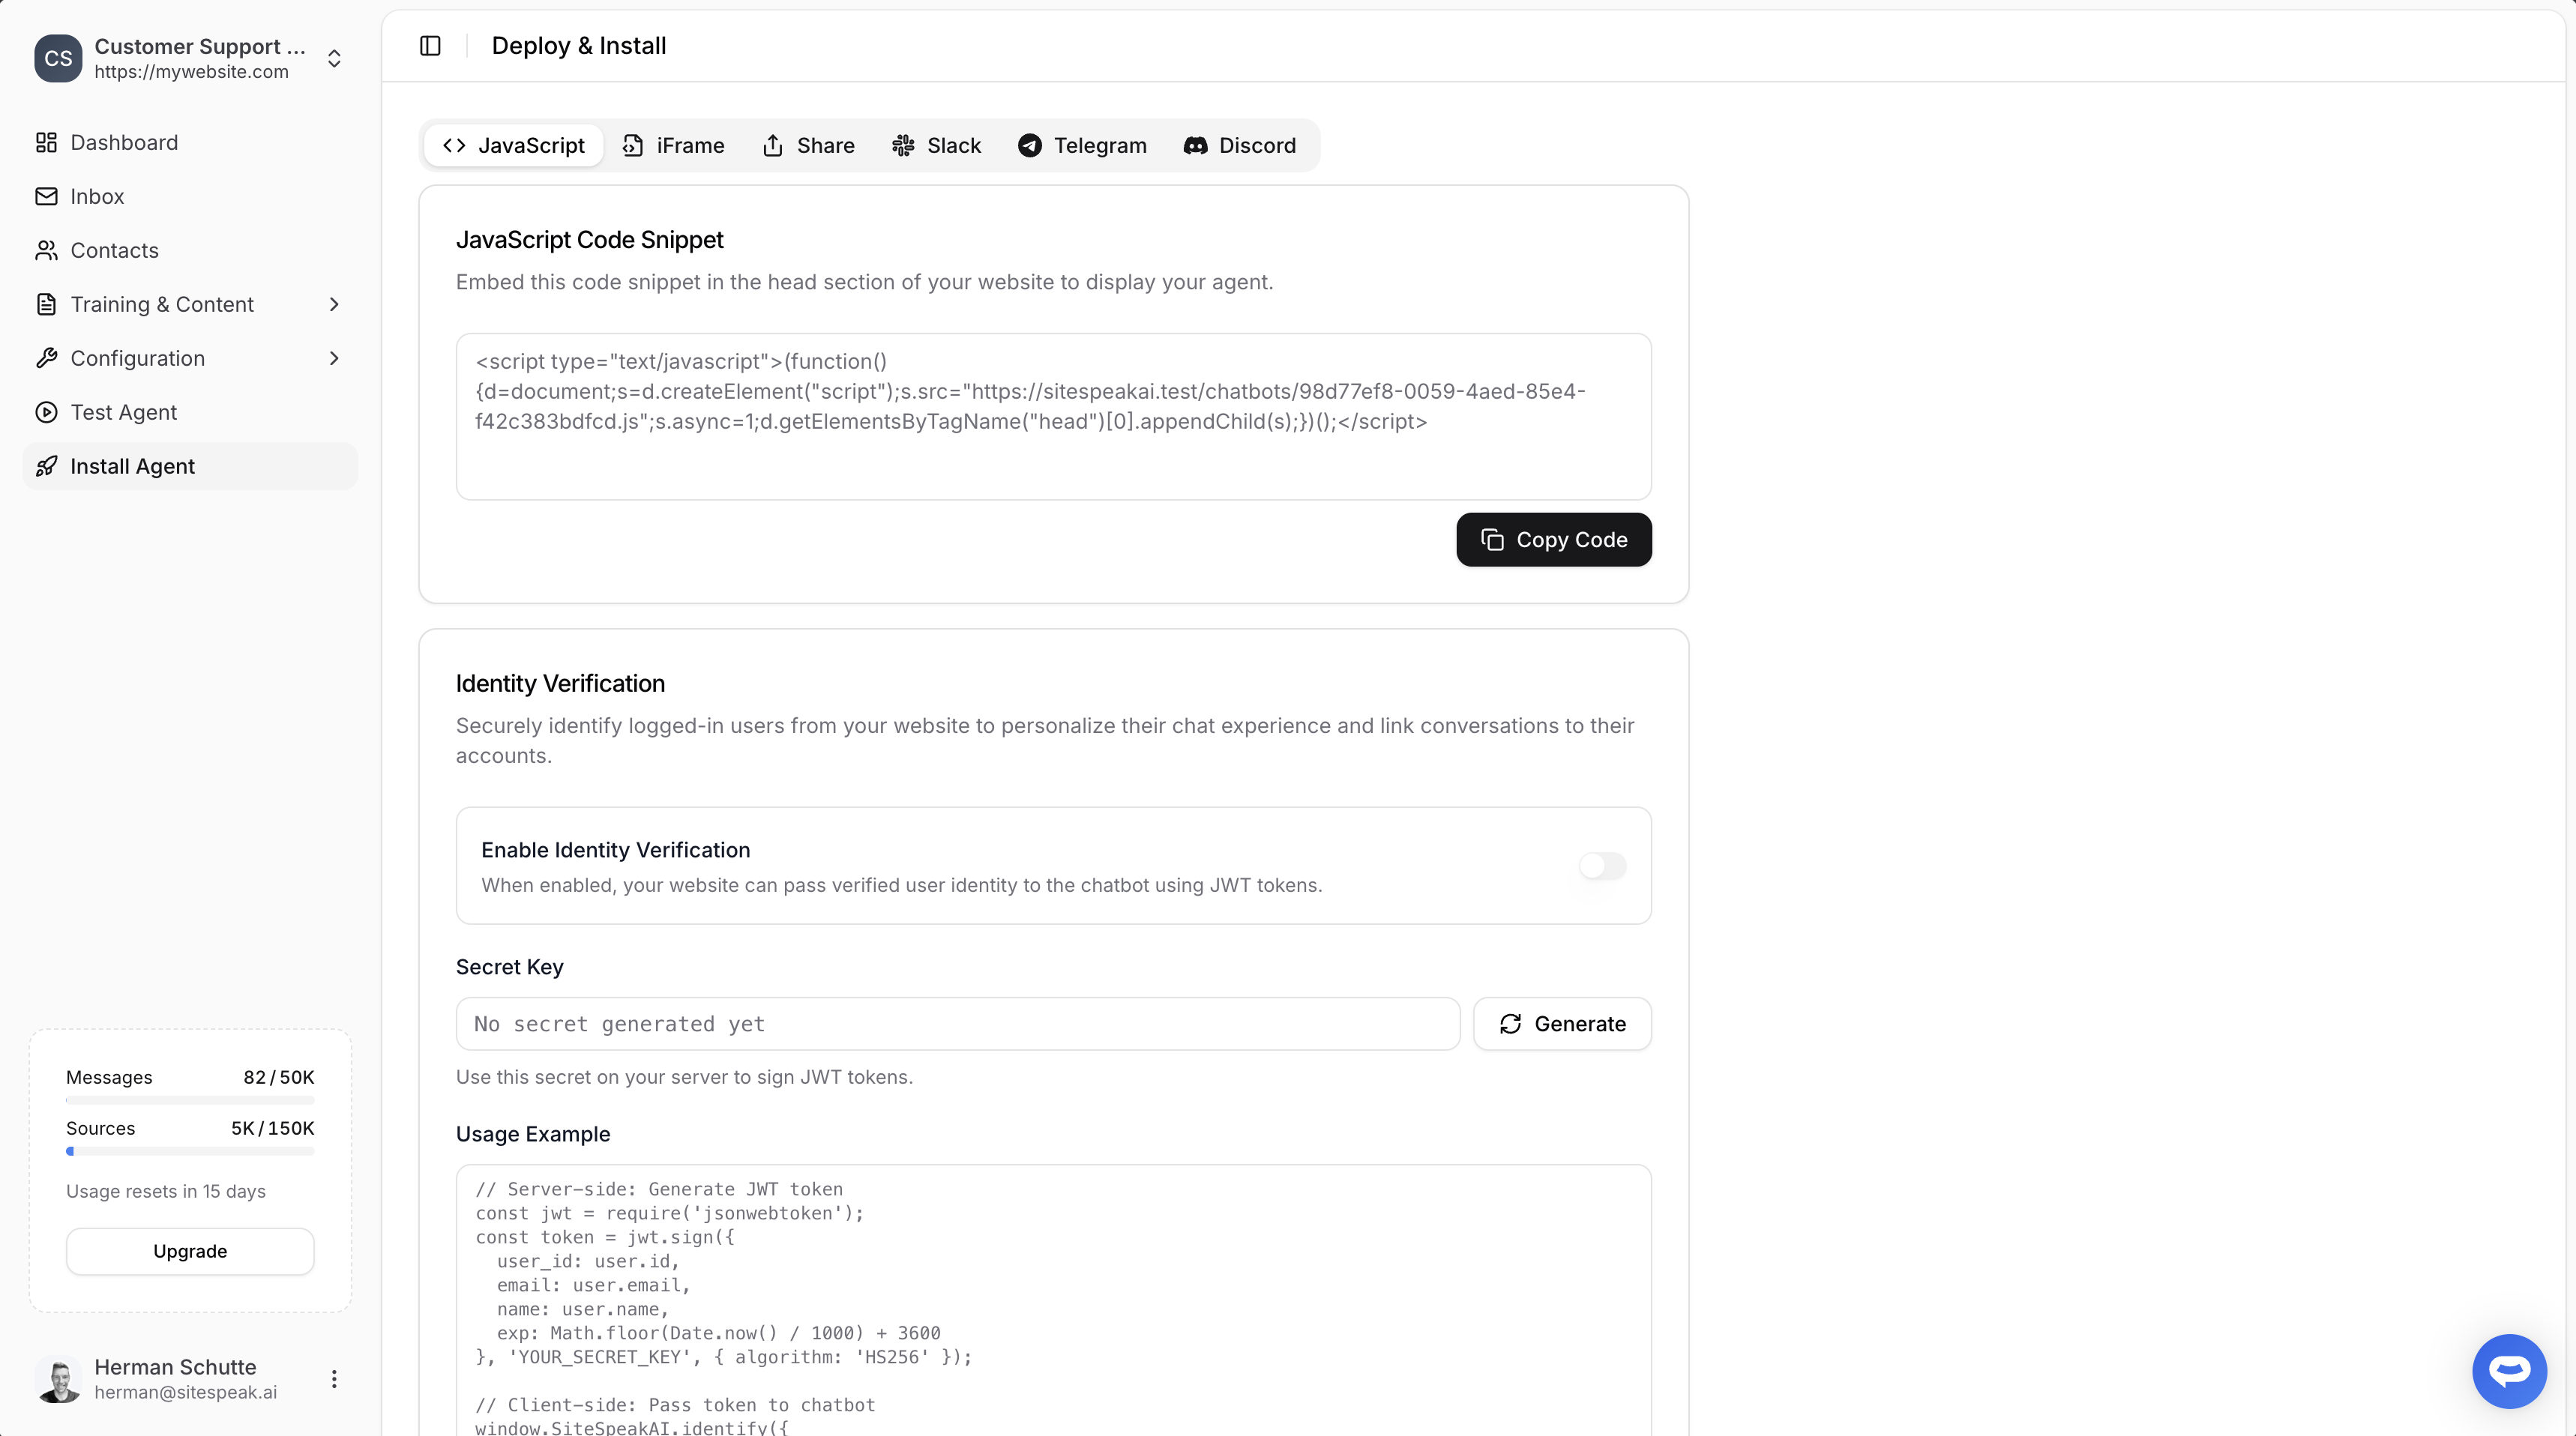
Select your chatbot from the dropdown menu at the top, click on the **Install Agent** section in the sidebar, then click on the **Copy Code** button to copy your code snippet.

<img src="https://mintcdn.com/espressodev/uRHTfU4evieXXVDw/images/installing-your-chatbot/copy-code.png?fit=max&auto=format&n=uRHTfU4evieXXVDw&q=85&s=b2614ba1d9a160d4d501b1d1bca094a2" alt="Copy code snippet" width="3436" height="1916" data-path="images/installing-your-chatbot/copy-code.png" />

### In W3Schools Spaces

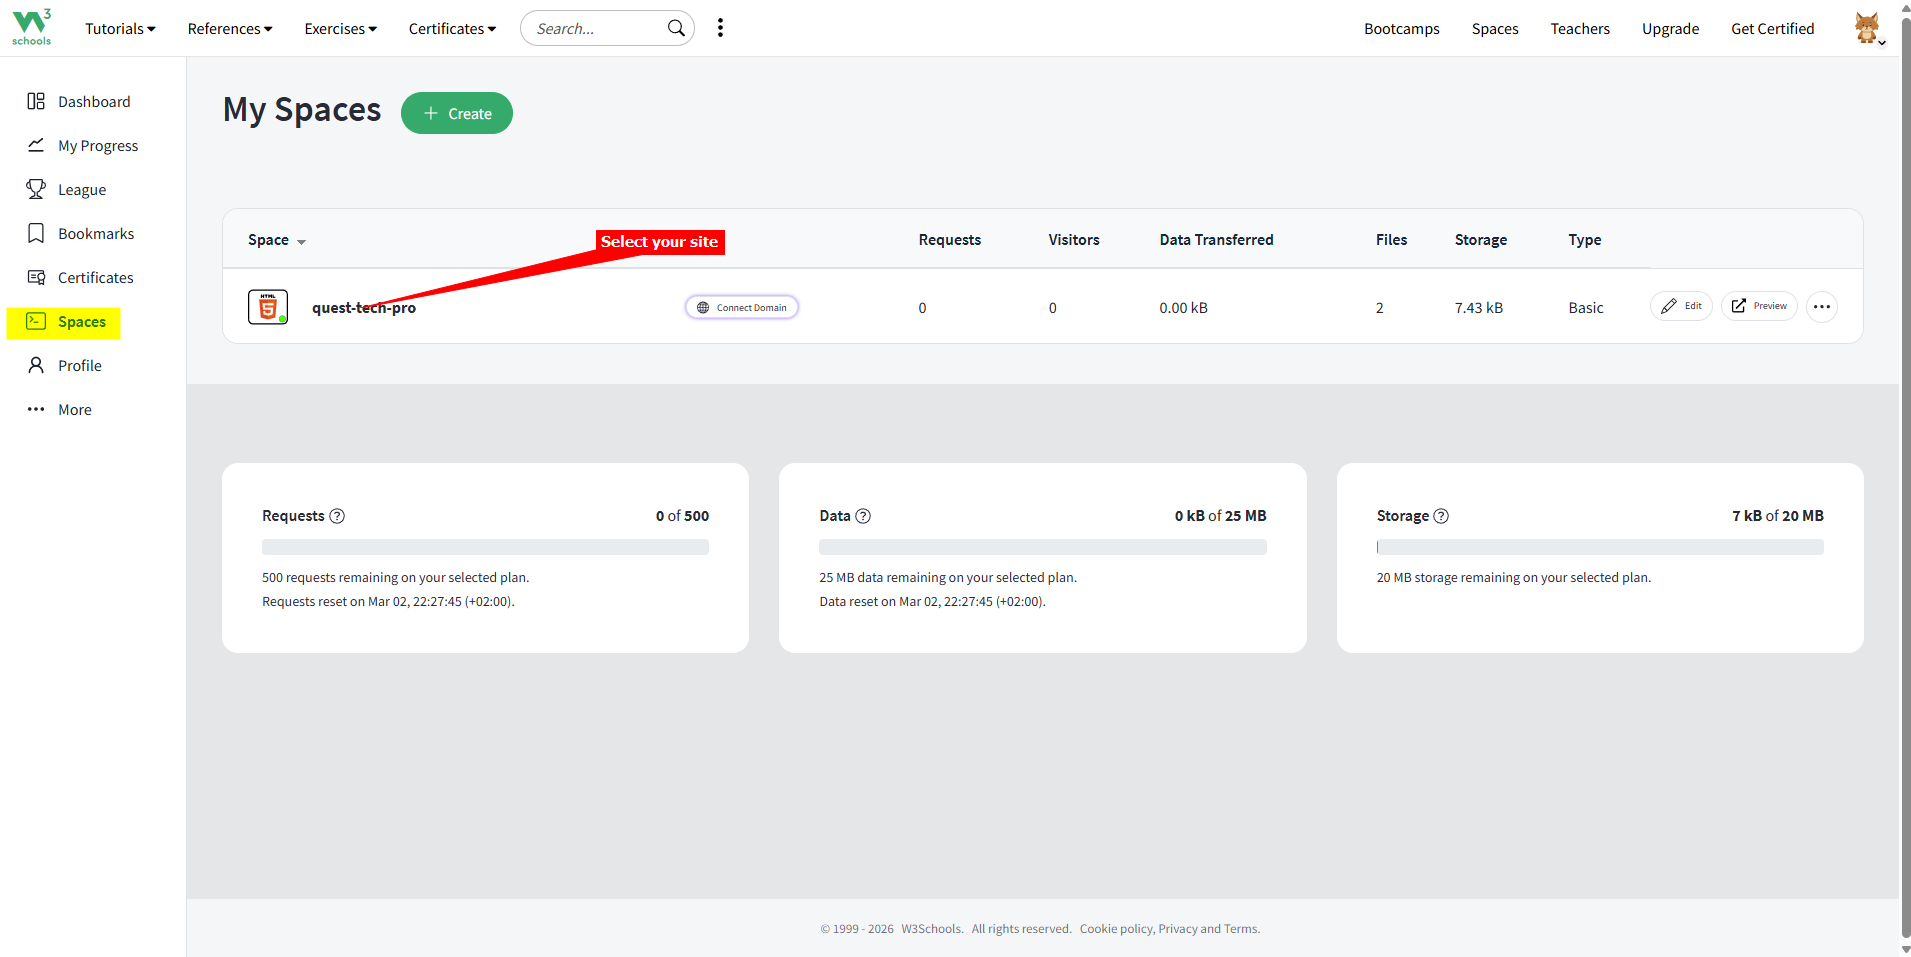
1. Log into your **W3Schools** account, select **Spaces** on the dashboard and then select your website

<img src="https://mintcdn.com/espressodev/M-R0dVKgYaQ73Jh2/images/installing-your-chatbot/w3schools/1-Log-into-your-acc-and-select-your-website.png?fit=max&auto=format&n=M-R0dVKgYaQ73Jh2&q=85&s=7acfe559b1a0497e68eef23f8dd22171" alt="" width="1911" height="957" data-path="images/installing-your-chatbot/w3schools/1-Log-into-your-acc-and-select-your-website.png" />

2. On the website editor page, select **index.html** (or any other html file, if you have added more pages to your website)

<img src="https://mintcdn.com/espressodev/M-R0dVKgYaQ73Jh2/images/installing-your-chatbot/w3schools/2-Select-your-html-file.png?fit=max&auto=format&n=M-R0dVKgYaQ73Jh2&q=85&s=a6d2aa24c0065b30447dd9f03e419684" alt="" width="1918" height="957" data-path="images/installing-your-chatbot/w3schools/2-Select-your-html-file.png" />

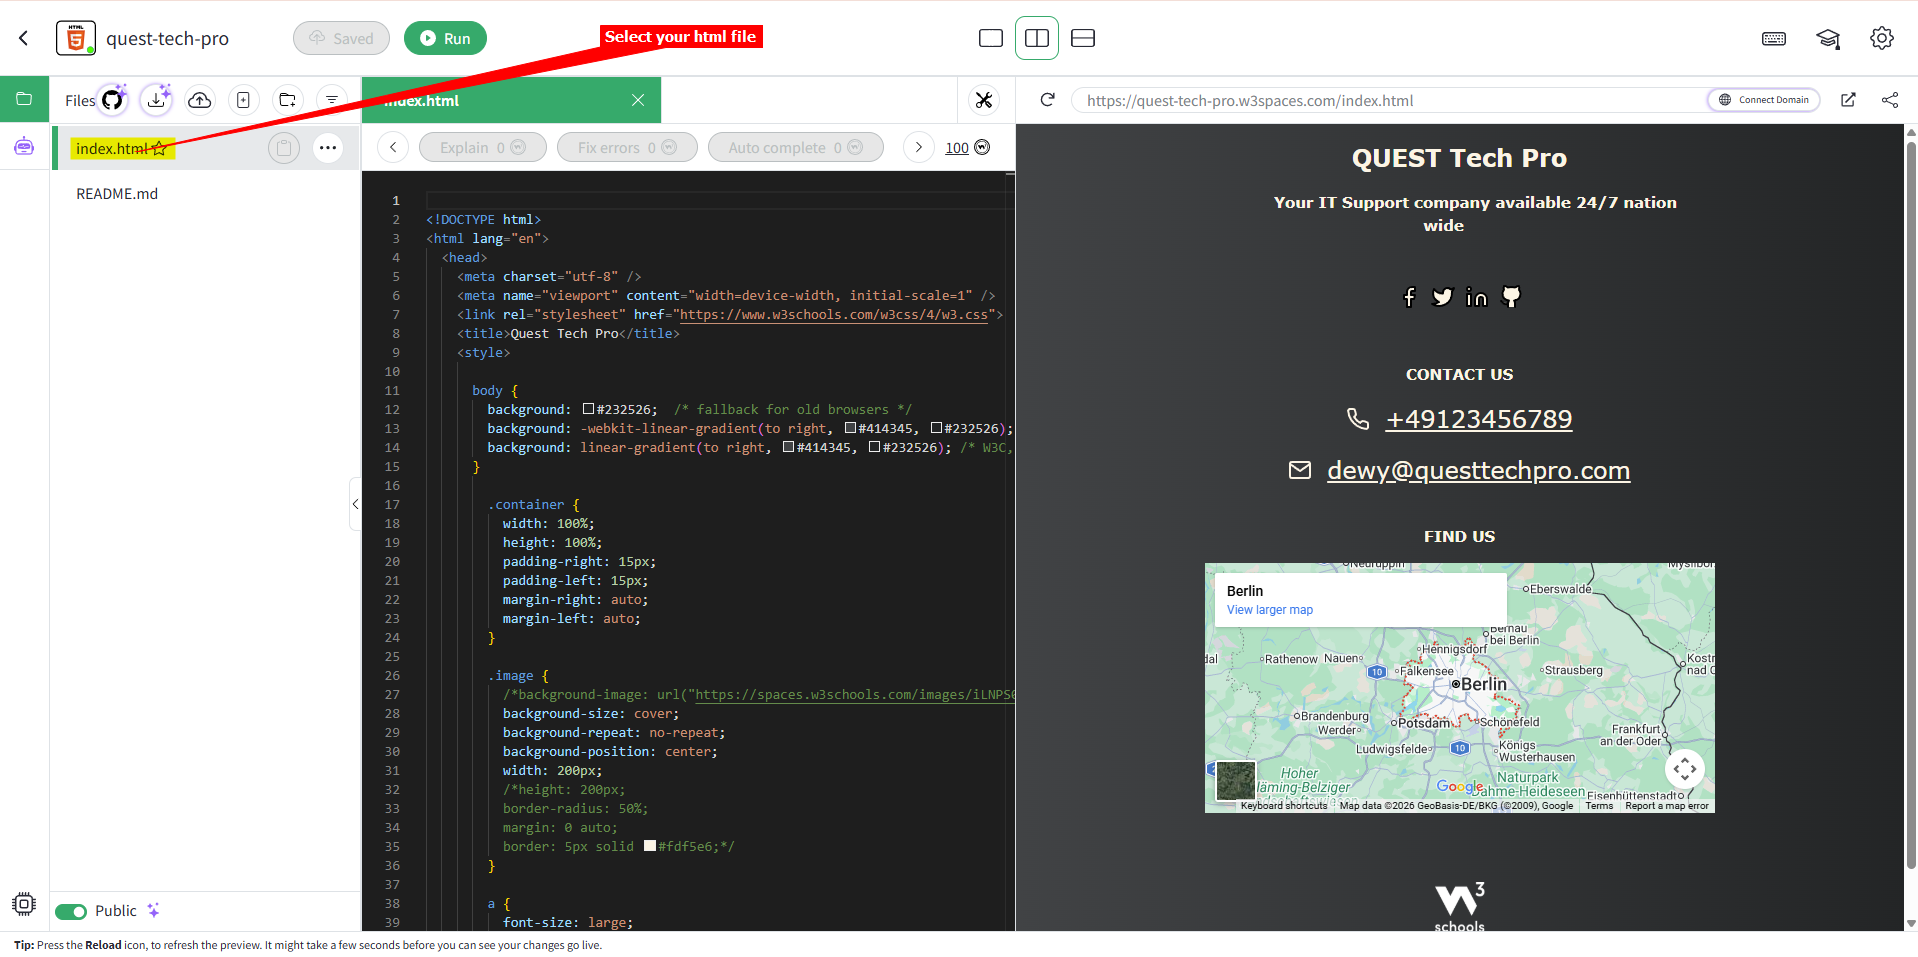
3. You will now have a split display with the index.html code on the left pane and the webpage preview in the right pane. Scroll down in the left pane to just before the ending `</body>` tag

<img src="https://mintcdn.com/espressodev/M-R0dVKgYaQ73Jh2/images/installing-your-chatbot/w3schools/3-Scroll-down-to-the-end-body-tag.png?fit=max&auto=format&n=M-R0dVKgYaQ73Jh2&q=85&s=b74b469482e2c6b53da9f316912f0264" alt="" width="1919" height="958" data-path="images/installing-your-chatbot/w3schools/3-Scroll-down-to-the-end-body-tag.png" />

4. Insert a blank line just above the `</body>` tag and insert your AI support agent snippet. When done, click on **Save** and then on **Run** to see your changes in the preview pane. Your AI support button will appear on your page

<img src="https://mintcdn.com/espressodev/M-R0dVKgYaQ73Jh2/images/installing-your-chatbot/w3schools/4-Insert-snippet-and-Save-&-Run-to-see-preview.png?fit=max&auto=format&n=M-R0dVKgYaQ73Jh2&q=85&s=725f74fa1682beea9fe2e0c5ed30485a" alt="" width="1919" height="955" data-path="images/installing-your-chatbot/w3schools/4-Insert-snippet-and-Save-&-Run-to-see-preview.png" />

5. If you click on the button it will display your support agent dialogue

<img src="https://mintcdn.com/espressodev/M-R0dVKgYaQ73Jh2/images/installing-your-chatbot/w3schools/5-Dialogue-in-preview.png?fit=max&auto=format&n=M-R0dVKgYaQ73Jh2&q=85&s=b8ebf6a87a13db51b2e79f7b0e2d3d2d" alt="" width="1917" height="957" data-path="images/installing-your-chatbot/w3schools/5-Dialogue-in-preview.png" />

6. If you click on the **View in a new tab** button, it will display your website in a new tab as a full webpage

<img src="https://mintcdn.com/espressodev/M-R0dVKgYaQ73Jh2/images/installing-your-chatbot/w3schools/6-Preview-in-a-new-tab.png?fit=max&auto=format&n=M-R0dVKgYaQ73Jh2&q=85&s=480e38d9f4ac17446f3be4714f72d806" alt="" width="1917" height="959" data-path="images/installing-your-chatbot/w3schools/6-Preview-in-a-new-tab.png" />

7. Your AI support agent button will now be displayed on your **W3Schools Spaces** website page

<img src="https://mintcdn.com/espressodev/M-R0dVKgYaQ73Jh2/images/installing-your-chatbot/w3schools/7-Dialogue-button.png?fit=max&auto=format&n=M-R0dVKgYaQ73Jh2&q=85&s=75cd3b2582e4cadff561861c6c945633" alt="" width="1923" height="962" data-path="images/installing-your-chatbot/w3schools/7-Dialogue-button.png" />

8. If you click on the button it will display the AI support agent dialogue

<img src="https://mintcdn.com/espressodev/M-R0dVKgYaQ73Jh2/images/installing-your-chatbot/w3schools/8-Dialogue-box.png?fit=max&auto=format&n=M-R0dVKgYaQ73Jh2&q=85&s=f60d34dbbe7d7e587c8b4a3d7d16c1f6" alt="" width="1920" height="957" data-path="images/installing-your-chatbot/w3schools/8-Dialogue-box.png" />

Your AI support agent has now been added to your **W3Schools Spaces** website and your visitors/customers can start interacting with it!

***

<Card title="Ready to automate your customer service with AI?" icon="bot" href="https://sitespeak.ai/register?utm_source=docs&utm_medium=cta&utm_campaign=primary-cta" arrow="true" cta="Create Your AI Agent">
  Join over 1000+ businesses, websites and startups automating their customer service and other tasks with a custom trained AI agent.
</Card>
