> ## Documentation Index
> Fetch the complete documentation index at: https://sitespeak.ai/docs/llms.txt
> Use this file to discover all available pages before exploring further.
# Connect SiteSpeakAI to WhatsApp Business
> Enable your AI chatbot to respond to WhatsApp messages using the WhatsApp Business API.
SiteSpeakAI integrates with WhatsApp Business to let your AI chatbot respond to customer messages on WhatsApp. This guide walks you through setting up the WhatsApp Business API and connecting it to your SiteSpeakAI chatbot.
In this tutorial, I'll show you how to connect your SiteSpeakAI chatbot to WhatsApp Business, so it can answer customer messages on WhatsApp automatically. WhatsApp is available on our Pro Plus and Business plans.
Before you can connect your agent to WhatsApp, you need to create and train it. After you log in to SiteSpeak, you land on the Get Started page, which walks you through it in five quick steps. First, give your agent a name. This is the name your visitors will see when they chat with it. Click Save and Continue to create the agent. Next, add the website you want your agent to learn from. For this example I'll use snapwidget.com. Click Save and Continue, and SiteSpeak crawls the site to find pages it can train on. In a few seconds, it finds the main pages on the site. SiteSpeak selects those pages for you. Click Save and Continue to train your agent on them. SiteSpeak now trains your agent on that content automatically. Once it finishes, your agent is ready to answer questions, and you can connect it to WhatsApp.
Now let's connect your agent to WhatsApp. Head to developers.facebook.com and log in, then create a new app. Give it a name, and under Add Use Cases, filter by Others and choose Other. Click Next. Select the Business app type, then click Next and create your app. In your app dashboard, scroll down to Add products and click Set up on the WhatsApp card. You'll be asked to select or create a Meta Business account, which the WhatsApp API requires. Open the API Setup page, click Add phone number, and verify it with the code Meta sends you by SMS or call. While you're here, copy your Phone Number ID shown below the number. You'll need it in a moment.
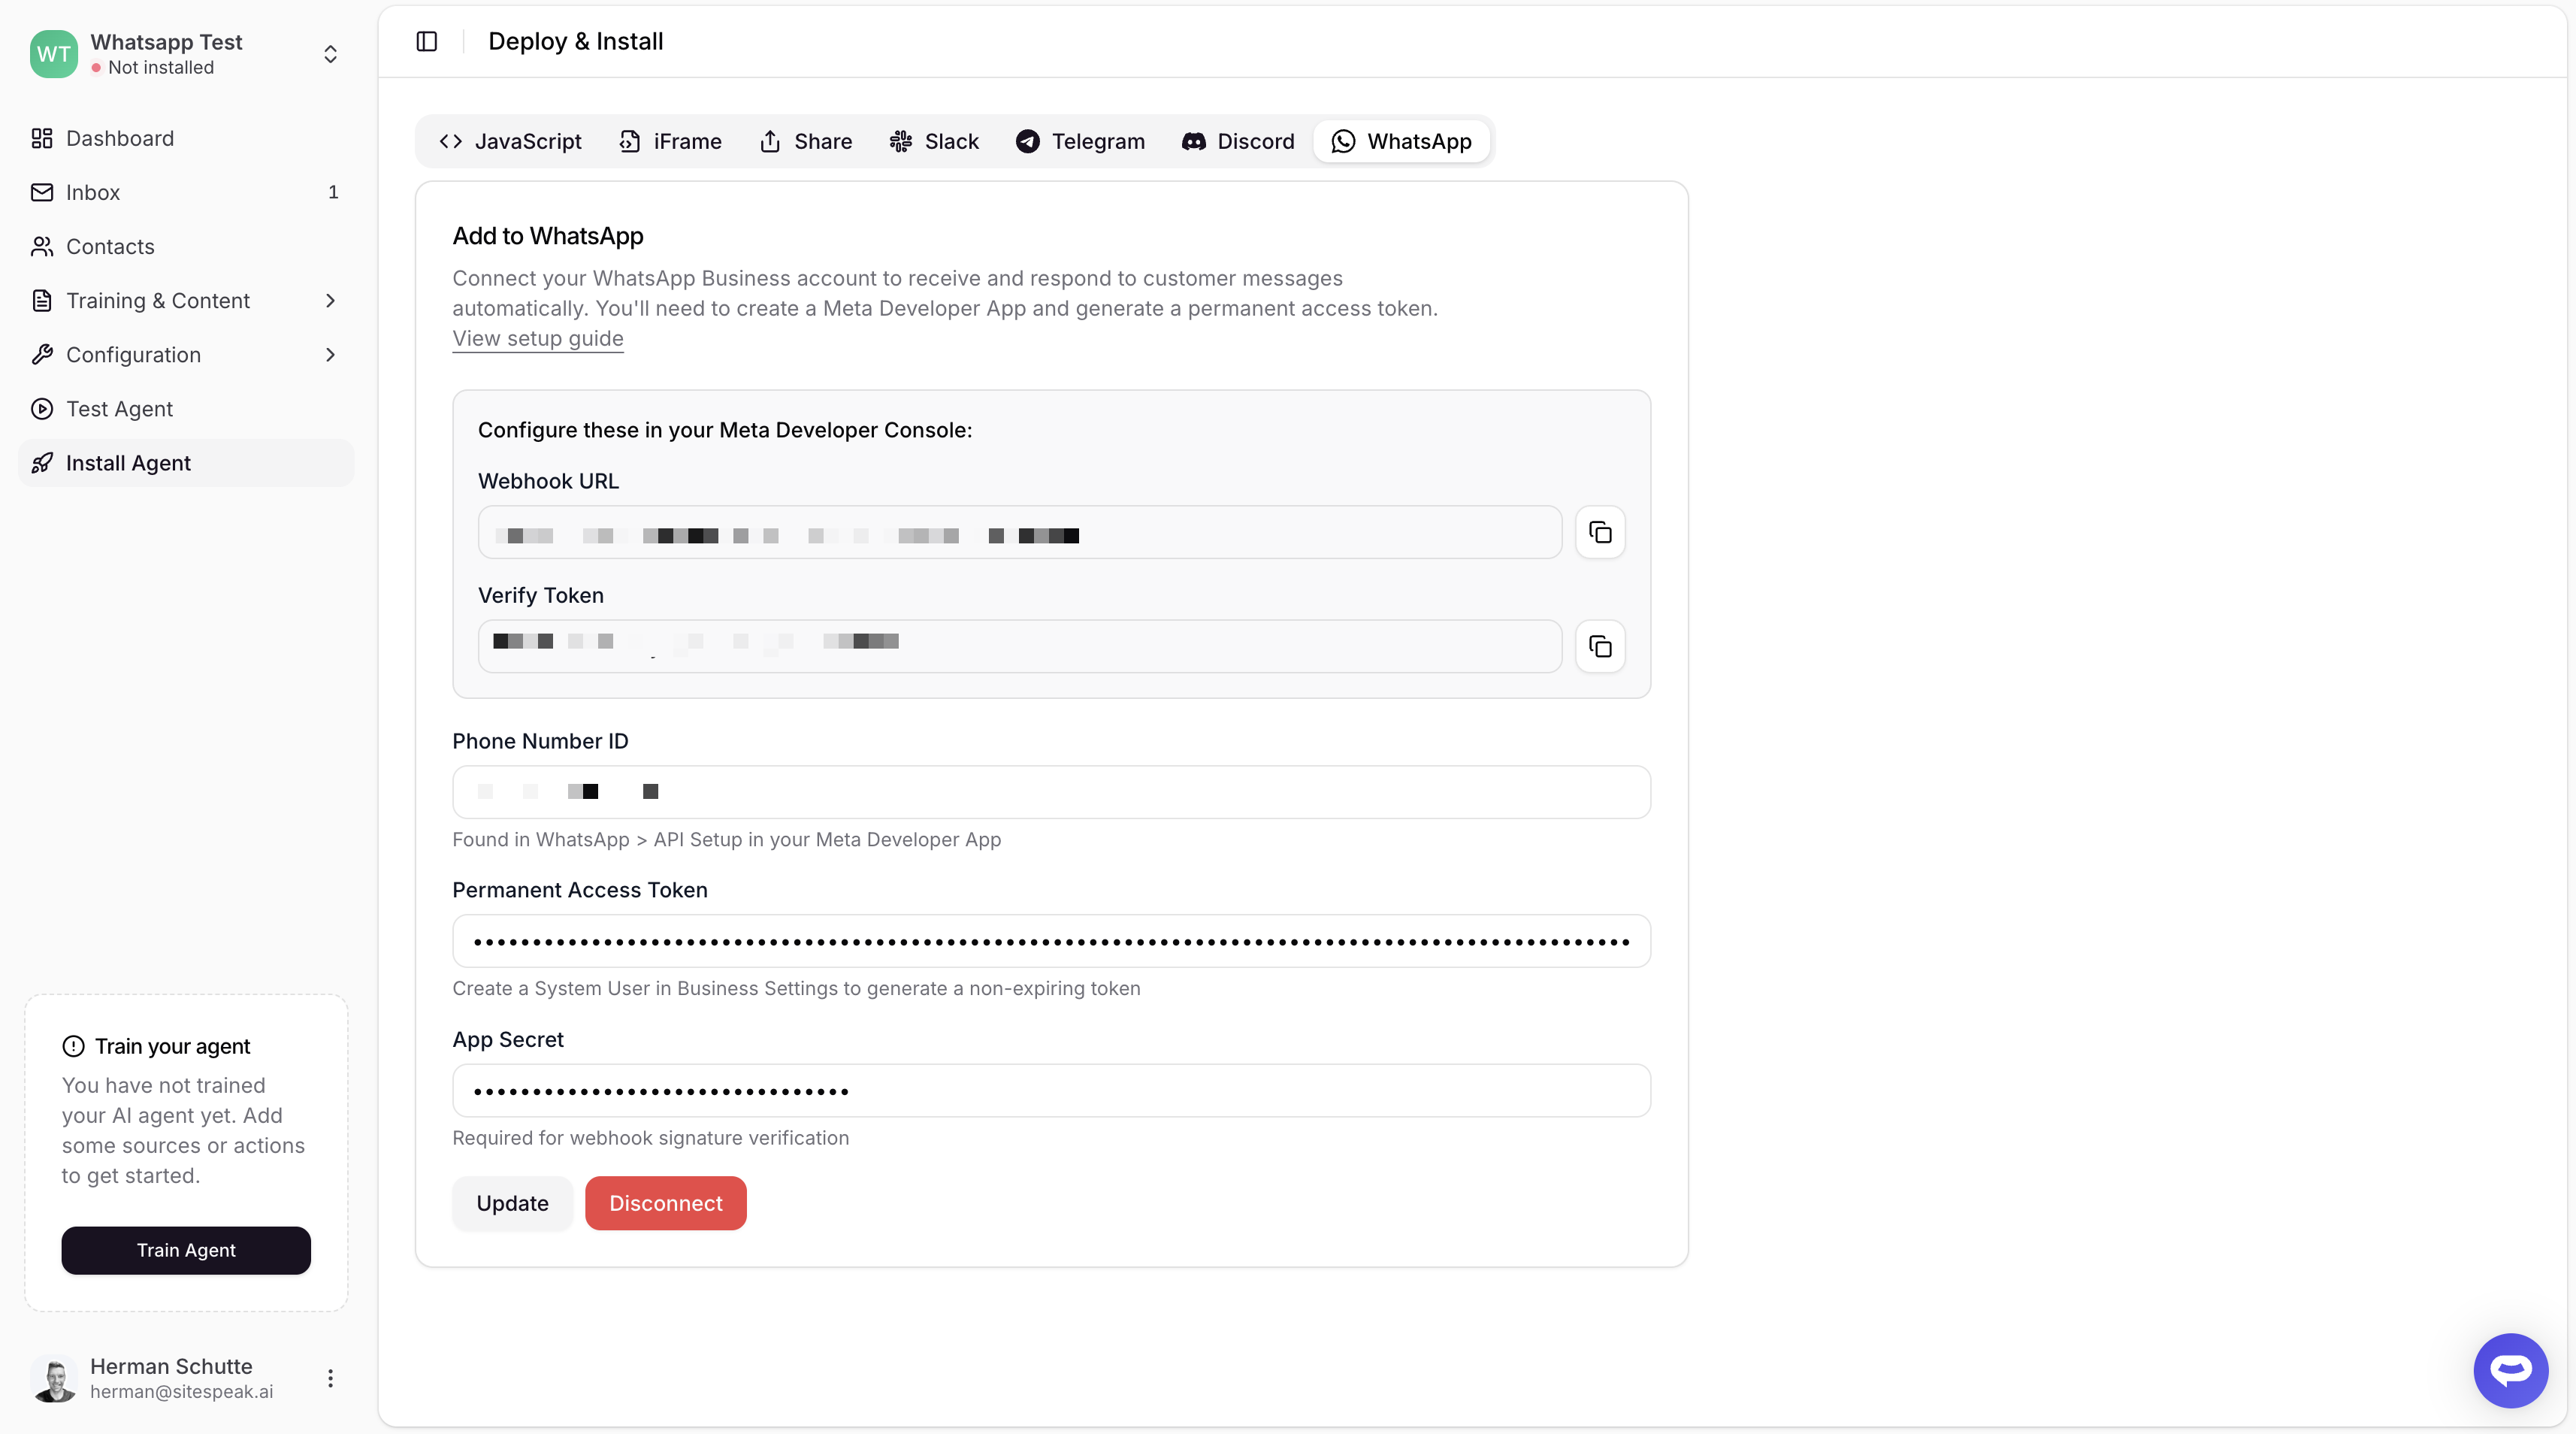
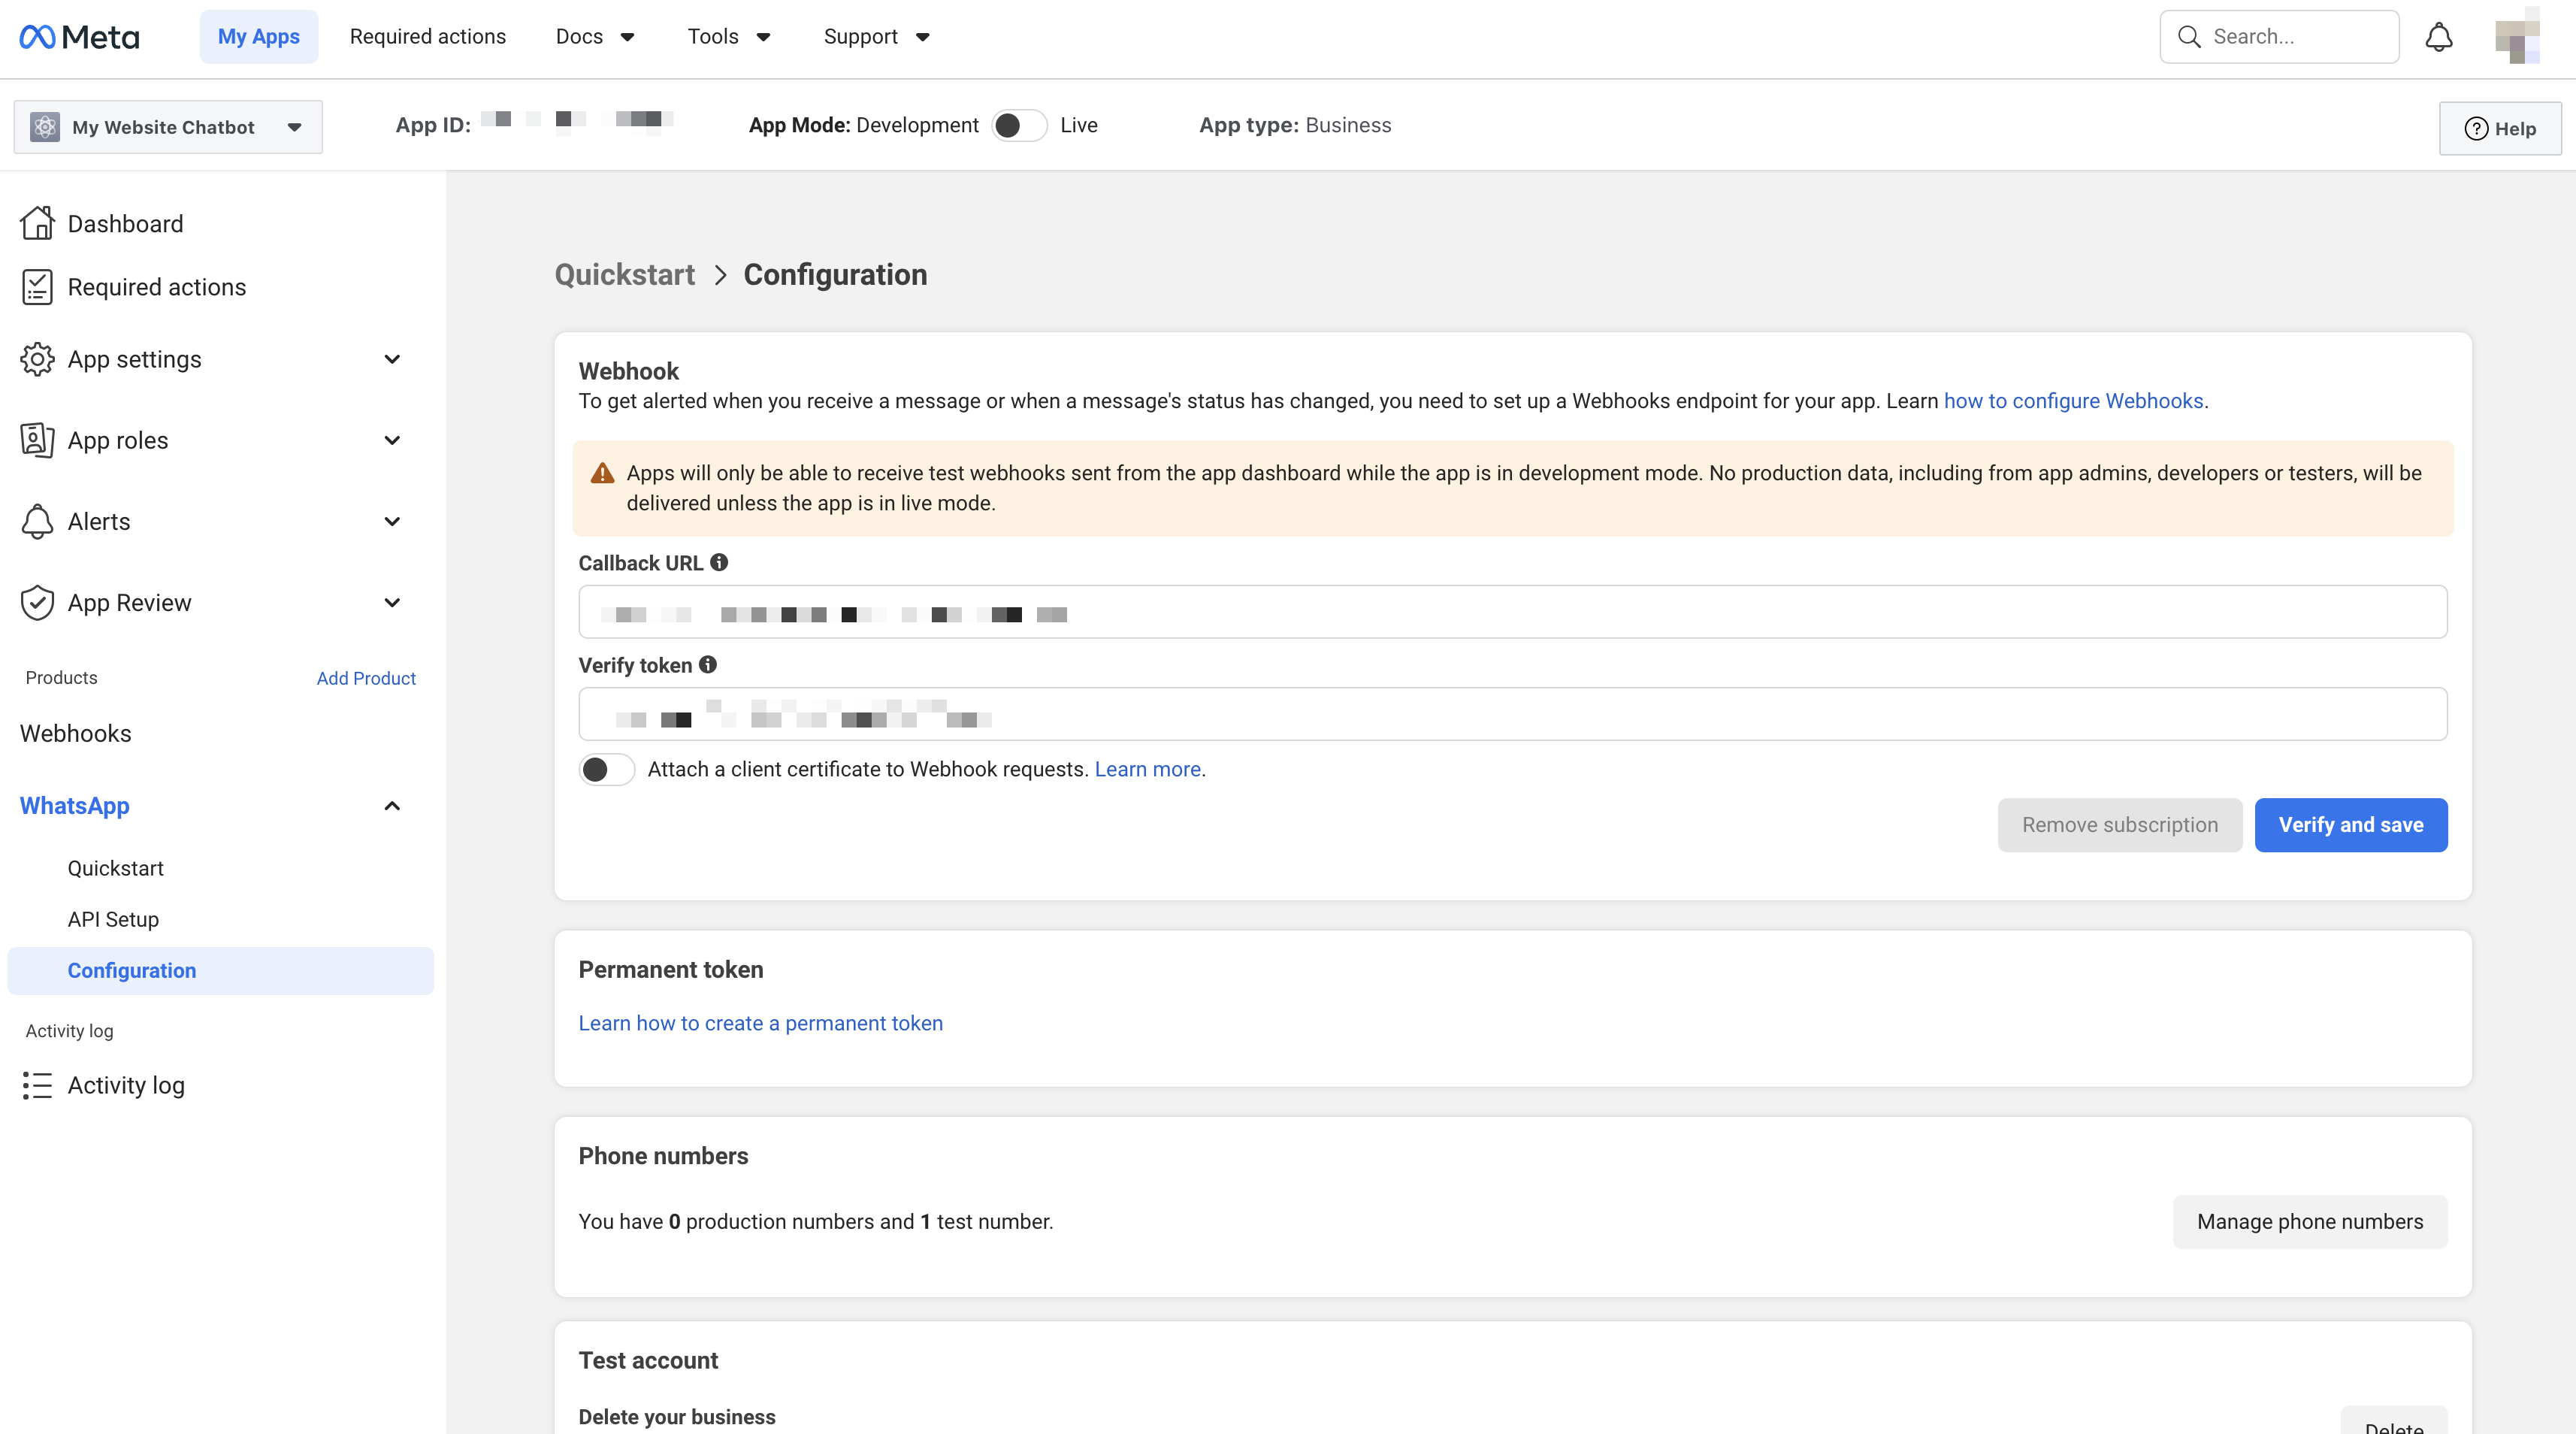
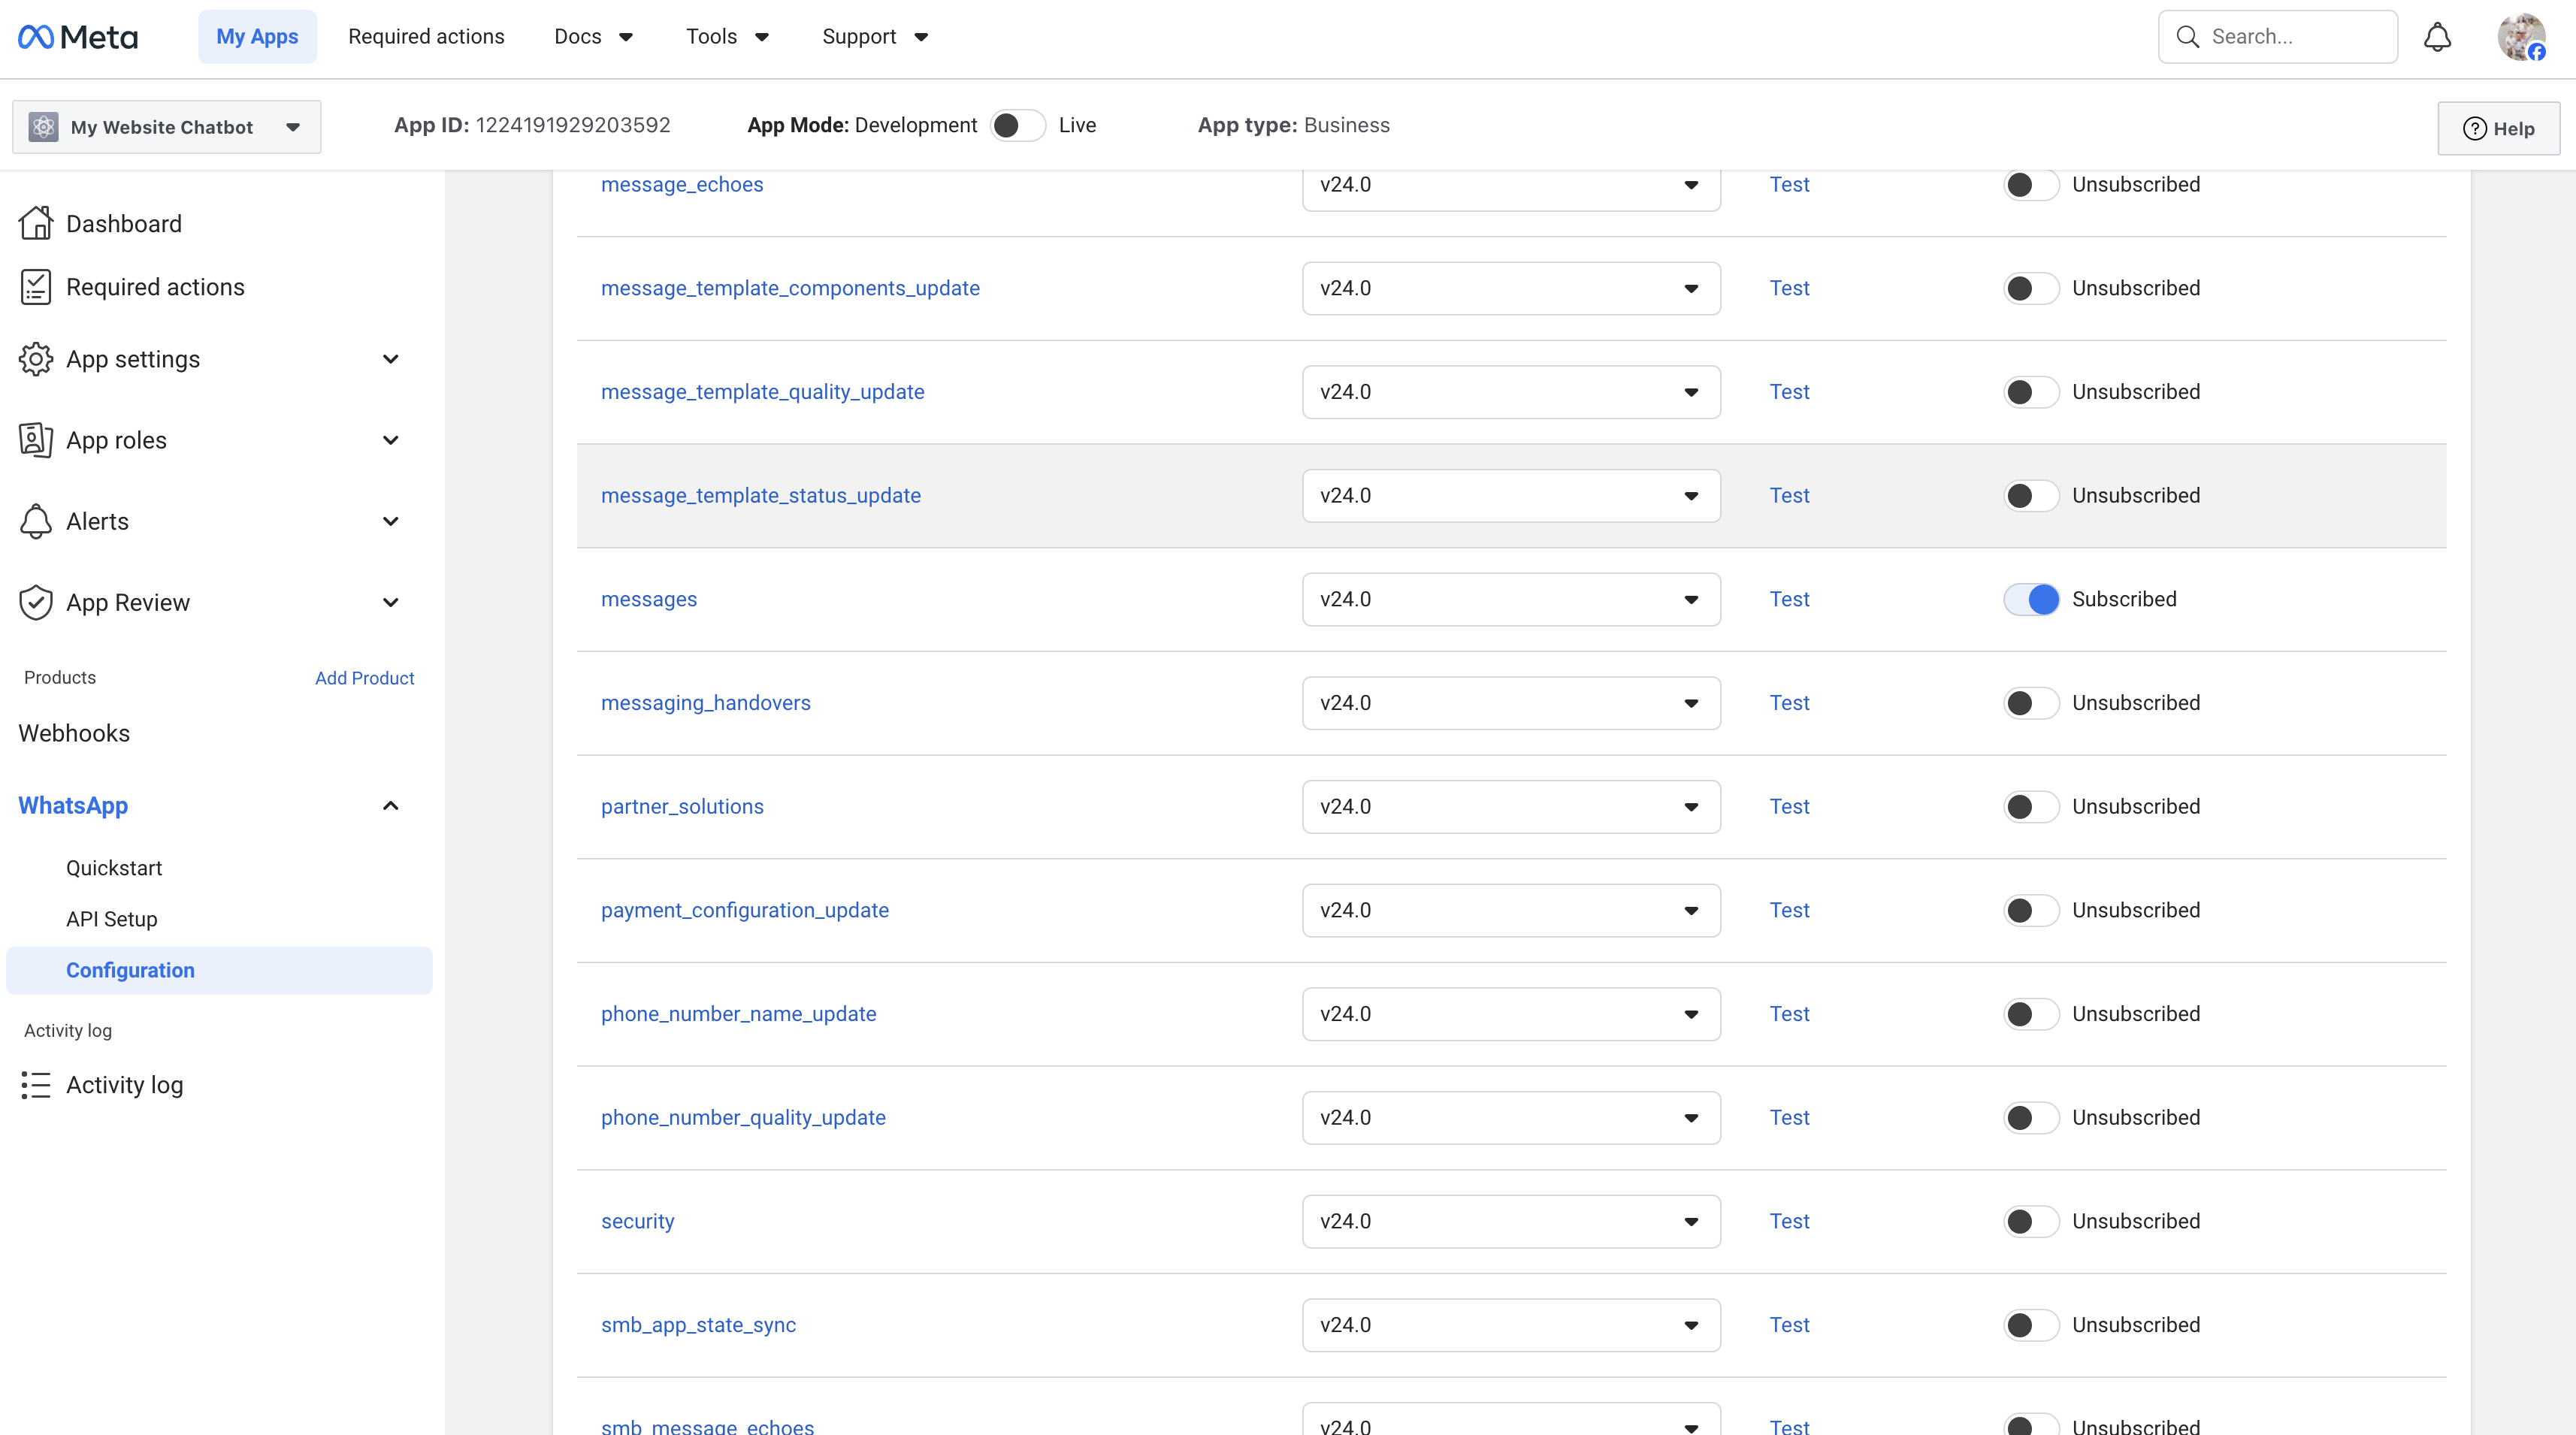
Back in SiteSpeak, open Deploy and Install and click the WhatsApp tab. Paste in your Phone Number ID, your permanent access token, which you generate from a System User in Meta Business Settings, and your App Secret from App Settings, Basic. Then click Connect, and SiteSpeak gives you a Webhook URL and a Verify Token. Now configure the webhook back in Meta. Go to WhatsApp, then Configuration, and paste in the Webhook URL as the Callback URL and the Verify Token. Click Verify and save. Finally, under Webhook fields, find the messages field and click Subscribe. Send a message to your WhatsApp Business number to test it, and your agent will reply automatically.
And that's it. Your SiteSpeakAI agent is now connected to WhatsApp Business, trained on your content and ready to answer your customers around the clock.
WhatsApp integration is available on **Pro Plus** and **Business** plans.
## Prerequisites
Before you begin, you'll need:
* A **Meta Business account** (free to create)
* A **phone number** that can receive SMS or voice calls for verification
* A **SiteSpeakAI Pro Plus or Business plan**
The phone number you use for WhatsApp Business cannot be the same as an existing personal WhatsApp account. You'll need a dedicated business number or a new number.
## Set Up Meta Developer App
Go to [developers.facebook.com](https://developers.facebook.com) and log in with your Facebook account. If you don't have a developer account, you'll be prompted to create one.
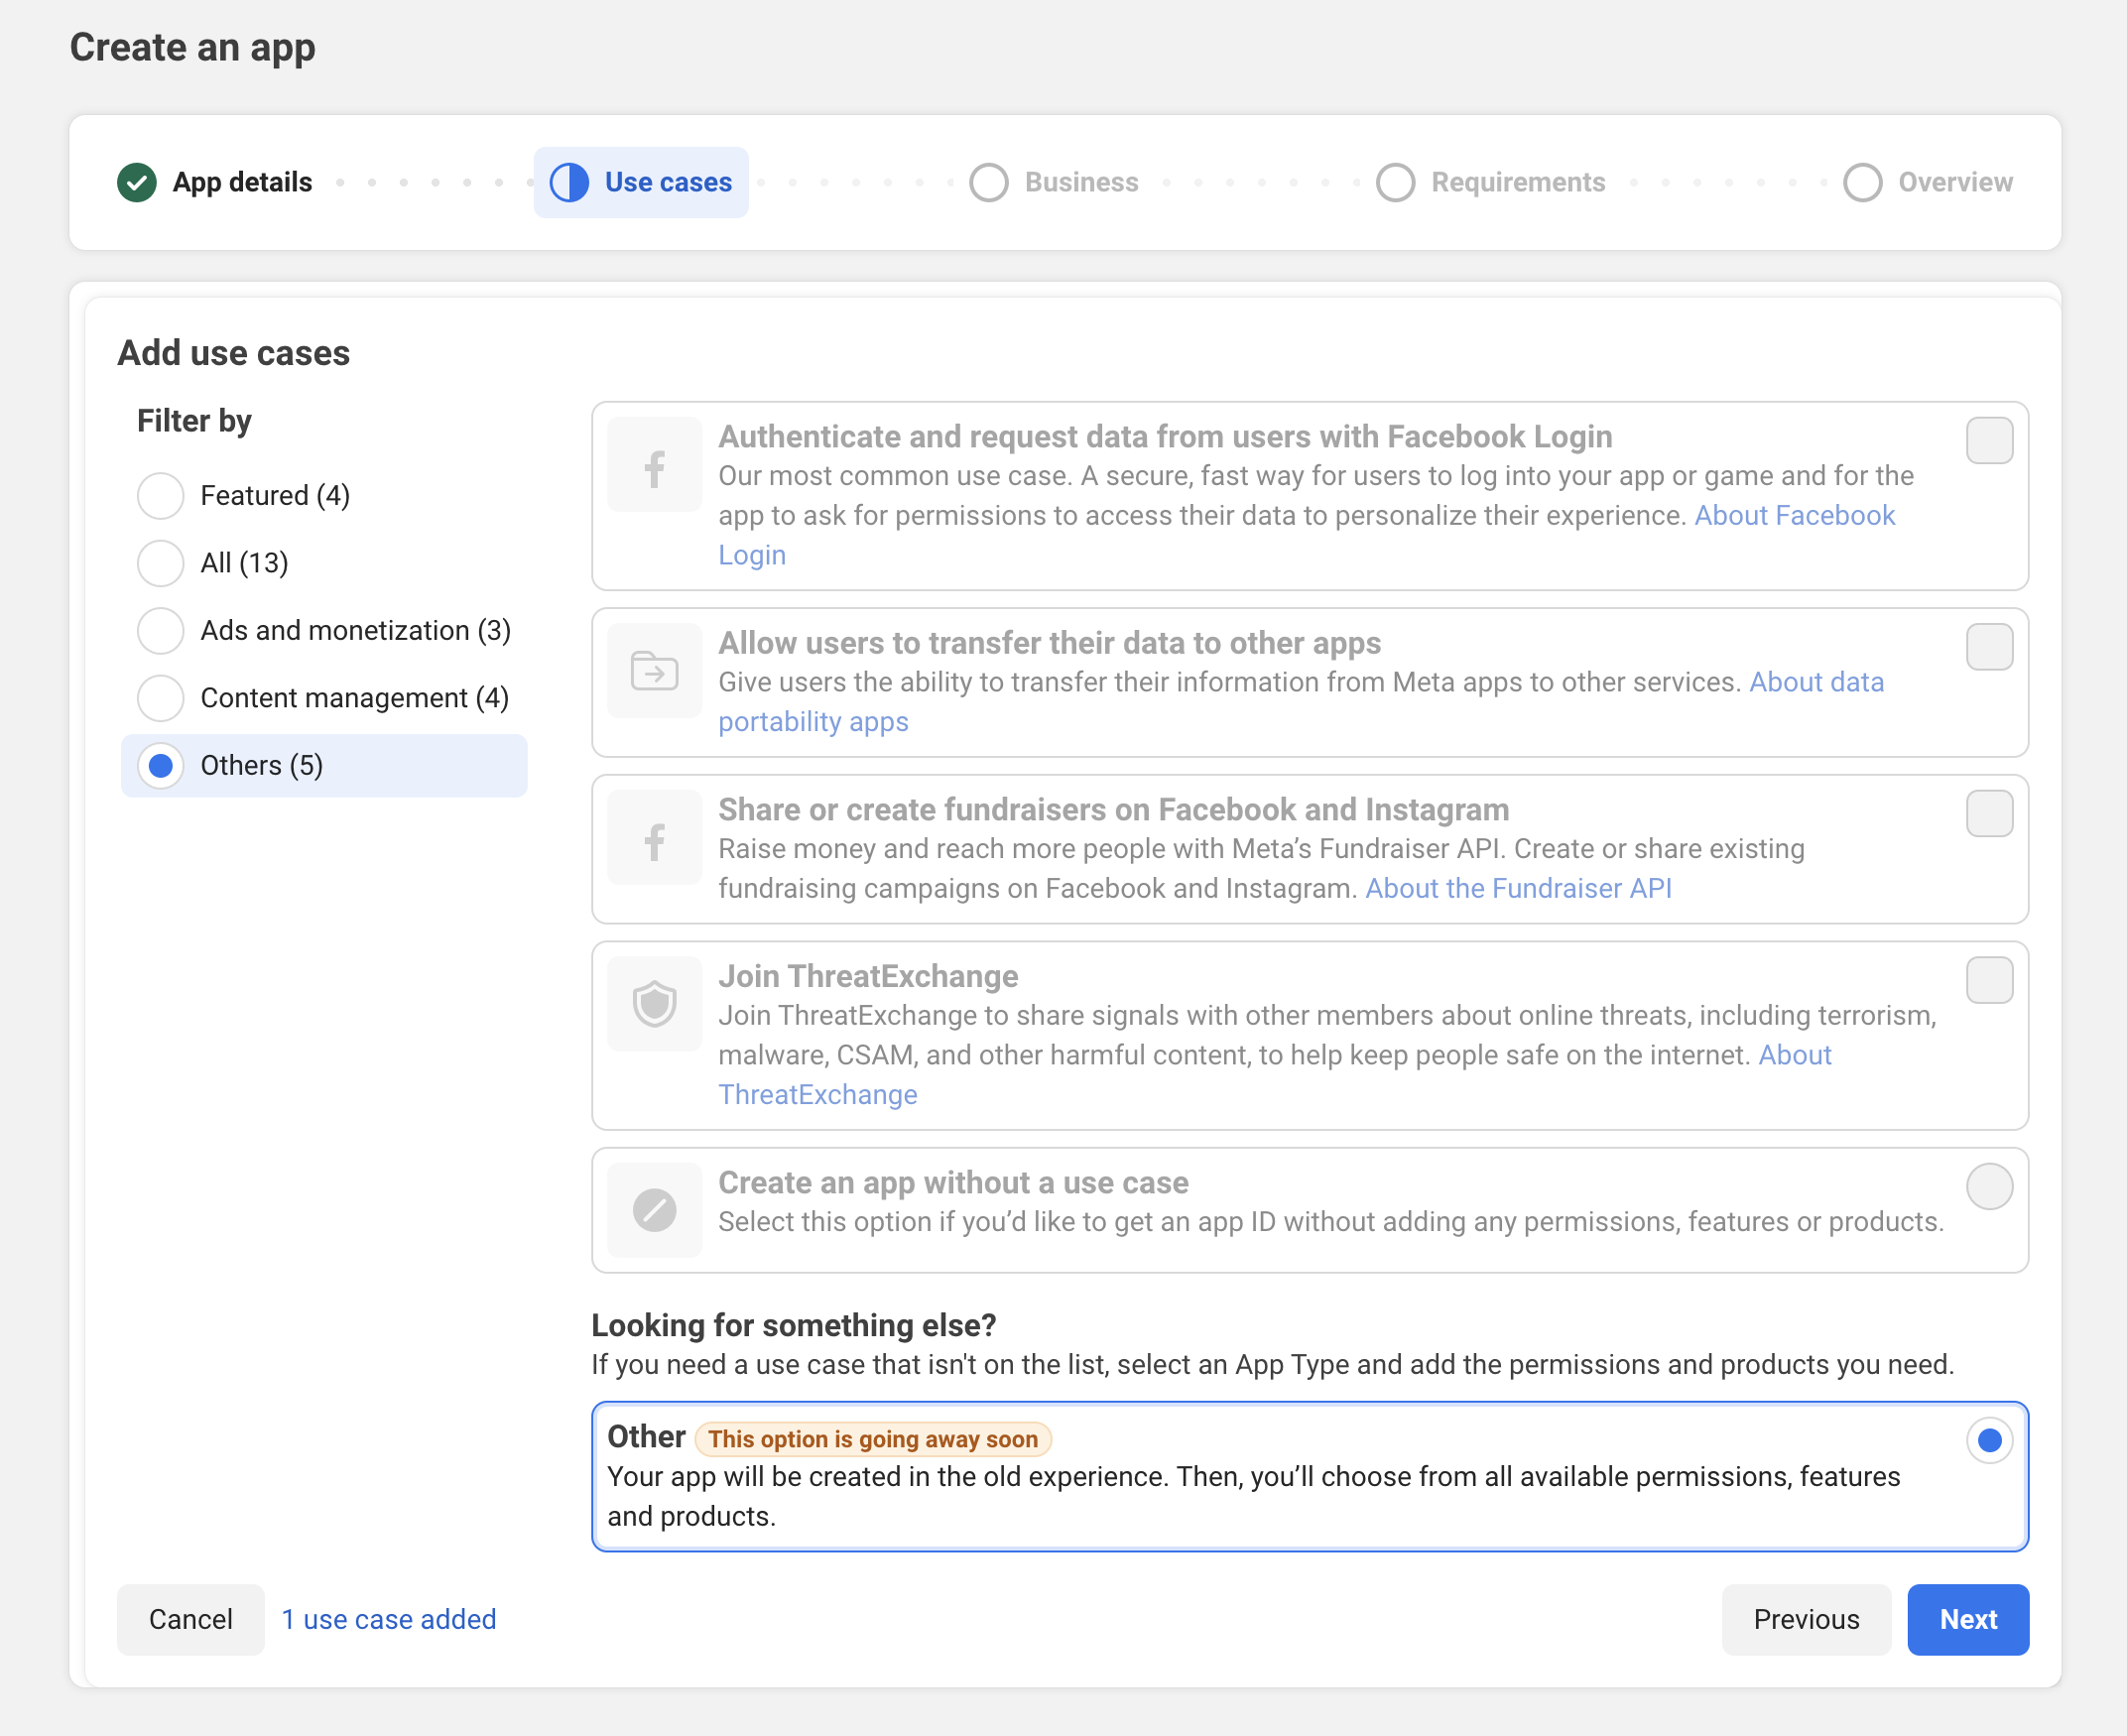
Click **My Apps** in the top right, then **Create App**. Give it a name (e.g., "My Business WhatsApp Bot"), and click **Next**. Under **Add Use Cases** filter by **Others**, then select **Other**. Click **Next**.
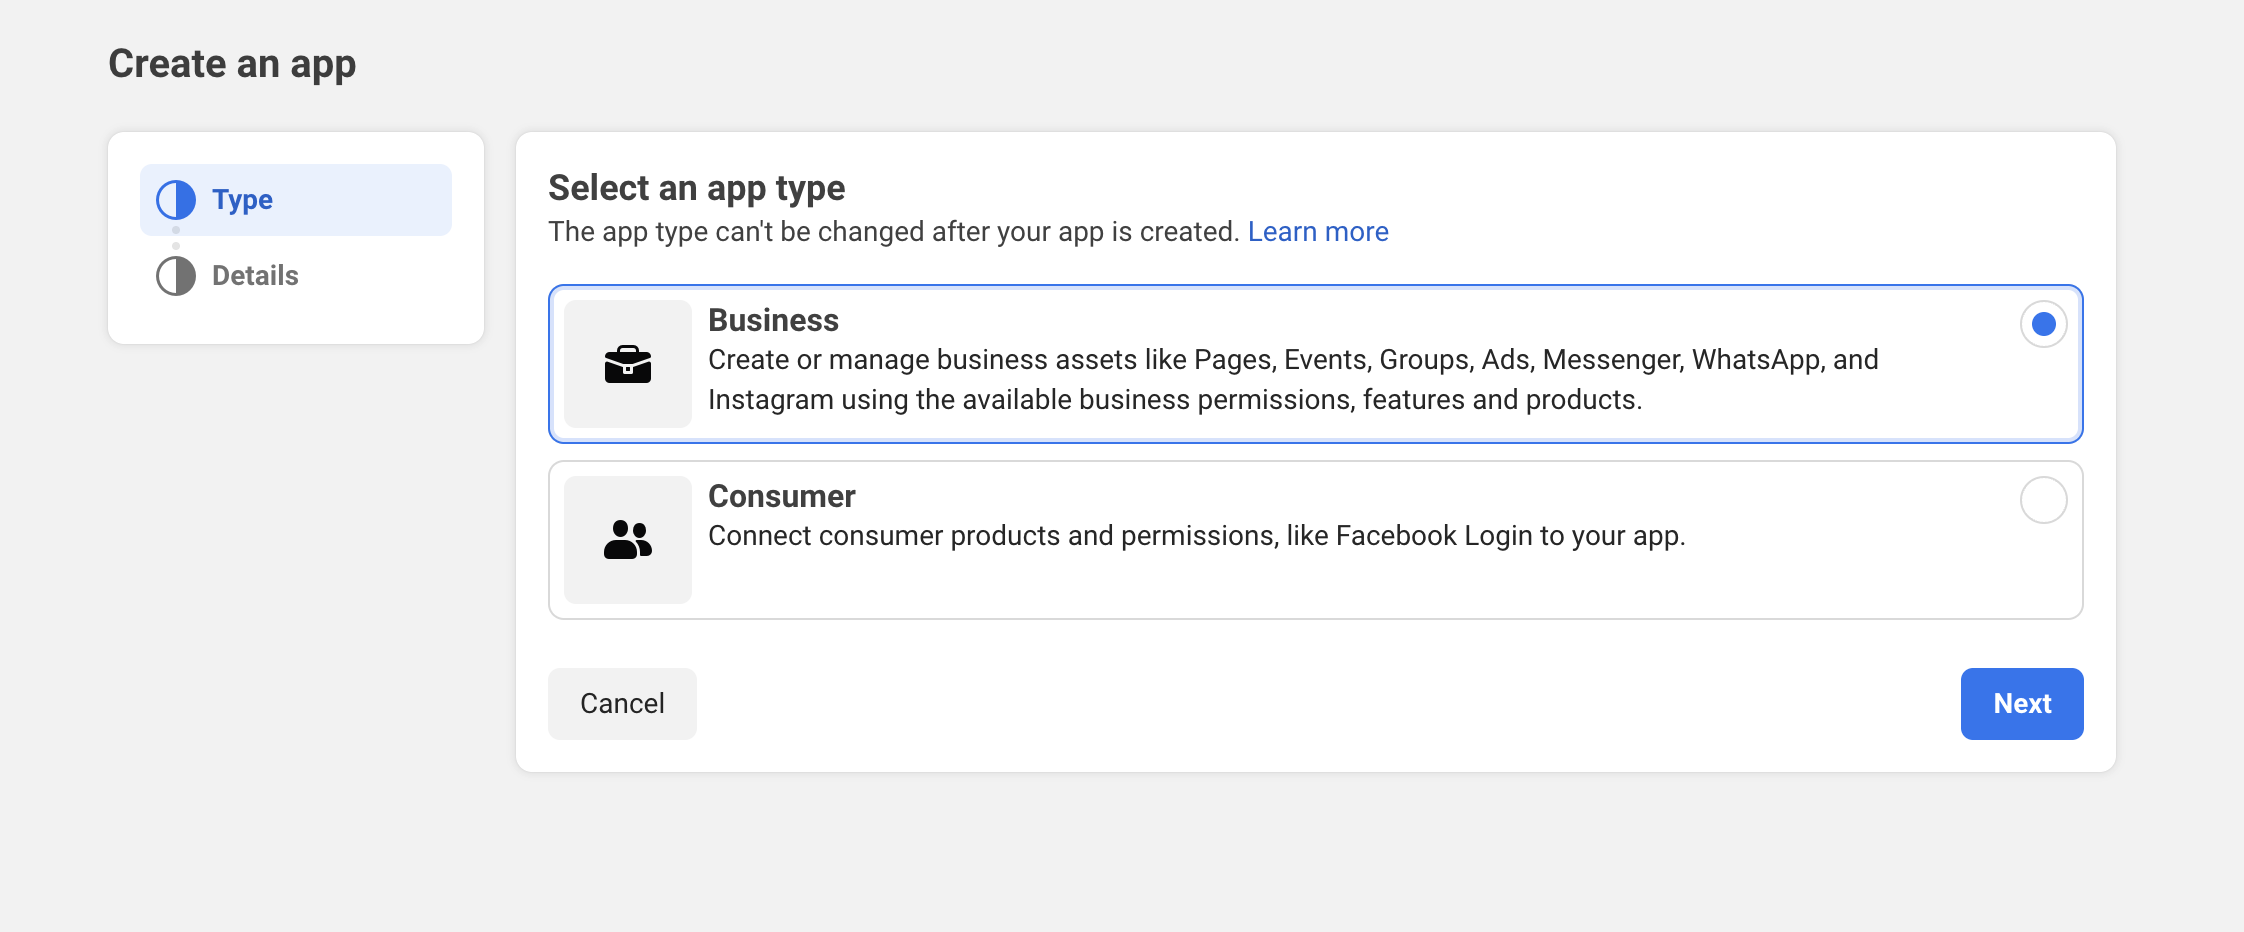
Select the **Business** app type and click **Next**. Then select **Create App** on the next screen.
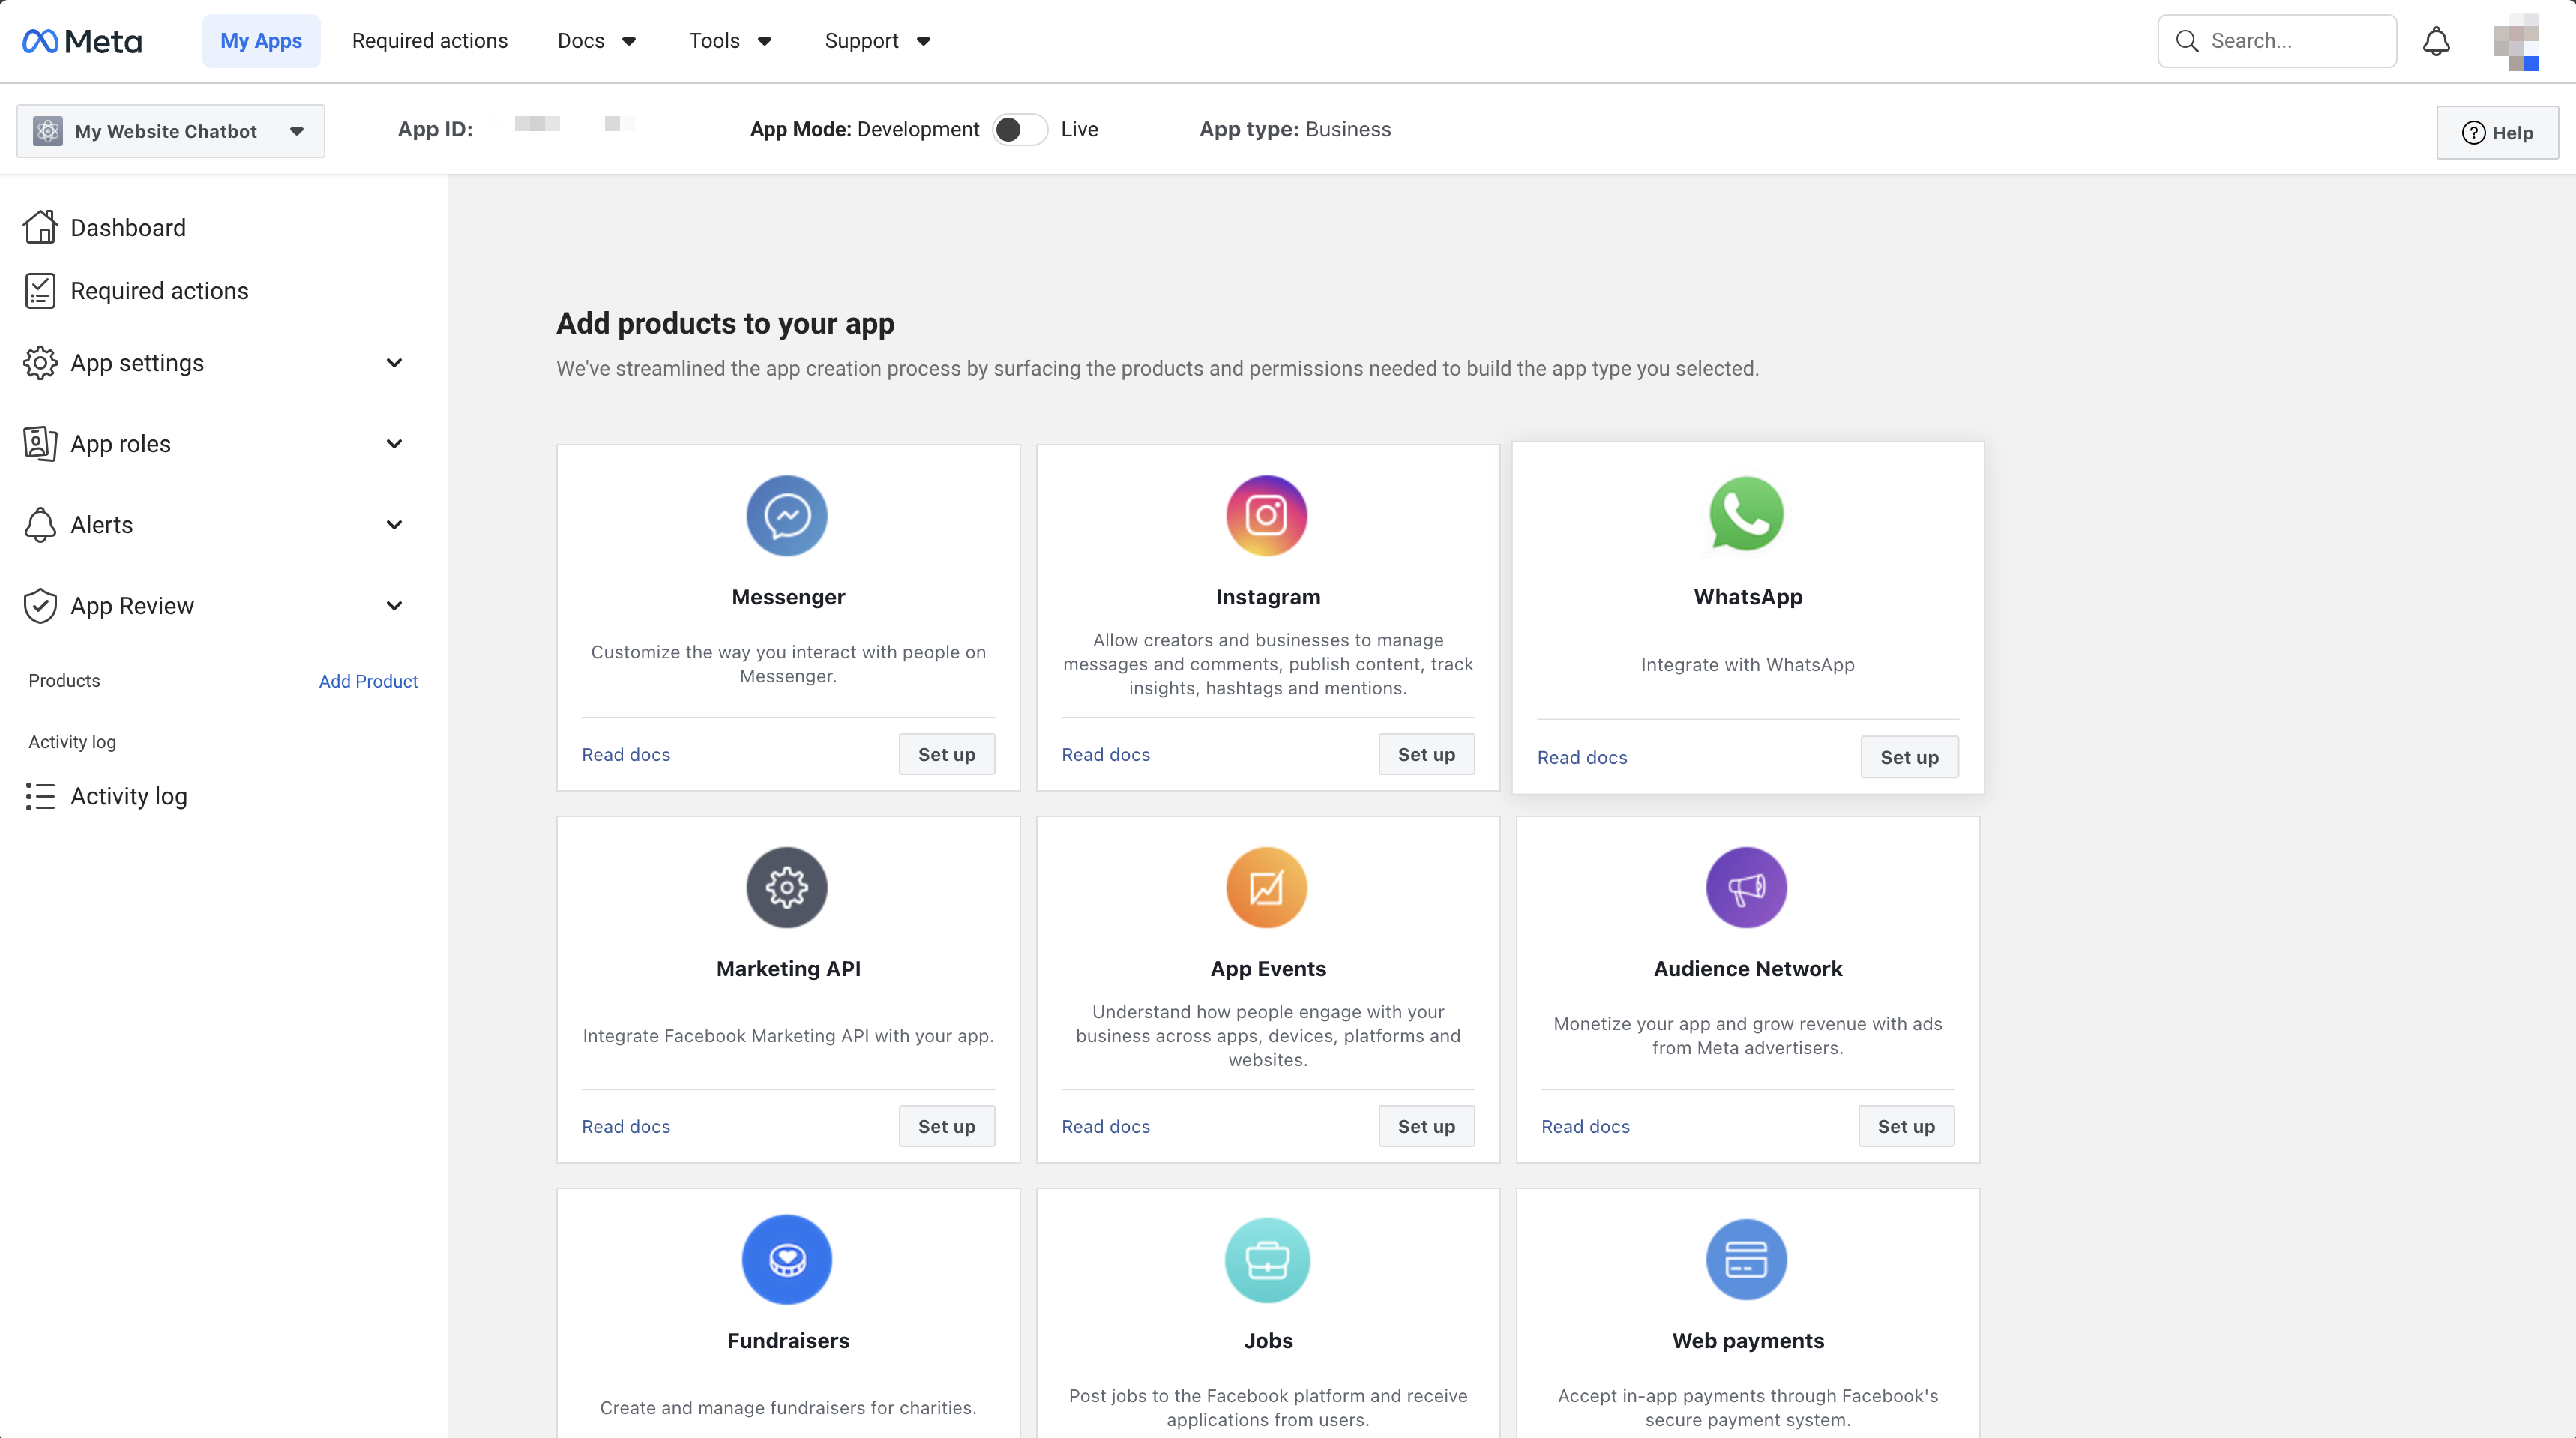
In your app dashboard, scroll down to **Add products** and click **Set up** on the **WhatsApp** card.
You'll be prompted to select an existing Meta Business Account or create a new one. This is required to use the WhatsApp Business API.
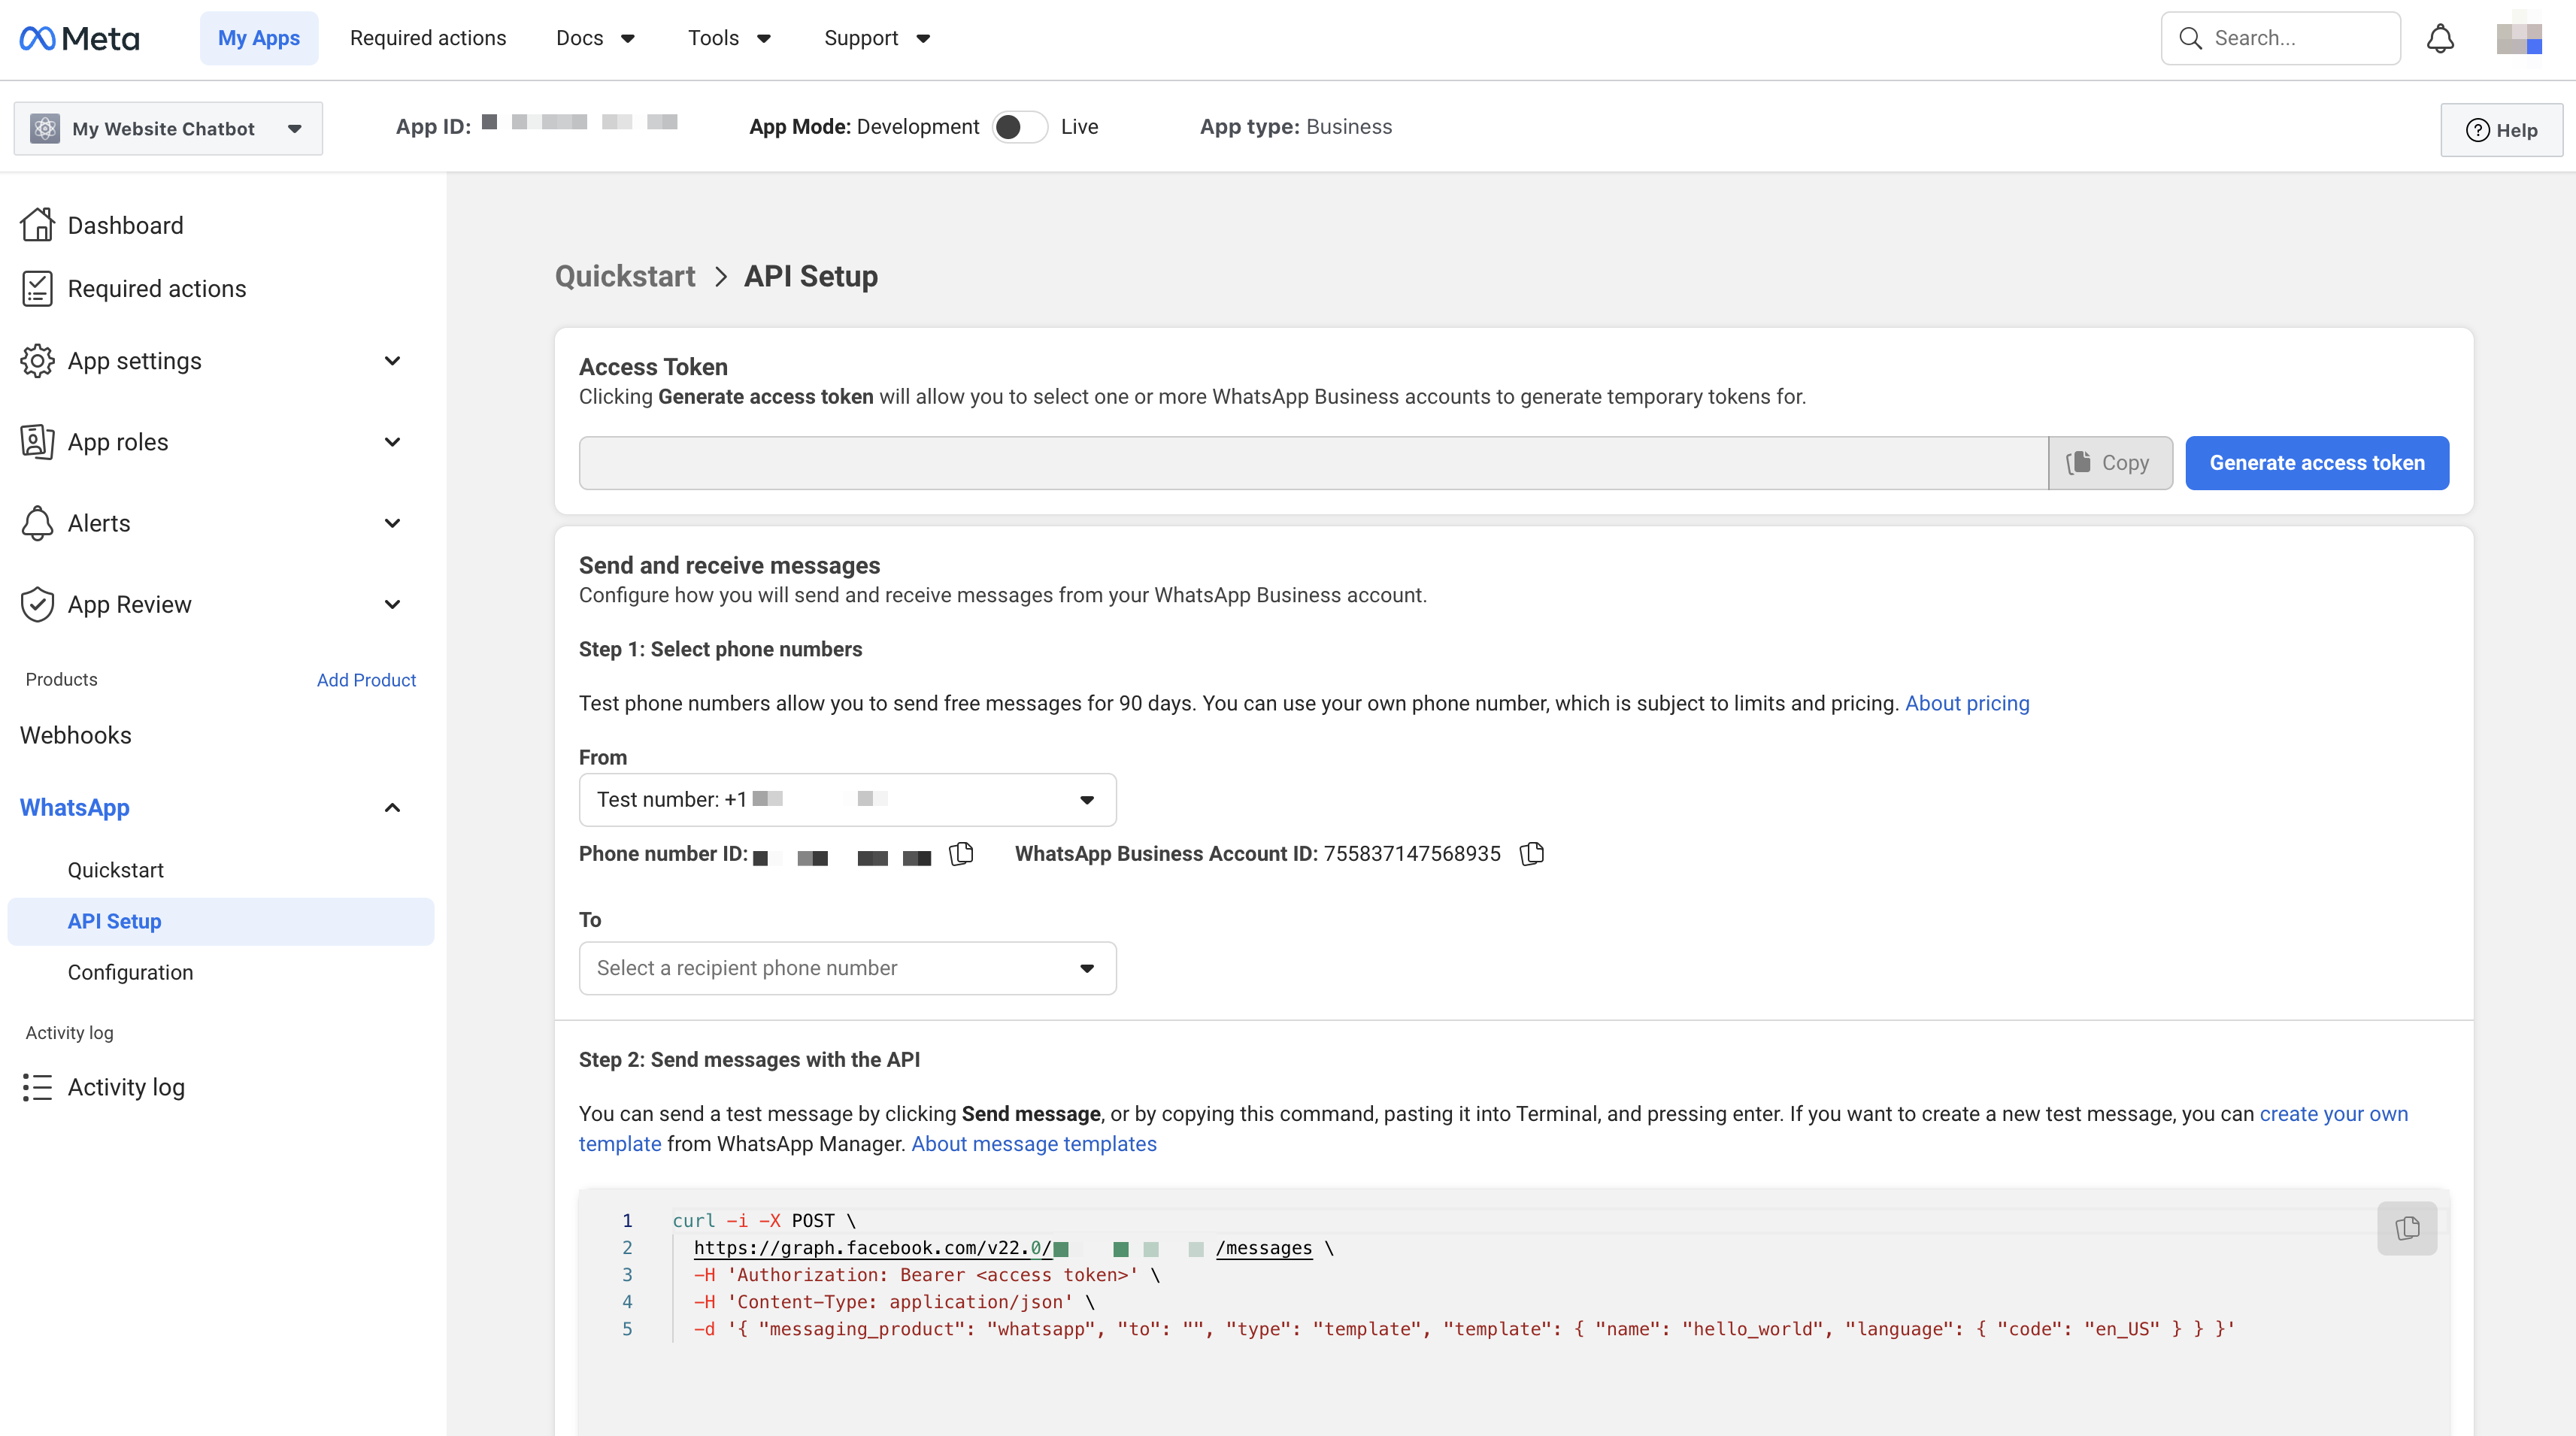
In the WhatsApp section of your app, go to **API Setup**. Click **Add phone number** and follow the verification process. You'll receive a code via SMS or voice call.
## Get Your API Credentials
Once your phone number is verified, you'll need three pieces of information from the Meta Developer dashboard:
In **WhatsApp > API Setup**, find your verified phone number. The **Phone Number ID** is displayed below the number (a long numeric string like `123456789012345`).
By default, Meta provides a temporary access token that expires in 24 hours. For production use, you need a permanent token:
1. Go to **Business Settings** at [business.facebook.com/settings](https://business.facebook.com/settings)
2. Navigate to **Users > System Users**
3. Click **Add** to create a new system user (if you don't have one)
4. Give it a name like "WhatsApp API" and select **Admin** role
5. Click **Add Assets**, select your WhatsApp app, and enable **Full control**
6. Click **Generate new token**, select your app, and check `whatsapp_business_messaging` and `whatsapp_business_management`
7. Copy the generated token - this is your permanent access token
Go back to your app in the [Meta Developer Dashboard](https://developers.facebook.com). Navigate to **App settings > Basic**. Click **Show** next to the **App Secret** field and copy it.
## Connect to SiteSpeakAI
In your SiteSpeakAI dashboard, select your chatbot and go to **Deploy & Install**.
Click on the **WhatsApp** tab.
Fill in the three fields:
* **Phone Number ID** - The numeric ID from Meta's API Setup page
* **Access Token** - Your permanent access token from the system user
* **App Secret** - Your app secret from App Settings > Basic
Click the **Connect** button. SiteSpeakAI will generate a **Webhook URL** and **Verify Token** for you.
## Configure the Webhook in Meta
After connecting in SiteSpeakAI, you need to configure the webhook in your Meta Developer App:
In your Meta Developer App, navigate to **WhatsApp > Configuration**.
* **Callback URL**: Paste the Webhook URL from SiteSpeakAI
* **Verify token**: Paste the Verify Token from SiteSpeakAI
Click **Verify and save**.
Navigate back to **WhatsApp > Configuration**. Under **Webhook fields**, find the `messages` field and click **Subscribe**.
## Test Your Integration
Send a message to your WhatsApp Business number from any WhatsApp account. Your SiteSpeakAI chatbot should respond automatically.
During development, you can only send messages to phone numbers that have been added as test numbers in your Meta app. To message any WhatsApp user, you'll need to complete Meta's business verification process.
## Troubleshooting
### Messages not being received
* Verify that the webhook URL is correctly configured in Meta
* Check that you've subscribed to the `messages` webhook field
* Ensure your access token hasn't expired (use a permanent system user token)
### Messages not being sent
* Check that your access token has the `whatsapp_business_messaging` permission
* Verify the phone number ID is correct
* Check the SiteSpeakAI conversation logs for any error messages
### Webhook verification failing
* Make sure the Verify Token in Meta matches exactly what SiteSpeakAI generated
* Ensure there are no extra spaces before or after the values
* Try disconnecting and reconnecting in SiteSpeakAI to generate new credentials
## Going Live
To send messages to any WhatsApp user (not just test numbers), you'll need to:
1. **Complete Business Verification** - Verify your business in Meta Business Settings
2. **Request Production Access** - In your app's WhatsApp settings, request to go live
3. **Add a Payment Method** - WhatsApp Business API charges per conversation (first 1,000 conversations per month are free)
For detailed information, see [Meta's WhatsApp Business documentation](https://developers.facebook.com/docs/whatsapp/cloud-api/get-started).
***
Join over 1000+ businesses, websites and startups automating their customer service and other tasks with a custom trained AI agent.