> ## Documentation Index
> Fetch the complete documentation index at: https://sitespeak.ai/docs/llms.txt
> Use this file to discover all available pages before exploring further.
# Train Your Chatbot on Website Content
> Add your website URL or specific page links to train your chatbot on your existing web content.
Training your chatbot on your website content is the most common way to get started with SiteSpeakAI. You can either crawl an entire website or add specific page URLs.
***
## Website Source
Use the Website option to automatically crawl and discover pages from your website.
In your chatbot dashboard, click **Training & Content** in the sidebar.
Click on **Sources**.
Click the **+ Add Sources** button.
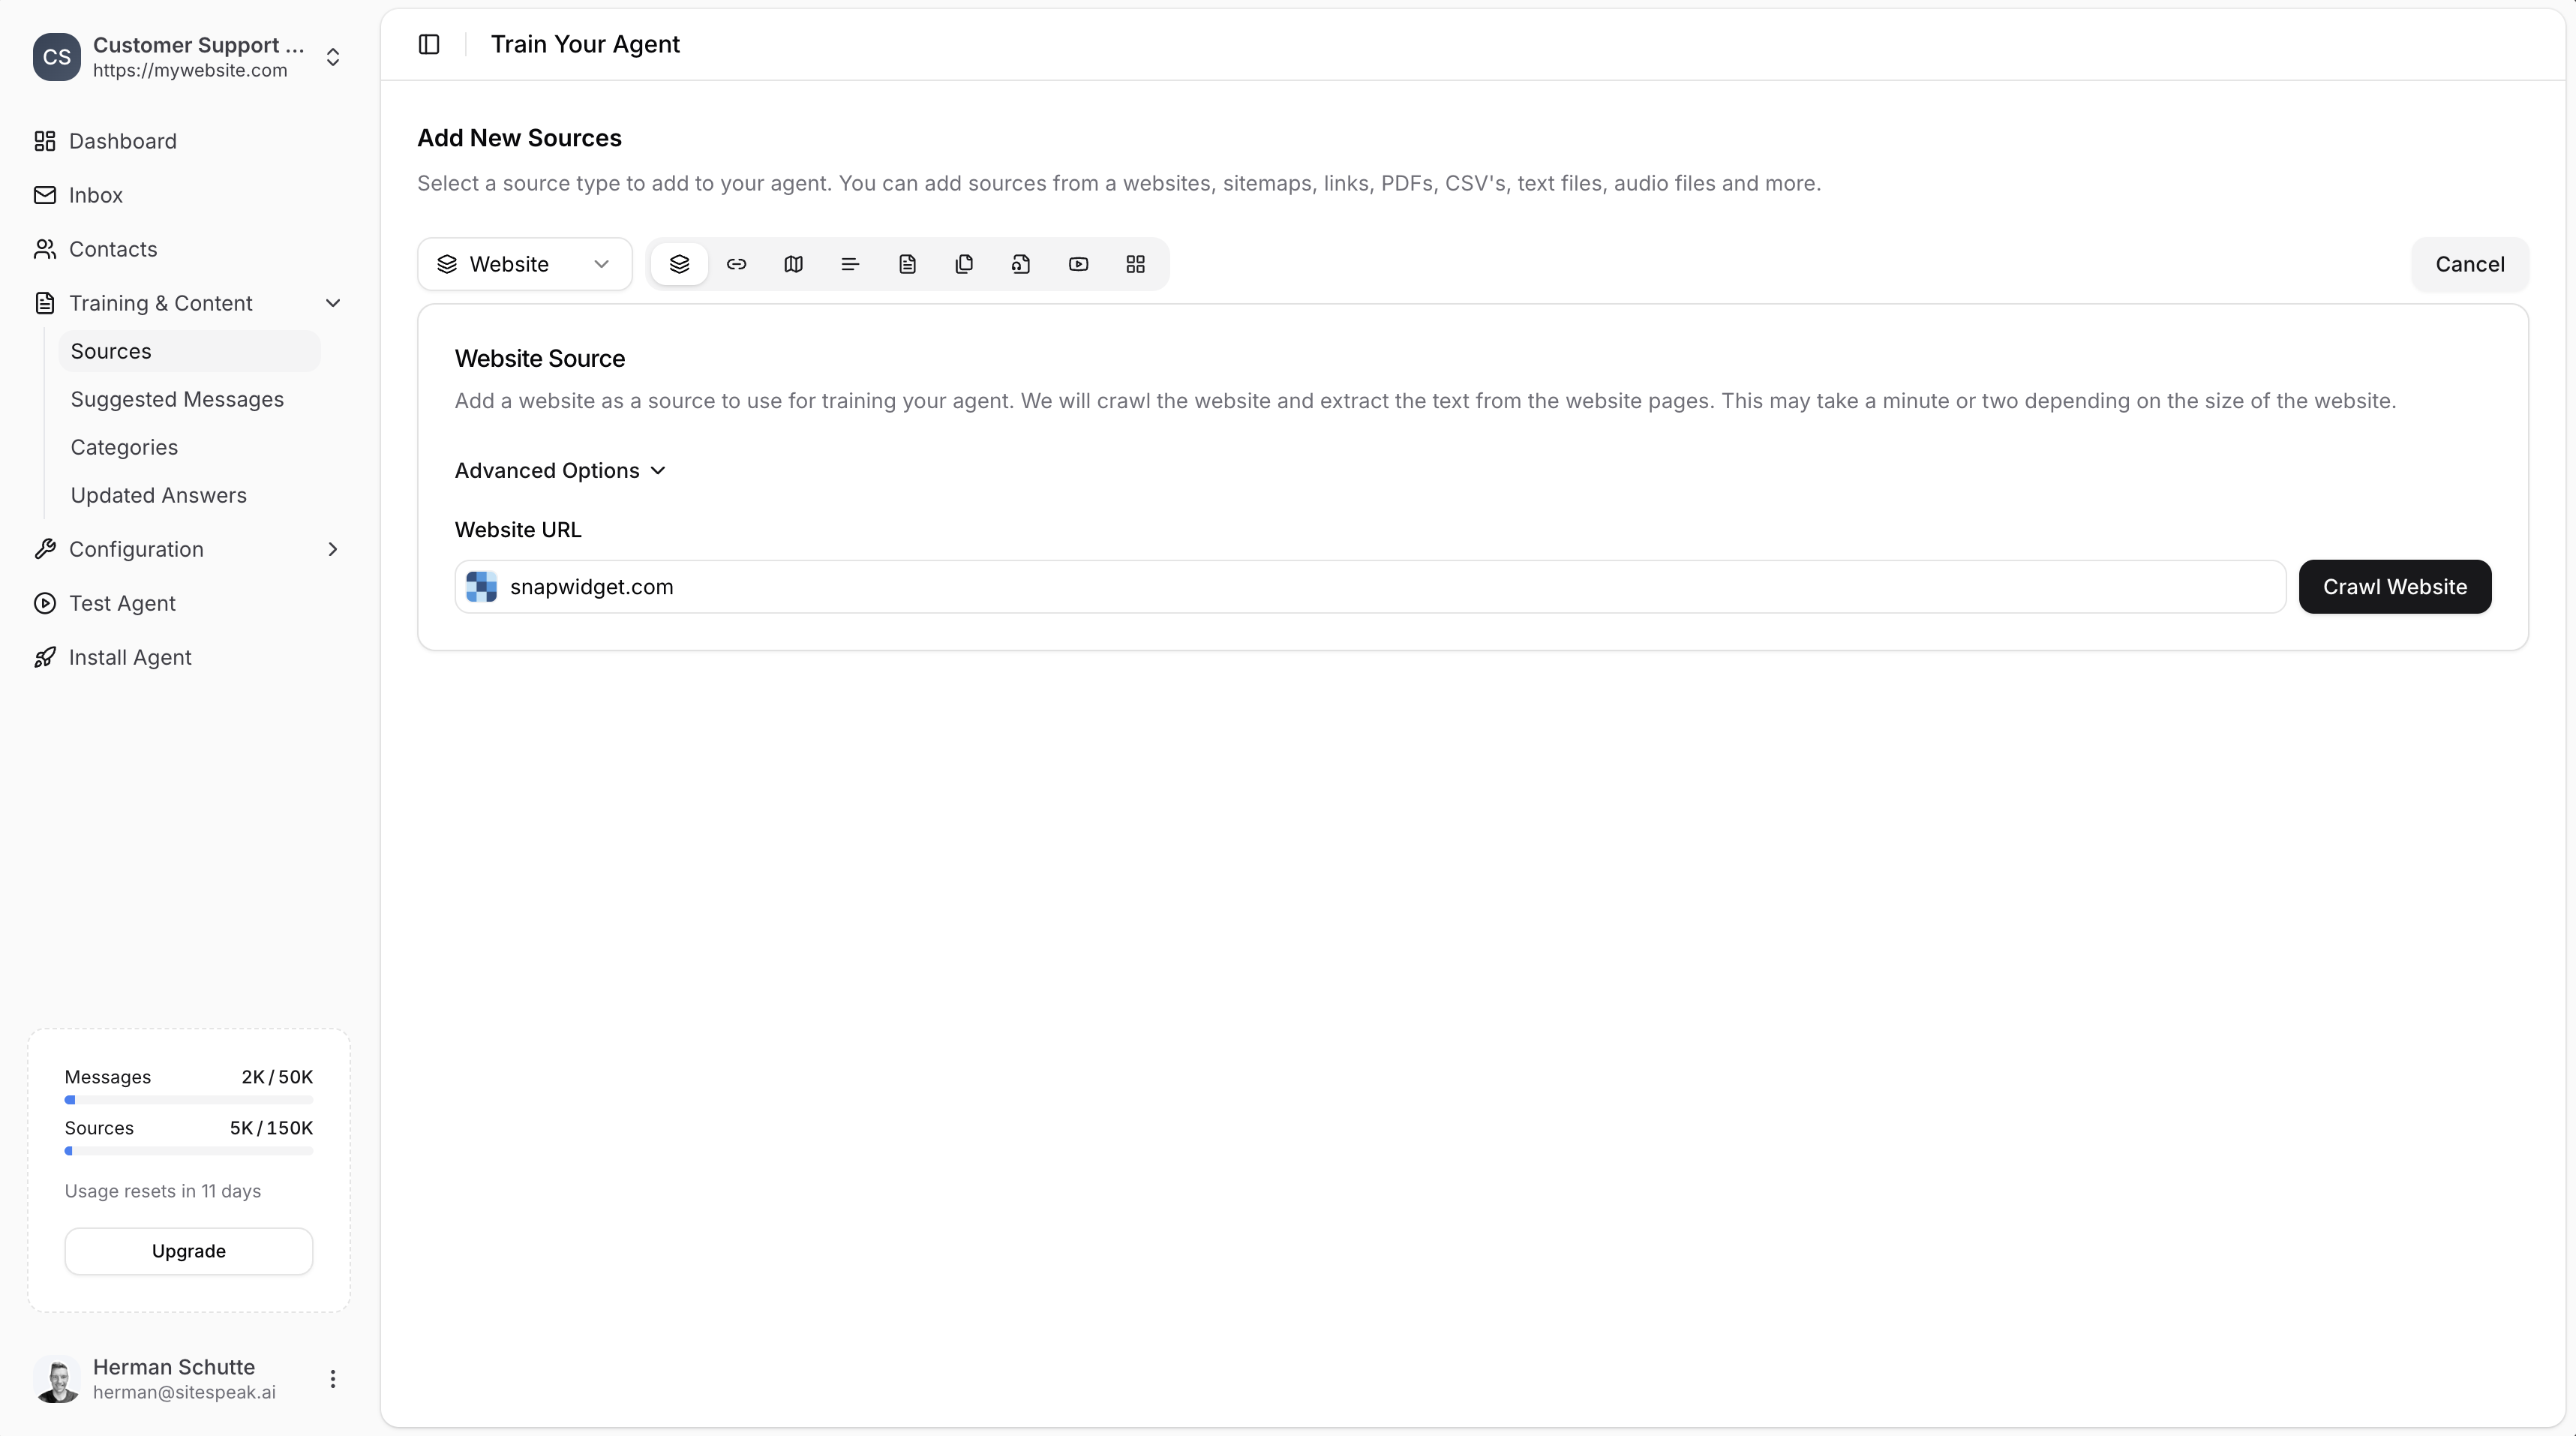
From the source type dropdown, select **Website**.
Enter your website URL in the **Website URL** field.
Click the **Crawl Website** button. SiteSpeakAI will scan your website and discover available pages. This may take a minute or two depending on the size of your website.
 ### Selecting Pages to Train
After crawling, you'll see a list of discovered pages with their URLs and content sizes.
Browse the list of pages found on your website.
Use the checkboxes to select which pages you want to train your chatbot on. You can select all or choose specific pages.
Click the **Add Selected** button to add the chosen pages as training sources.
### Selecting Pages to Train
After crawling, you'll see a list of discovered pages with their URLs and content sizes.
Browse the list of pages found on your website.
Use the checkboxes to select which pages you want to train your chatbot on. You can select all or choose specific pages.
Click the **Add Selected** button to add the chosen pages as training sources.
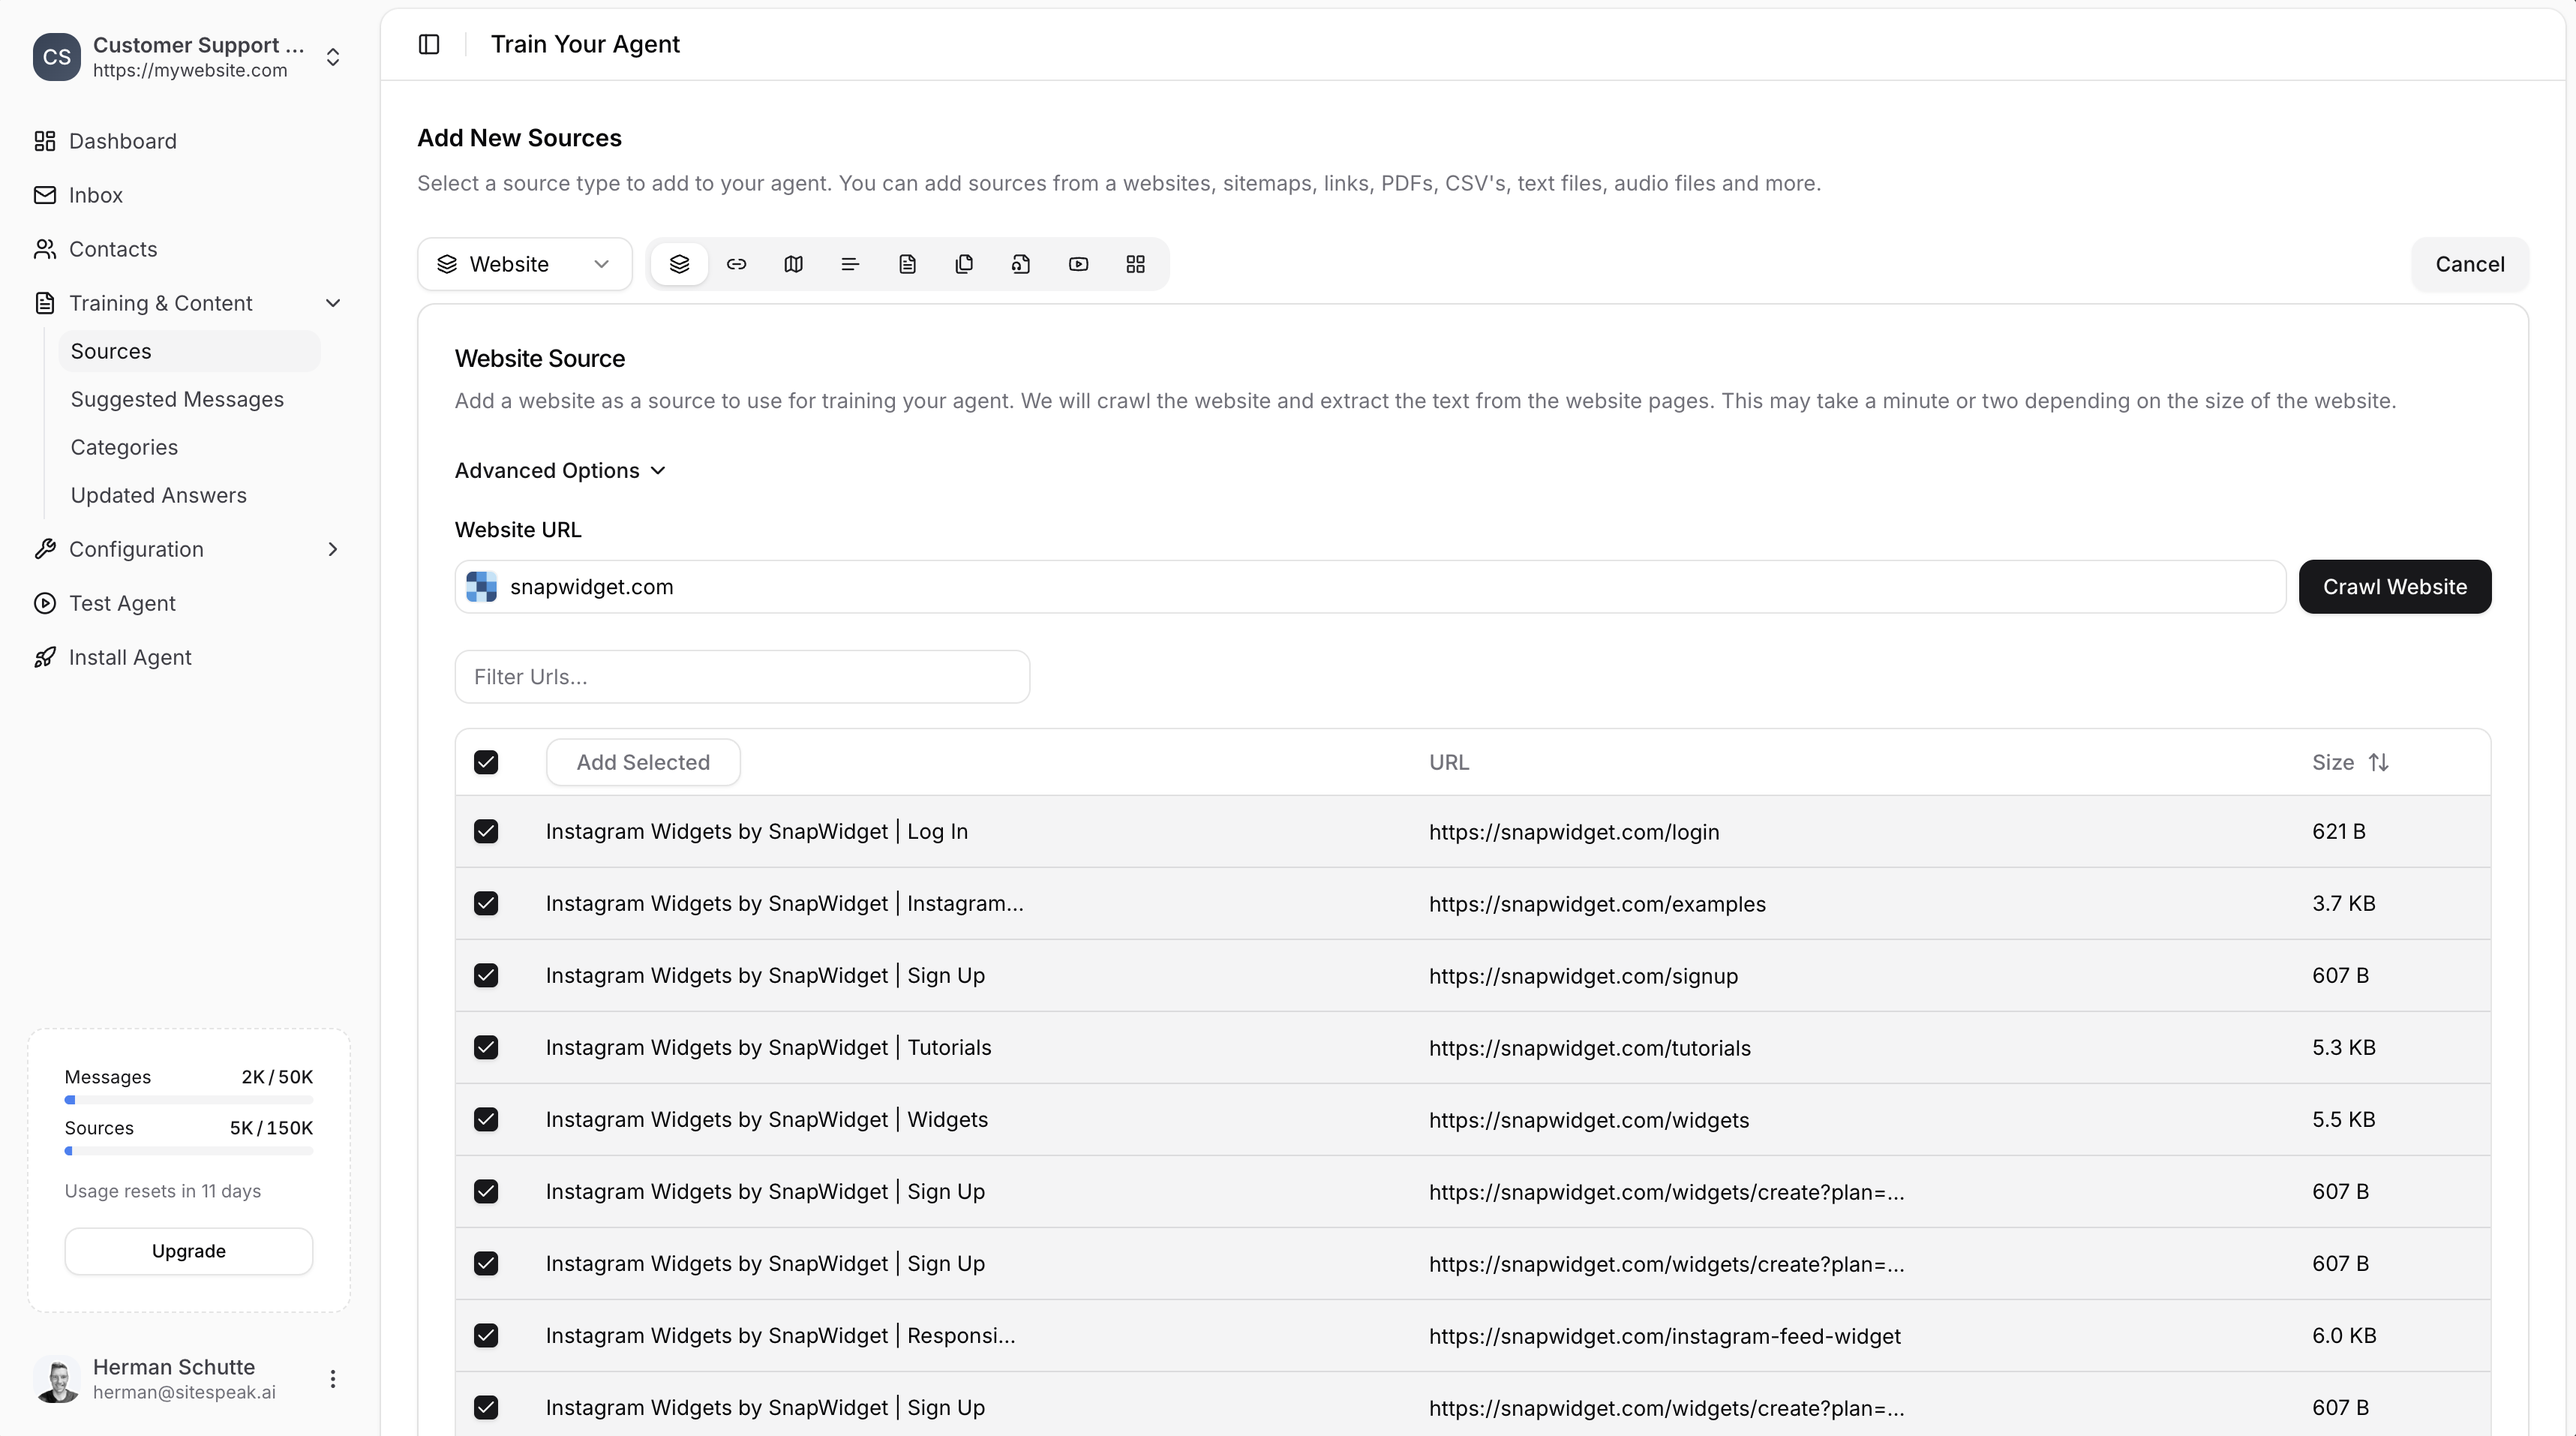 Focus on pages with valuable content like product pages, FAQs, help articles, and documentation. Skip pages with minimal content like login pages or utility pages.
### Auto-Sync Website
Instead of manually selecting pages, you can set up automatic syncing that crawls your website daily and keeps your training data up to date.
Before crawling, check the **Auto-sync website pages daily** checkbox below the URL input field.
Open **Advanced Options** to add URL exclusion patterns. Any URLs matching these patterns will be skipped during crawling. For example, you can exclude `/admin/*` or `/login`.
Click the **Create Auto-Syncing Website** button. SiteSpeakAI will crawl your website, discover all pages, and set up daily automatic syncing.
Once set up, SiteSpeakAI checks your website daily for changes:
* **New pages** are automatically discovered and added as training sources
* **Removed pages** are cleaned up and removed from your training data
* **Exclusion patterns** are applied on every sync cycle
Auto-sync for websites requires the **Pro Plus** plan or higher.
***
## Link Sources
Use the Links option to add specific page URLs directly, without crawling an entire website.
In your chatbot dashboard, click **Training & Content** in the sidebar.
Click on **Sources**.
Click the **+ Add Sources** button.
From the source type dropdown, select **Links**.
Enter the page URLs you want to train on in the **Link URLs** field. Separate each link by a new line.
Click the **Fetch Links** button to retrieve the content from each URL.
Focus on pages with valuable content like product pages, FAQs, help articles, and documentation. Skip pages with minimal content like login pages or utility pages.
### Auto-Sync Website
Instead of manually selecting pages, you can set up automatic syncing that crawls your website daily and keeps your training data up to date.
Before crawling, check the **Auto-sync website pages daily** checkbox below the URL input field.
Open **Advanced Options** to add URL exclusion patterns. Any URLs matching these patterns will be skipped during crawling. For example, you can exclude `/admin/*` or `/login`.
Click the **Create Auto-Syncing Website** button. SiteSpeakAI will crawl your website, discover all pages, and set up daily automatic syncing.
Once set up, SiteSpeakAI checks your website daily for changes:
* **New pages** are automatically discovered and added as training sources
* **Removed pages** are cleaned up and removed from your training data
* **Exclusion patterns** are applied on every sync cycle
Auto-sync for websites requires the **Pro Plus** plan or higher.
***
## Link Sources
Use the Links option to add specific page URLs directly, without crawling an entire website.
In your chatbot dashboard, click **Training & Content** in the sidebar.
Click on **Sources**.
Click the **+ Add Sources** button.
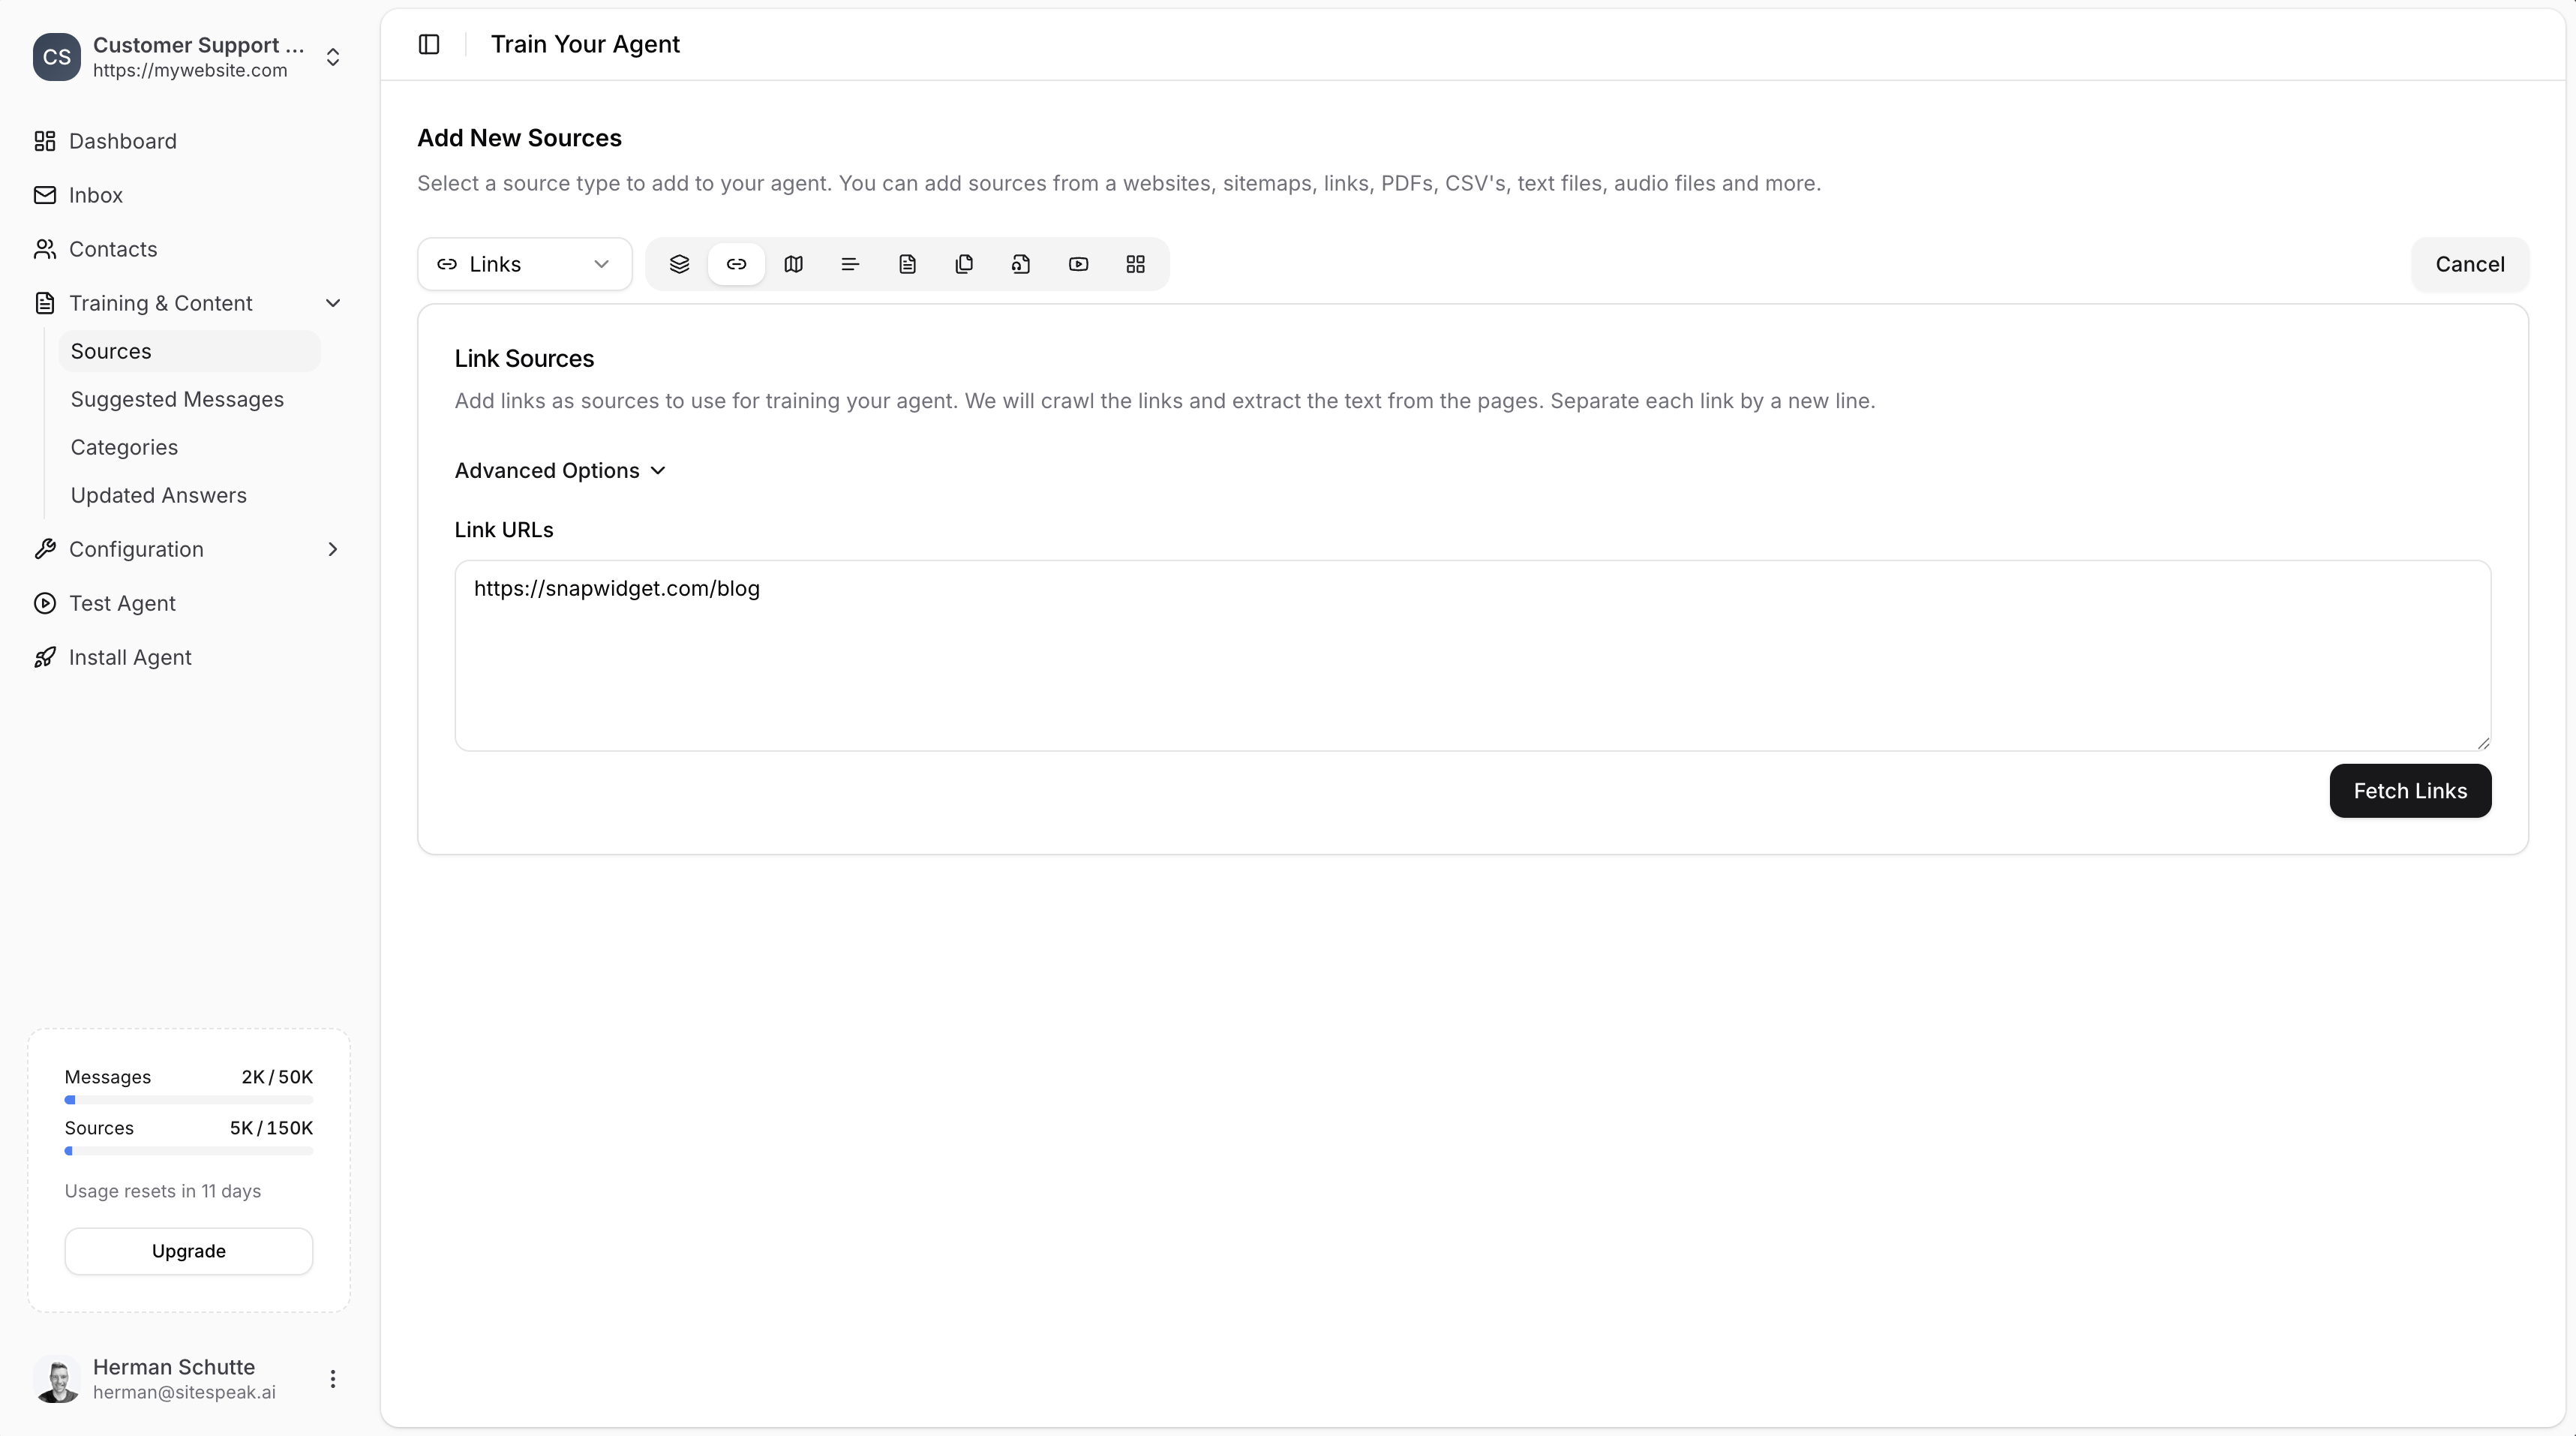
From the source type dropdown, select **Links**.
Enter the page URLs you want to train on in the **Link URLs** field. Separate each link by a new line.
Click the **Fetch Links** button to retrieve the content from each URL.
 ### Selecting Links to Train
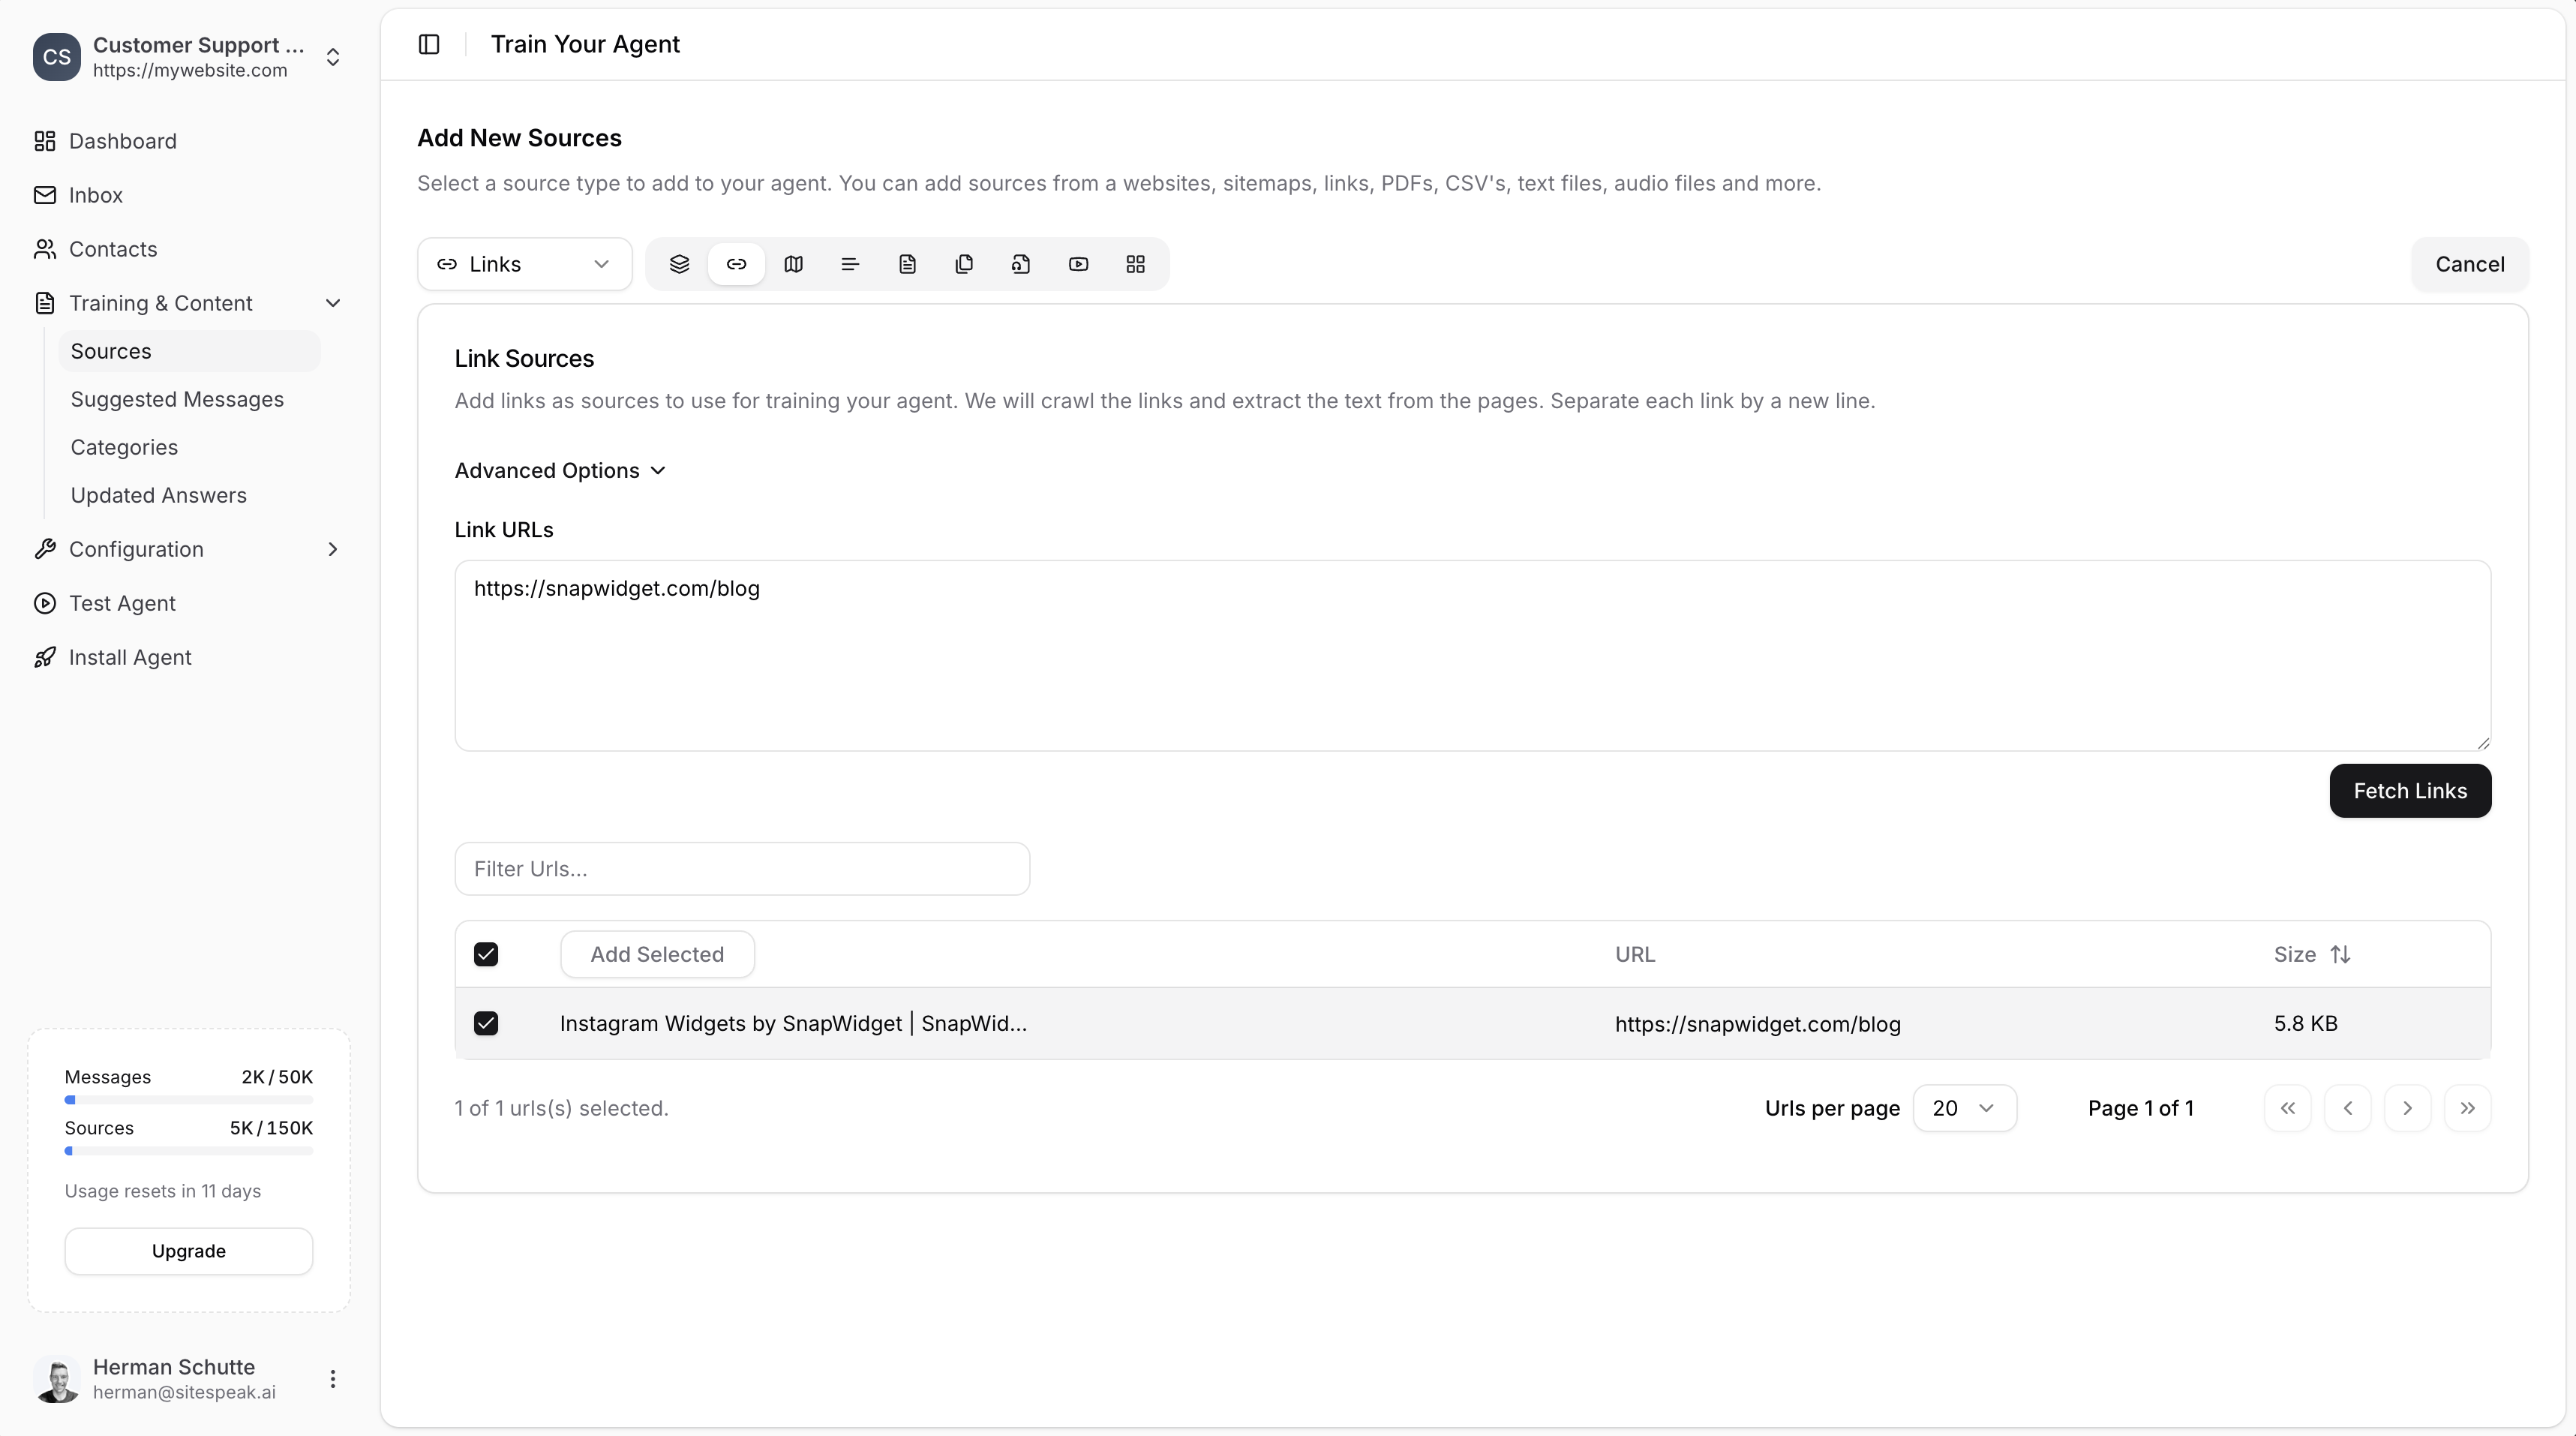
After fetching, you'll see each URL with its content size.
Check the list of URLs and their content sizes.
Use the checkboxes to select which links you want to train on.
Click the **Add Selected** button to add the chosen links as training sources.
### Selecting Links to Train
After fetching, you'll see each URL with its content size.
Check the list of URLs and their content sizes.
Use the checkboxes to select which links you want to train on.
Click the **Add Selected** button to add the chosen links as training sources.
 ***
## Website vs Links: When to Use Each
| Use Case | Recommended Option |
| ------------------------------------------ | ------------------ |
| Train on your entire website | **Website** |
| Train on specific pages only | **Links** |
| Add pages from multiple different websites | **Links** |
| Discover pages you might have missed | **Website** |
| Add a single blog post or article | **Links** |
***
## Managing Your Trained Sources
After adding sources, they'll appear in your Sources list with their training status.
***
## Website vs Links: When to Use Each
| Use Case | Recommended Option |
| ------------------------------------------ | ------------------ |
| Train on your entire website | **Website** |
| Train on specific pages only | **Links** |
| Add pages from multiple different websites | **Links** |
| Discover pages you might have missed | **Website** |
| Add a single blog post or article | **Links** |
***
## Managing Your Trained Sources
After adding sources, they'll appear in your Sources list with their training status.
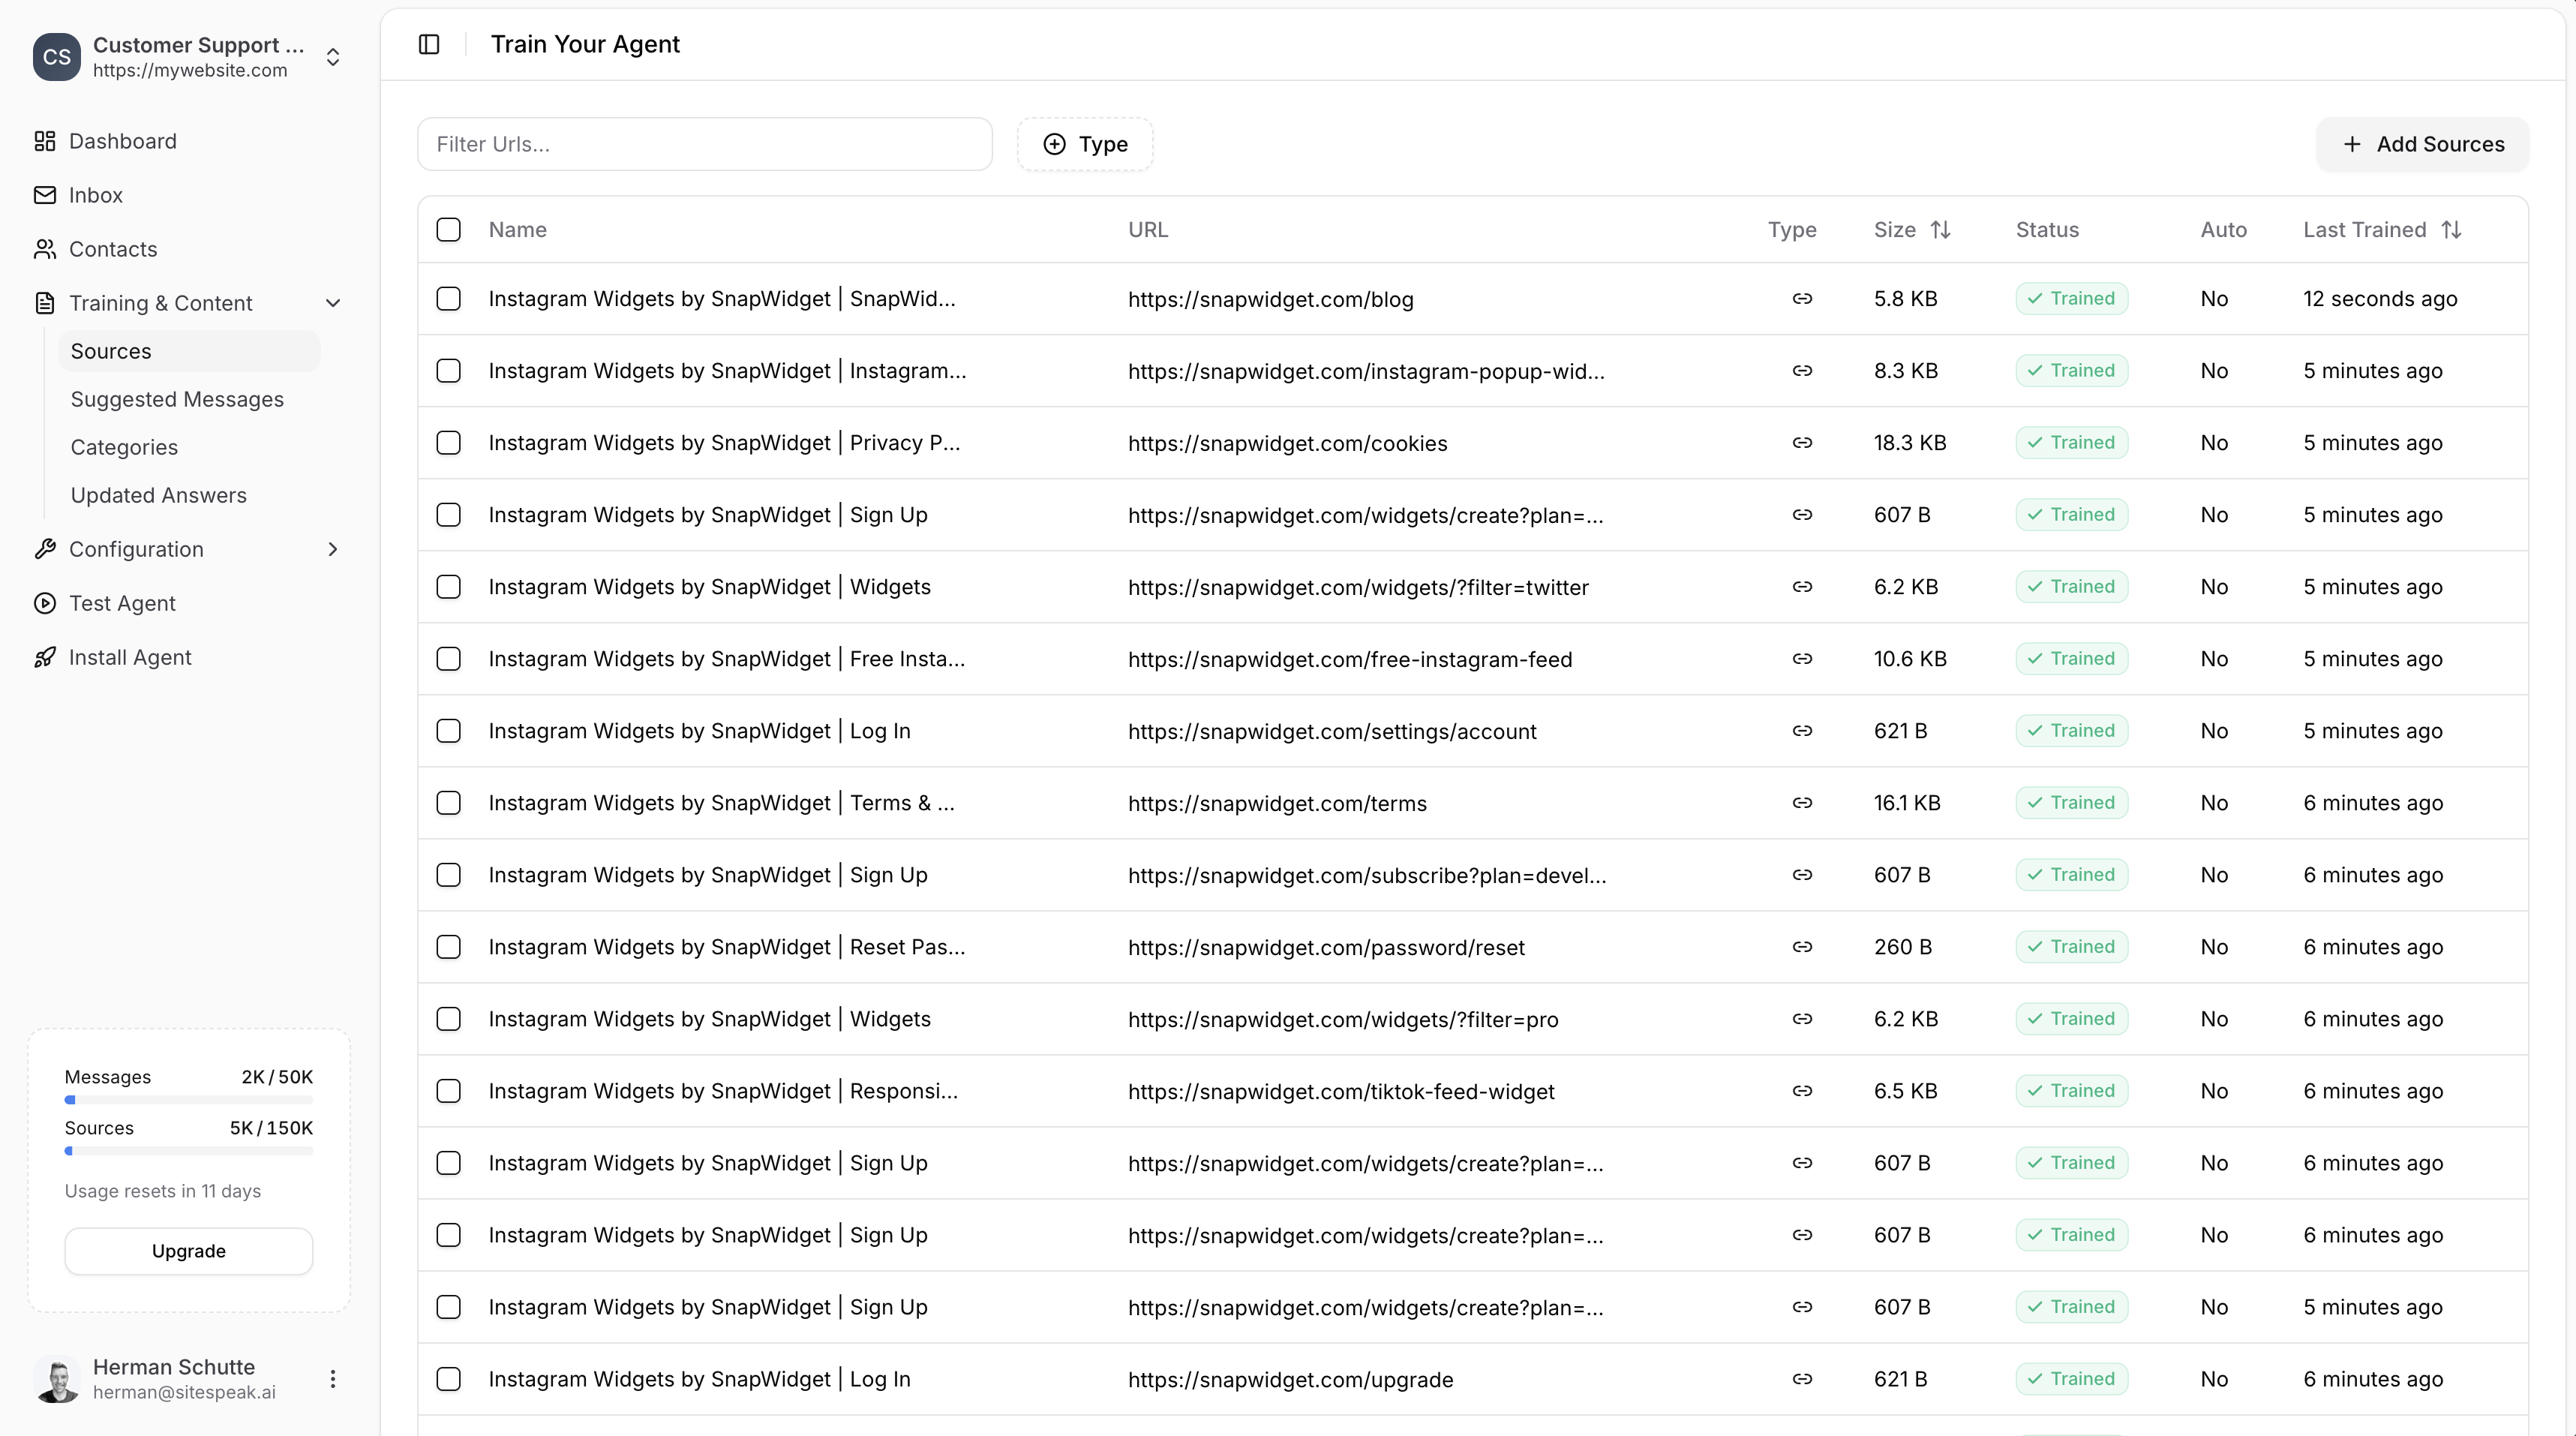 Each source shows:
* **Name**: The page title
* **URL**: The source URL
* **Type**: Link icon for web sources
* **Size**: Content size (e.g., 5.8 KB)
* **Status**: Training status (Trained, Training, Pending, Error)
* **Auto**: Whether auto-sync is enabled
* **Last Trained**: When it was last processed
### Keeping Content Updated
To update your trained content when your website changes:
Use the checkboxes to select the sources you want to update.
Click the **Retrain** button to re-fetch and retrain on the latest content.
Enable **Auto Sync** on important sources to automatically keep them updated.
***
## Best Practices
* **Start with key pages**: Train on your most important content first (FAQs, product pages, documentation)
* **Review content quality**: Ensure pages have meaningful text content, not just images or videos
* **Remove duplicates**: Avoid training on multiple pages with the same content
* **Update regularly**: Retrain sources when your website content changes significantly
***
Join over 1000+ businesses, websites and startups automating their customer service and other tasks with a custom trained AI agent.
Each source shows:
* **Name**: The page title
* **URL**: The source URL
* **Type**: Link icon for web sources
* **Size**: Content size (e.g., 5.8 KB)
* **Status**: Training status (Trained, Training, Pending, Error)
* **Auto**: Whether auto-sync is enabled
* **Last Trained**: When it was last processed
### Keeping Content Updated
To update your trained content when your website changes:
Use the checkboxes to select the sources you want to update.
Click the **Retrain** button to re-fetch and retrain on the latest content.
Enable **Auto Sync** on important sources to automatically keep them updated.
***
## Best Practices
* **Start with key pages**: Train on your most important content first (FAQs, product pages, documentation)
* **Review content quality**: Ensure pages have meaningful text content, not just images or videos
* **Remove duplicates**: Avoid training on multiple pages with the same content
* **Update regularly**: Retrain sources when your website content changes significantly
***
Join over 1000+ businesses, websites and startups automating their customer service and other tasks with a custom trained AI agent.