In this video
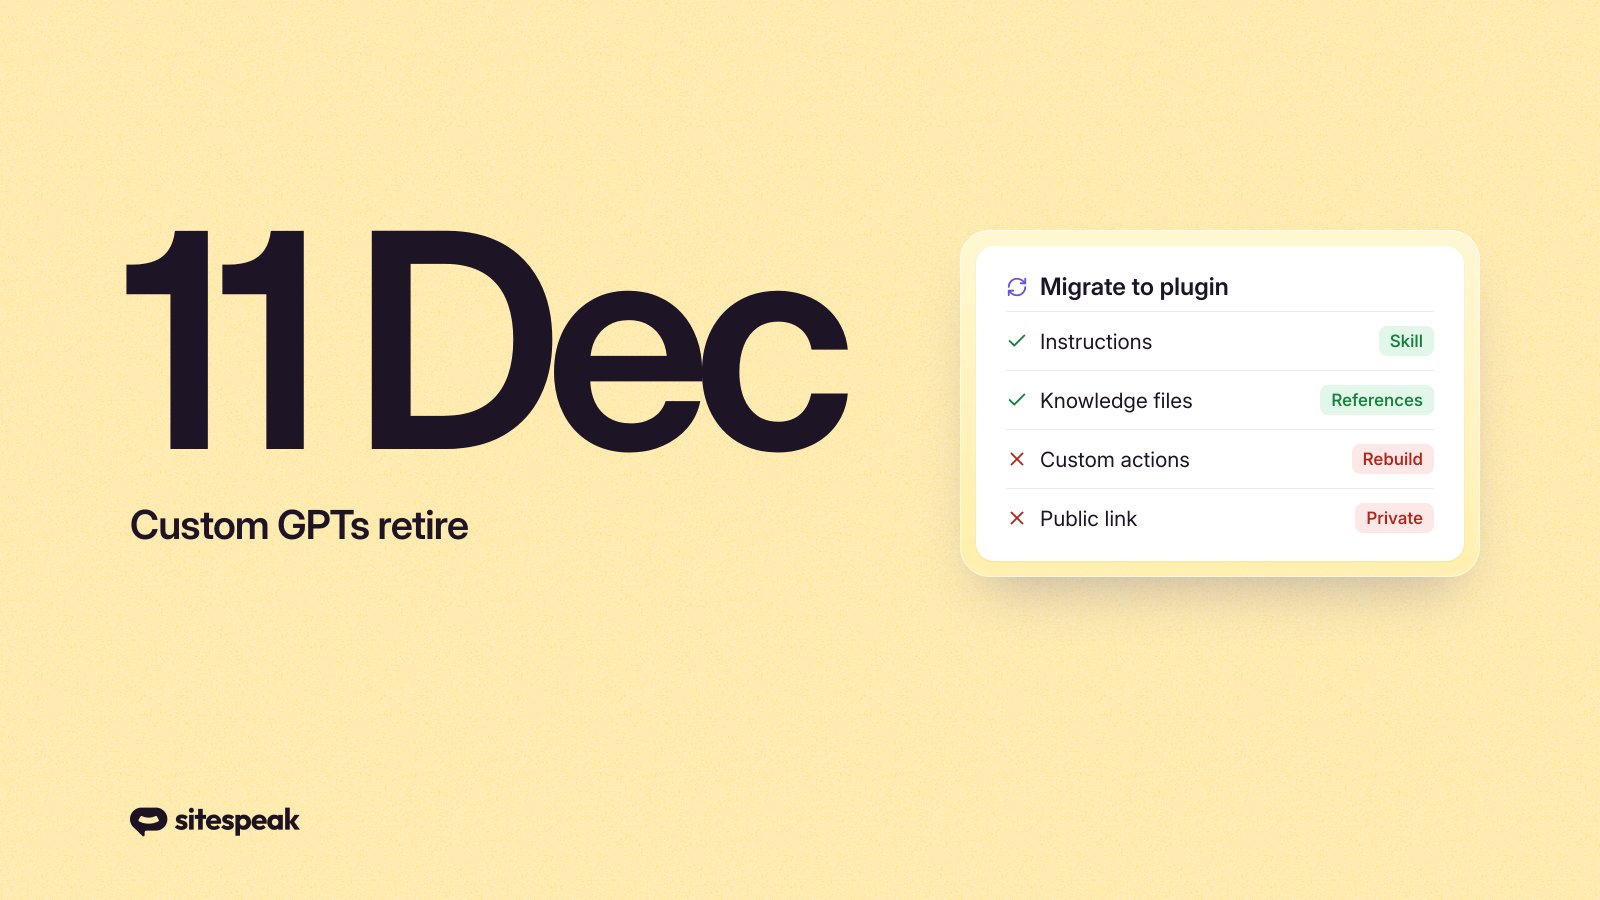
OpenAI is retiring Custom GPTs. On 11 December 2026, Custom GPTs stop running, their GPT pages go offline, and they leave the GPT directory. ChatGPT plugins replace them.
If you built a GPT, you have about two months to move it. This guide covers the whole job: what a plugin is, what moves over and what does not, how to migrate step by step, how to rebuild Custom Actions, how to build a plugin from scratch, and what to do if your GPT answered customers rather than your own team.
Every date and rule below comes from OpenAI's own documentation, linked in each section. OpenAI updates these pages often, so check the migration FAQ and the notice in your own account before you act.
The short version
Custom GPTs retire on 11 December 2026 (11 February 2027 for Enterprise workspaces with an approved deferral). Plugins replace them. A plugin bundles skills, reference files and apps.
The "Migrate to plugin" button moves your GPT's name, instructions, knowledge files and connected apps. It leaves behind Custom Actions, sharing settings, the selected model, conversation starters and capability settings. The new plugin is private, and making it public takes a separate review by OpenAI. Your old chats with the GPT stay readable.
Our view: migrate the GPTs your team uses inside ChatGPT. For a GPT that answers customers, the plugin route is a poor fit, and we explain why below.
The dates
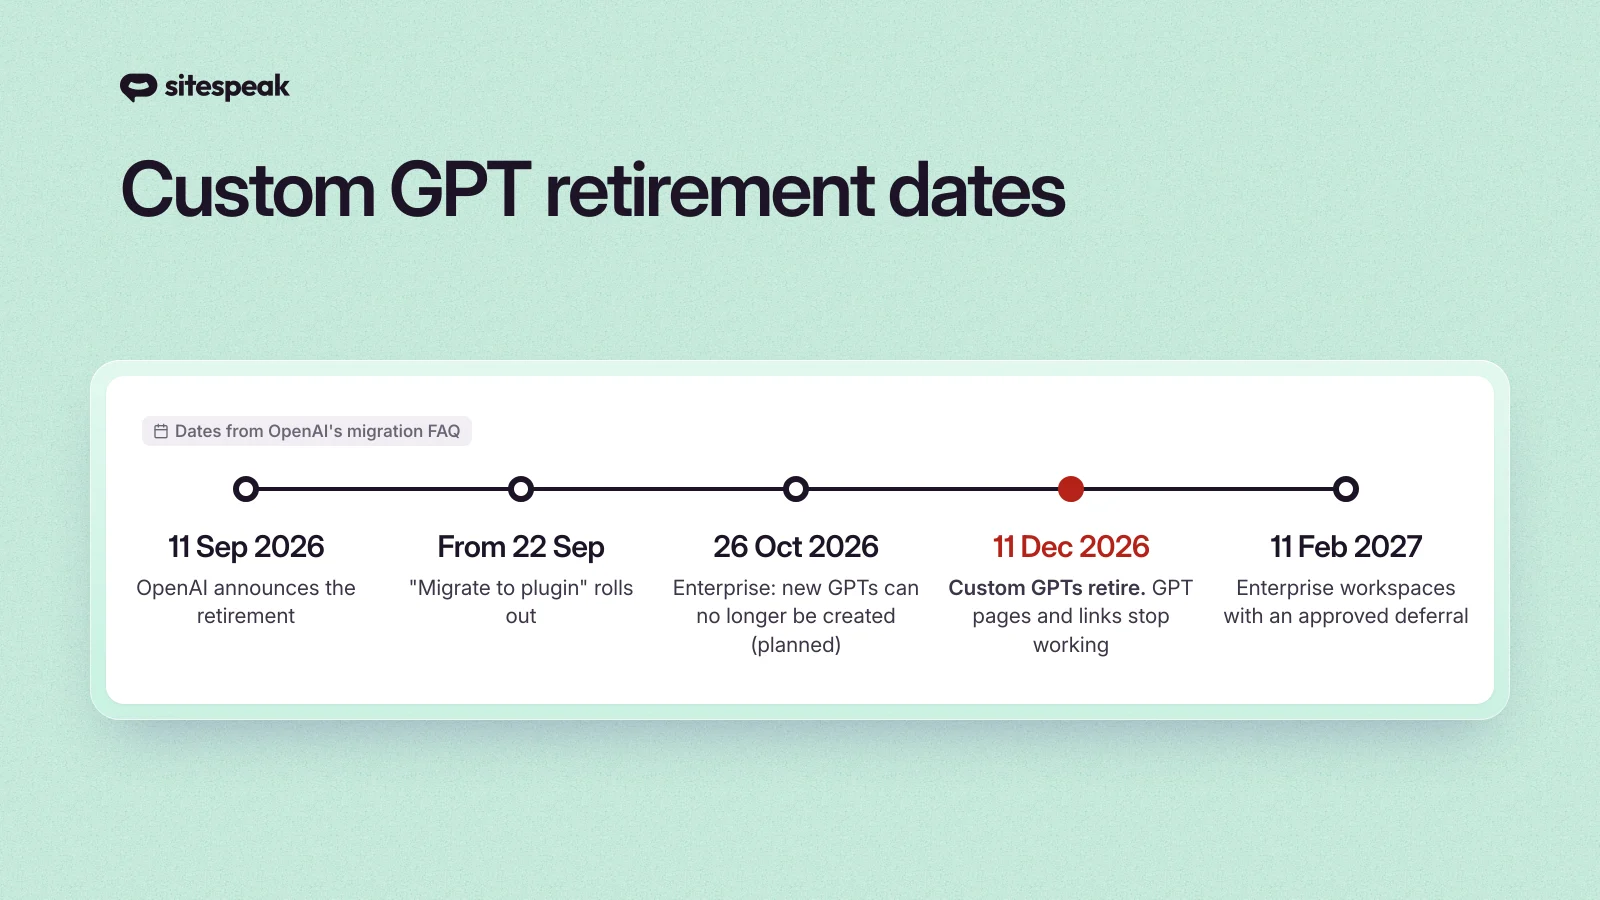
OpenAI announced the change on 11 September 2026 in the ChatGPT release notes. The "Migrate to plugin" option started to roll out on 22 September. The migration FAQ gives these dates:
| Date | What happens |
|---|---|
| 11 Sep 2026 | Retirement announced |
| 22 Sep 2026 | "Migrate to plugin" starts to roll out |
| 26 Oct 2026 | Enterprise: creation of new GPTs ends (planned) |
| 11 Dec 2026 | Custom GPTs retire. GPT pages become inaccessible |
| 11 Feb 2027 | Retirement for Enterprise workspaces with an approved deferral |
Personal accounts (Free, Go, Plus and Pro) already cannot create or publish new GPTs. You can still edit an existing GPT if your plan allows it.
OpenAI says the change affects all ChatGPT plans, and that migration and plugin access can differ by account and workspace. The date that counts is the one for the account where the GPT was created, even if people use it from another account.
What is a ChatGPT plugin in 2026?
Forget the ChatGPT plugins from 2023. That was a different product, and OpenAI retired it in 2024. The 2026 plugins are a new way to package work for ChatGPT, and they also run in Codex.
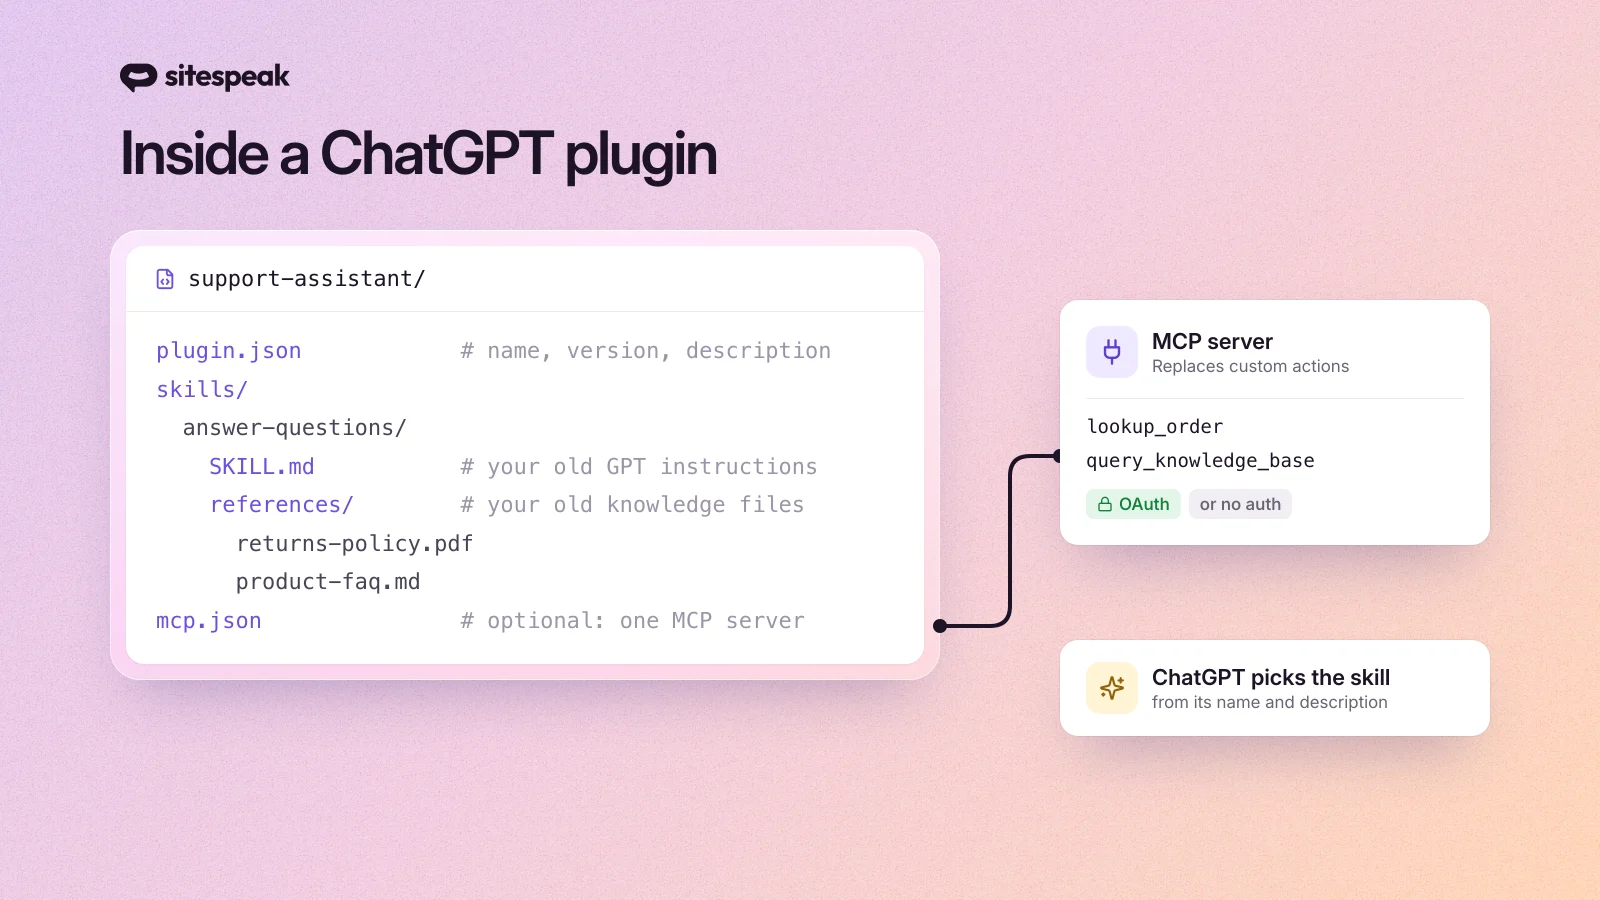
According to OpenAI's plugins help page, a plugin can contain:
- skills, which hold instructions and workflow guidance. A skill is a folder with a
SKILL.mdfile, plus optional reference files, templates and scripts; - apps, which connect to outside services such as a CRM, a calendar or your own API. Under the hood, an app is an MCP server;
- extensions, such as interactive UI, forms and plugin settings.
Some plugins are only skills. Others are only an app. Many are both.
You find plugins under Plugins in the ChatGPT sidebar, or at chatgpt.com/plugins. ChatGPT uses an installed plugin when it thinks the plugin is relevant. You can also call one by name with @, or pick it from Plugins in the message box.
The main difference from a GPT: a GPT was a separate chat with its own personality. A plugin is a set of skills and tools that ChatGPT picks up inside your normal chats when the task fits.
What moves when you migrate, and what does not
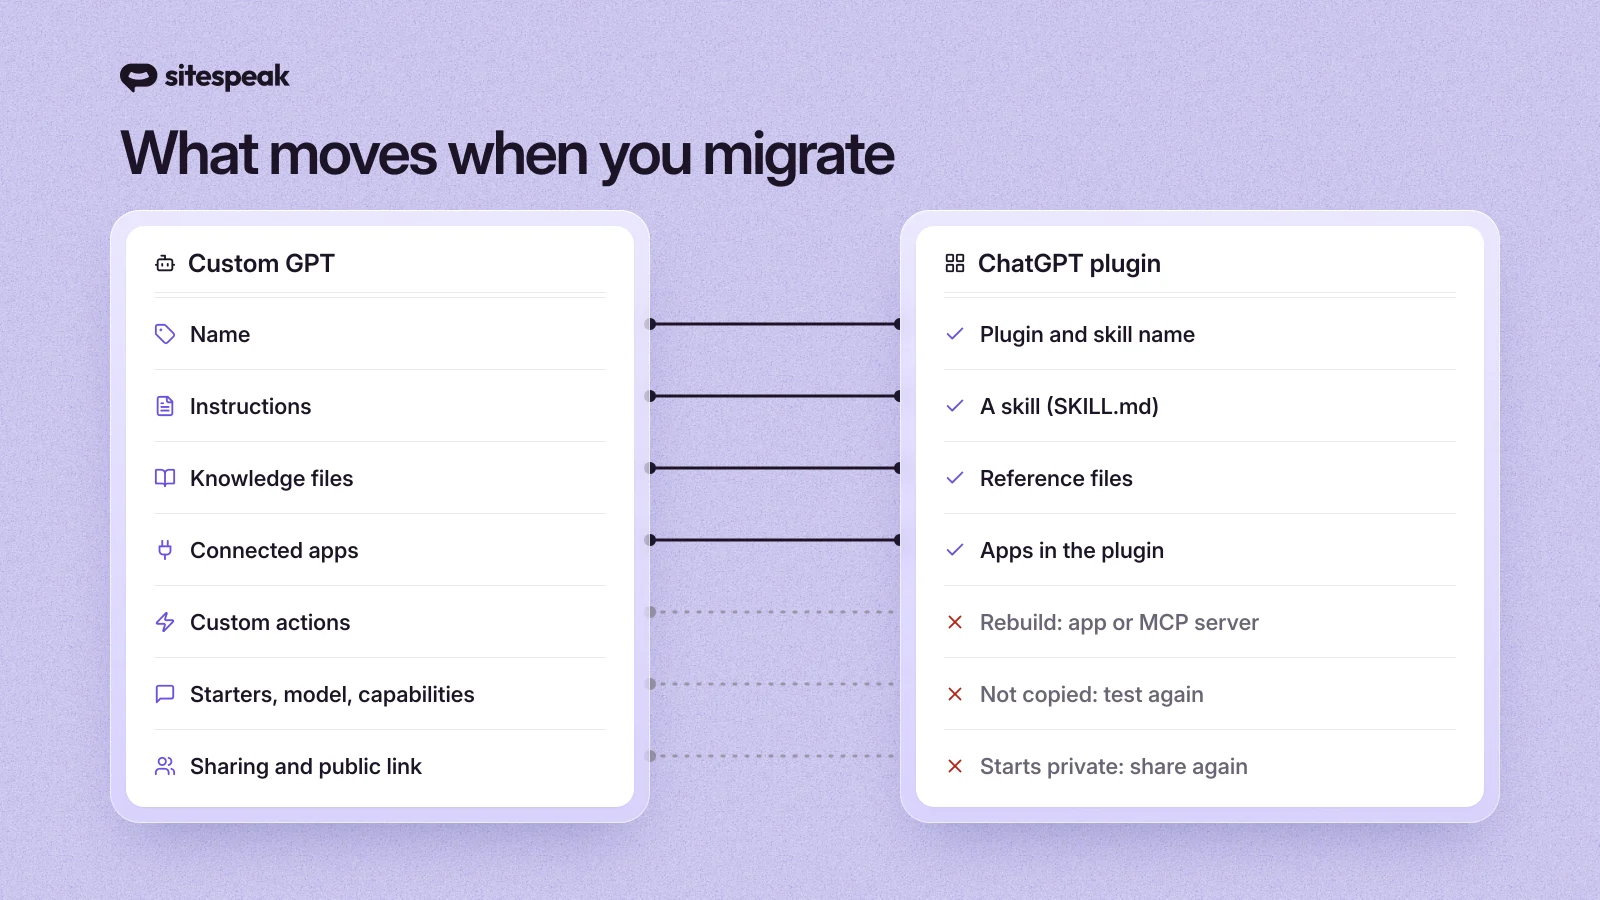
| In your GPT | In the plugin |
|---|---|
| Name | The plugin and its skill get the GPT's name |
| Instructions | Become a skill |
| Knowledge files | Are copied into the skill's reference files |
| Connected apps | Are added to the plugin as apps |
| Custom Actions | Do not transfer. Rebuild them as an app or a custom MCP server |
| Conversation starters | Do not transfer one to one. Save the useful ones |
| Capabilities (web search, images, data analysis) | Not guaranteed. Test each one |
| Selected model | Does not carry over |
| Sharing and public link | Do not carry over. The plugin starts private |
| Conversations | Stay with the old GPT and stay readable |
Two more rules matter before you click anything:
- Only the latest published version migrates. Drafts and unpublished edits are left behind. You do not have to share a GPT publicly to publish it.
- The original GPT becomes read-only after migration, and you cannot delete it. Finish your edits first.
Only the person who created the GPT can migrate it. In Enterprise workspaces, a workspace admin can too. Access to someone else's GPT does not give you the right to migrate it.
Before you migrate: a checklist
Do this before you click anything. Once a GPT is migrated it is read-only, so gaps you find later are harder to fix.
- List your GPTs. Go to My GPTs and write down every GPT you created that people still use.
- Note who uses each one. Is it you, your team, or the public? The answer decides your path (see "Who uses your GPT?" below).
- Publish your final edits. Migration takes the latest published version only.
- Copy your instructions into a document. It is a free backup, and you can reuse it outside ChatGPT. OpenAI gives no export button for GPTs.
- Save 3 to 5 test prompts. Include your best conversation starters and one hard question. You will run them against the plugin later.
- List your Custom Actions. For each one, note the API it calls, the authentication it uses and what it does. These need the most work.
- Check your knowledge files. A GPT holds up to 20 files of up to 512 MB each. OpenAI does not publish limits for plugin reference files, and some people report that migration rejected large files. Split very large files before you start.
How to migrate a Custom GPT to a plugin, step by step
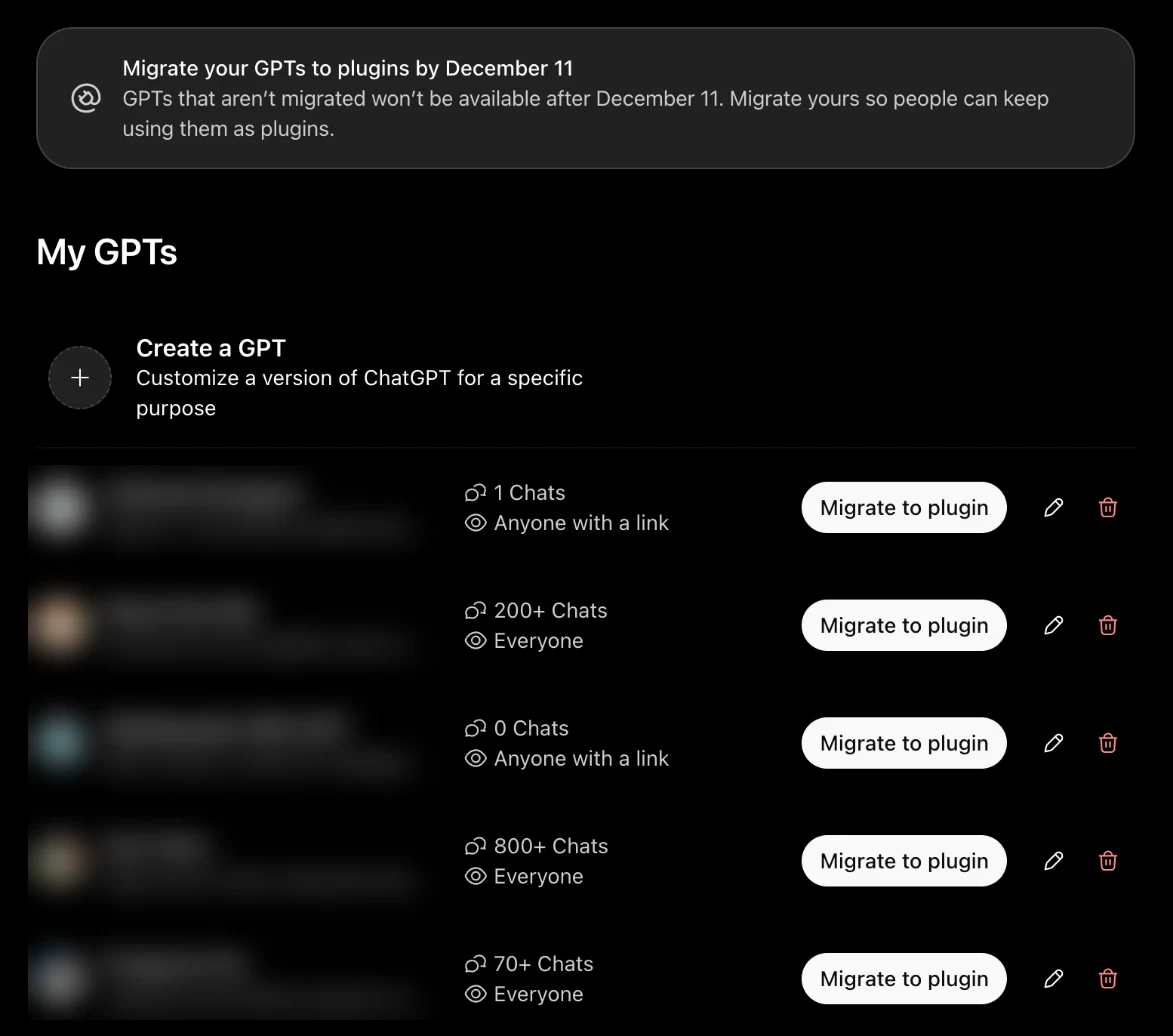
Step 1: Open My GPTs
In ChatGPT on the web, open My GPTs and find your GPT under Created by me. If the migration option is live for your account, you will also see a banner that asks you to migrate by 11 December.
Step 2: Select Migrate to plugin
Select Migrate to plugin next to the GPT, or from the GPT's menu. ChatGPT shows what will and will not move. Read the warning about sharing: the new plugin will be private.
If you do not see the option, check three things. You must be the creator (or a workspace admin), the GPT must be published, and plugins must be turned on for your account or workspace.
Step 3: Open the new plugin
When migration finishes, select Plugins in the ChatGPT sidebar and open the Personal tab. Your plugin has the same name as the GPT, and inside it is a skill with the GPT's instructions and files.
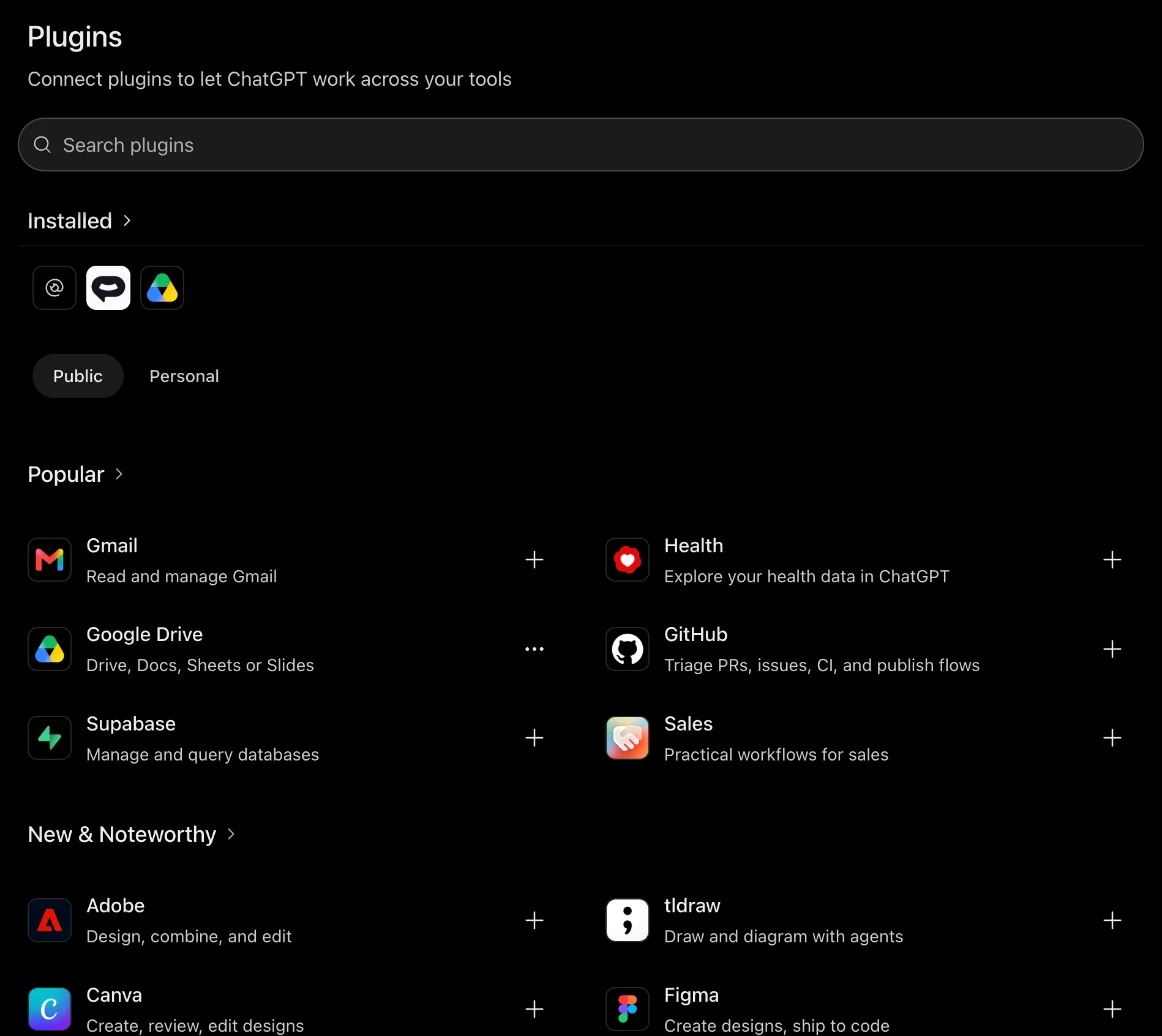
Step 4: Install it
This step is easy to miss. Migration does not install the plugin, not even for you. Open the plugin and select Install. Until you do, ChatGPT will not use it.
Step 5: Test it with your saved prompts
Start a new chat and run the prompts you saved. Try it two ways: once with @ and the plugin name, and once without, to see if ChatGPT picks it up on its own. OpenAI's migration guide suggests you check that:
- the right skill is selected,
- it uses the reference files you expect,
- the answer comes back complete and in the format you need,
- the hard case works in a reasonable time,
- any apps and tools are available.
The model can differ from the one your GPT used, so compare tone and length too.
Step 6: Edit the skill if needed
To change anything, open Plugins, select your plugin and choose Edit Plugin. This opens a chat where you describe the change in plain language. If answers are too vague, tighten the skill's description. ChatGPT decides when to use a skill from its name and description, so a description such as "Answers questions about Northwind's returns and shipping policies" works better than "Support bot".
Step 7: Share it
New plugins start private. On a Business or Enterprise workspace, open the plugin, select the ••• menu, then Share plugin. Under Who has access, choose one of these:
- Only those invited
- Anyone in this workspace with the link
- Visible in workspace directory
Every person still has to install the plugin before they can use it. Ask one real user to install and test it before you tell everyone. Then update the links in your docs, onboarding and saved bookmarks, because the old GPT link stops working on 11 December.
Workspace admins can migrate many GPTs at once with the ChatGPT Admin plugin. Bulk migration does not copy sharing settings either.
How to rebuild Custom Actions as an MCP server
Custom Actions are the one part that needs real work. OpenAI's advice is to first check if an existing app in the plugin directory already does the job. If not, you rebuild the action as a custom MCP server.
An MCP server is a small web service that tells ChatGPT which tools it has, and runs them when ChatGPT asks. If your Custom Action called your own API, the MCP server calls the same API. Your OpenAPI schema is a good guide for the tool names and inputs.
Here is a complete MCP server in Node.js that replaces a typical "look up an order" Custom Action. It uses the official MCP TypeScript SDK. We ran it locally against SDK version 1.32 to check that it works.
npm init -y
npm pkg set type=module
npm install @modelcontextprotocol/sdk@1 express zod
// server.js
import express from "express"
import { z } from "zod"
import { McpServer } from "@modelcontextprotocol/sdk/server/mcp.js"
import { StreamableHTTPServerTransport } from "@modelcontextprotocol/sdk/server/streamableHttp.js"

// The same API your Custom Action called
const ORDERS_API = "https://api.example.com/orders"

function buildServer() {
  const server = new McpServer({ name: "order-lookup", version: "1.0.0" })

  server.registerTool(
    "lookup_order",
    {
      title: "Look up an order",
      description: "Get the status and tracking link for an order number.",
      inputSchema: { orderNumber: z.string().describe("For example 10482") },
      annotations: { readOnlyHint: true }
    },
    async ({ orderNumber }) => {
      const res = await fetch(`${ORDERS_API}/${orderNumber}`, {
        headers: { Authorization: `Bearer ${process.env.ORDERS_API_KEY}` }
      })
      const order = await res.json()
      return {
        content: [{ type: "text", text: JSON.stringify(order) }]
      }
    }
  )

  return server
}

const app = express()
app.use(express.json())

app.post("/mcp", async (req, res) => {
  const server = buildServer()
  const transport = new StreamableHTTPServerTransport({
    sessionIdGenerator: undefined
  })
  res.on("close", () => {
    transport.close()
    server.close()
  })
  await server.connect(transport)
  await transport.handleRequest(req, res, req.body)
})

app.listen(3005, () => console.log("MCP server on http://localhost:3005/mcp"))
Run it with ORDERS_API_KEY=... node server.js, then deploy it anywhere that serves HTTPS. ChatGPT supports streamable HTTP and SSE connections.
A few details decide whether this works well in ChatGPT.
First, mark read-only tools. ChatGPT treats every tool without readOnlyHint: true as a write action and asks the user to confirm each call. A lookup should not need a confirmation click, so set the hint on tools that only read data.
Next, plan your authentication. This is the biggest change from Custom Actions. A Custom Action could send an API key in a header. ChatGPT cannot. According to OpenAI's authentication docs, ChatGPT supports only:
- no authentication, for public data such as a product catalogue or help docs,
- OAuth 2.1, so each user signs in to your service,
- a mix of both, set per tool.
It does not support API keys, client credentials or other machine-to-machine methods. In the example above, the API key stays on your server, where ChatGPT never sees it. That works for data that every user may see. If each user should only see their own data, you need OAuth.
Last, connect the server to your plugin. Go to chatgpt.com/plugins, select Add, then Create custom MCP server. Enter a name, your server URL and the authentication type, confirm the warning, and select Create as a plugin. To add the server to your migrated plugin instead, copy the ID that starts with plugin_asdk_app from the browser address bar and give it to @plugin-creator in a chat. One plugin can connect to one MCP server.
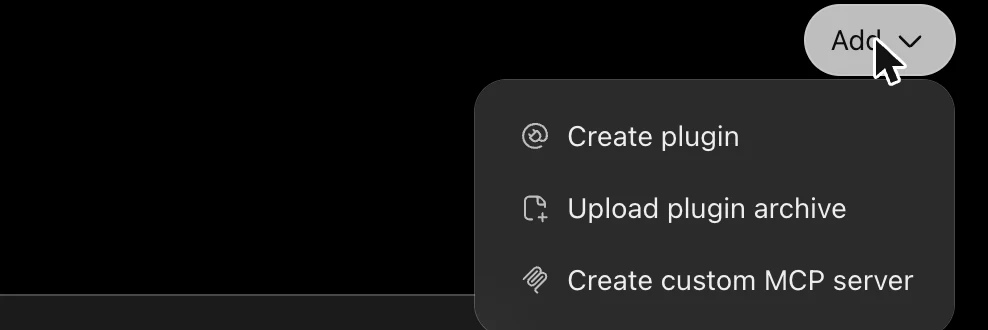
Custom MCP access depends on your plan. OpenAI's developer mode page says full MCP is available on Business, Enterprise and Edu. Pro users can connect MCP servers with read and fetch permissions in developer mode.
How to build a ChatGPT plugin from scratch
You do not need an old GPT to build a plugin. There are two ways to do it.
The no-code way: Plugin Creator
- Open chatgpt.com/plugins, select Add, then Create plugin. This opens a chat with Plugin Creator.
- Type
@plugin-creatorand describe what you want. Say what the plugin is for, what the user gives it, what it should return, and the rules it must follow. - Attach any templates or reference files.
- Review what it builds, then finish.
OpenAI's build guide uses this example prompt:
Create a plugin called Document Summary. Summarize documents I provide in three sections: Overview, Key points, and Open questions. Use the attached template for the format. Base the summary only on the document. If requested information is missing, mark it as not provided. Do not edit the source document.
You can also create a skill on its own: open Plugins, switch to the Skills tab and select Create. Choose Create with chat, Create with editor or Upload from your computer.
The developer way: files
A plugin is a folder. At its smallest, it holds a plugin.json manifest and one skill. This structure comes from OpenAI's plugin packaging docs:
support-assistant/
├── plugin.json
├── skills/
│   └── answer-questions/
│       ├── SKILL.md
│       └── references/
│           ├── returns-policy.pdf
│           └── product-faq.md
└── mcp.json
The manifest:
{
  "$schema": "https://agent-plugins.org/schemas/1.0.0/plugin.schema.json",
  "name": "support-assistant",
  "version": "1.0.0",
  "description": "Answers questions about Northwind's products, returns and shipping."
}
The skill. The name and description lines are required, and the description is what ChatGPT reads to decide when to use the skill. Paste your old GPT instructions below the second ---:
---
name: answer-questions
description: Answer customer questions about Northwind products, returns and shipping, using the reference files.
---

Answer only from the files in references/. If the answer is not there, say so
and suggest the customer contact support@northwind.example.
Keep answers under 120 words. Link to the relevant policy page when there is one.
The optional MCP server, in mcp.json:
{
  "$schema": "https://agent-plugins.org/schemas/1.0.0/mcp.schema.json",
  "mcpServers": {
    "orders": {
      "type": "streamable-http",
      "url": "https://mcp.northwind.example/mcp"
    }
  }
}
Skills follow the open Agent Skills format, which Claude, Codex and other tools use too. A well-written SKILL.md is portable, not tied to ChatGPT.
To test a local plugin, add it to a marketplace file at ~/.agents/plugins/marketplace.json and restart the ChatGPT desktop app. To roll it out to a workspace, an admin uploads the ZIP in the Admin Console under Plugins, Add, Upload plugin.
Publishing to the public plugin directory
Workspace sharing does not make a plugin public. For the public directory (shared by ChatGPT and Codex), you submit the plugin in the OpenAI Platform plugins dashboard. OpenAI's submission guide requires:
- a verified individual or business developer identity,
- the plugin ZIP, which must pass automated checks,
- for plugins with an MCP server: verification of your domain, reviewer test credentials without MFA, five positive and three negative test cases, a video walkthrough, and website, support, privacy policy and terms URLs,
- a review by OpenAI before you can publish.
OpenAI does not accept trial or demo plugins, and skills-only plugins can face extra eligibility rules.
Who uses your GPT? That decides your path
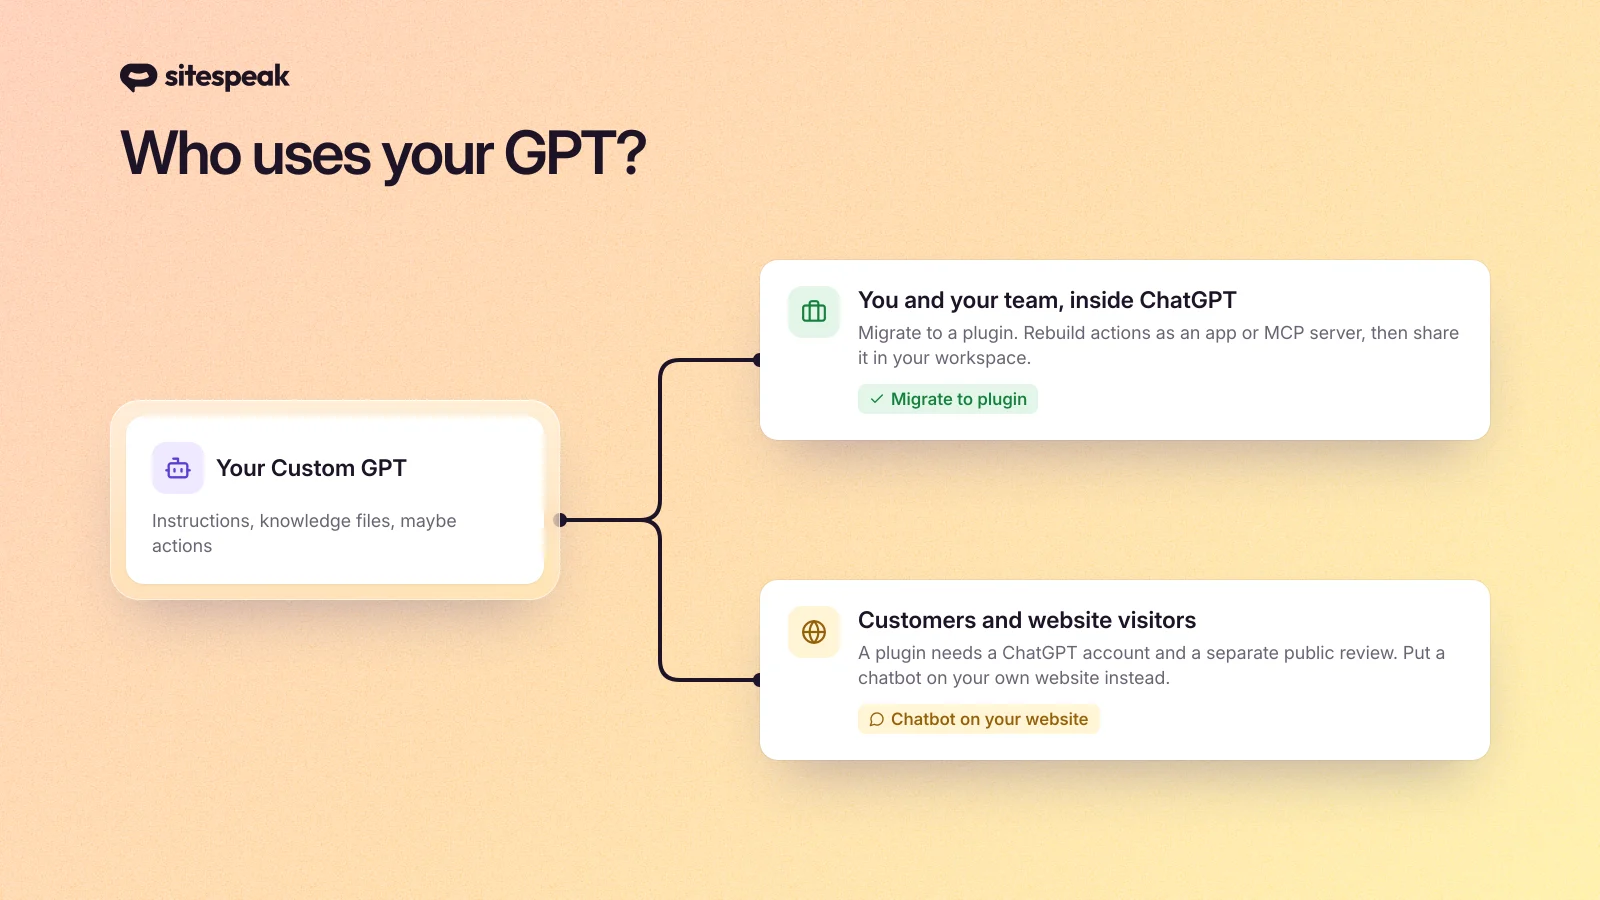
For a GPT that you or your team use inside ChatGPT, migration is the right move. Follow the steps above.
For a GPT that customers use, the picture is different. Many businesses shared a public GPT link from their website, newsletter or a QR code: "Ask our assistant". This is the part of the change that hurts small businesses most.
On 11 December that link breaks, because GPT pages become inaccessible. The migrated plugin is private. To make it public you need developer verification, test cases and approval from OpenAI. And every customer needs a ChatGPT account where plugins are available. That last part is not new: public GPT pages already asked visitors to sign in before they could chat. But a plugin makes the gap wider, because the customer now has to find and install it too.
OpenAI says so on its GPTs help page: GPTs "are not a way to embed ChatGPT in an external website or application". If your goal is to answer customers, the better home for the assistant is your own website, where anyone can use it with no account.
Move a customer-facing GPT to your website
This is what we build at SiteSpeakAI, so here is how the parts of a GPT map to a website chatbot:
| In your GPT | In a SiteSpeakAI chatbot |
|---|---|
| Instructions | The chatbot's instructions, with your tone and rules |
| Knowledge files | Upload the same files, and train it on your website so it stays current as pages change |
| Custom Actions | API tools that call your API, for example order lookups or bookings |
| Conversation starters | Suggested messages in the chat widget |
| Model | Pick OpenAI, Anthropic, Google or xAI models |
| Public link | A widget on your site, plus a shareable chat page |
You also get things a GPT never had: live chat handoff when a question needs a person, lead capture, and a list of the questions your assistant could not answer, so you know which content to add.
Here is how to move it:
- Create a free account and enter your website URL. SiteSpeakAI reads your pages.
- Upload the knowledge files from your GPT.
- Paste your GPT instructions into the chatbot's instructions.
- Ask it your saved test prompts and compare the answers.
- Add the widget to your site with one line of code, and point your old GPT link to your site.
For more on training an assistant on your own content, see our guide to training ChatGPT with your own data.
SiteSpeakAI inside ChatGPT
Our SiteSpeak plugin is now in the ChatGPT plugin directory. The plugin is for you and your team. It brings your SiteSpeakAI account into ChatGPT, so you can work on your chatbot from a chat. With it you can:
- read the inbox, search conversations and mark them as done;
- reply to a website visitor as a human agent. ChatGPT drafts the reply, and it sends only after you approve it;
- see the leads that visitors left in the chat;
- check analytics and the questions your chatbot could not answer;
- add or recrawl a page in your chatbot's knowledge, and change its settings.
To install it:
- Open the SiteSpeak plugin page, or select Plugins in the ChatGPT sidebar and find SiteSpeak.
- Select Install plugin.
- When ChatGPT asks, select Connect. Sign in with your SiteSpeakAI login and select Authorize.
- Ask, for example, "Show me the open conversations in my SiteSpeak inbox". To pick the plugin yourself, type @ and select SiteSpeak.
For a full dashboard with Inbox, Leads, Analytics and Knowledge tabs, open the SiteSpeak app from the ChatGPT sidebar. The same tools also work in Claude and Claude Code, as our AI agents guide explains. For how we use them to answer support questions, see how we automate first-pass support with MCP.
Frequently asked questions
When do Custom GPTs stop working?
On 11 December 2026. Enterprise workspaces with an approved deferral have until 11 February 2027. OpenAI says timing can differ by plan, so check the notice in your account.
Will I lose my conversations with a GPT?
No. OpenAI says existing conversations stay accessible after retirement, and you do not need to do anything to keep them.
Can I still create a new Custom GPT?
Not on personal accounts (Free, Go, Plus and Pro). On Enterprise, creation of new GPTs is planned to end on 26 October 2026. Build a plugin instead.
Do Custom Actions migrate?
No. Rebuild each action with an existing app from the plugin directory, or with your own MCP server. Note that ChatGPT plugins cannot send API keys, so an authenticated API needs OAuth or a server that holds the key for you.
Can I delete my GPT after I migrate it?
No. After migration the original GPT is read-only, and its creator cannot delete it.
Can people without a ChatGPT account use my plugin?
No. Plugins work inside ChatGPT and Codex, so every user needs an account where plugins are available. To reach people who do not use ChatGPT, put an assistant on your website.
Does migration cost anything?
On Enterprise, OpenAI says converting a GPT to a plugin does not use credits. Editing or updating a plugin does use credits under credit-based pricing.
What to do this week
Open My GPTs, list every GPT you created, and sort them into two groups: the ones your team uses and the ones your customers use. Migrate the first group with the steps above. For the second group, the deadline is the time to give customers an assistant on your own site that does not depend on someone else's product decisions. You can start free with SiteSpeakAI and have it running before 11 December.