

How human handoff works
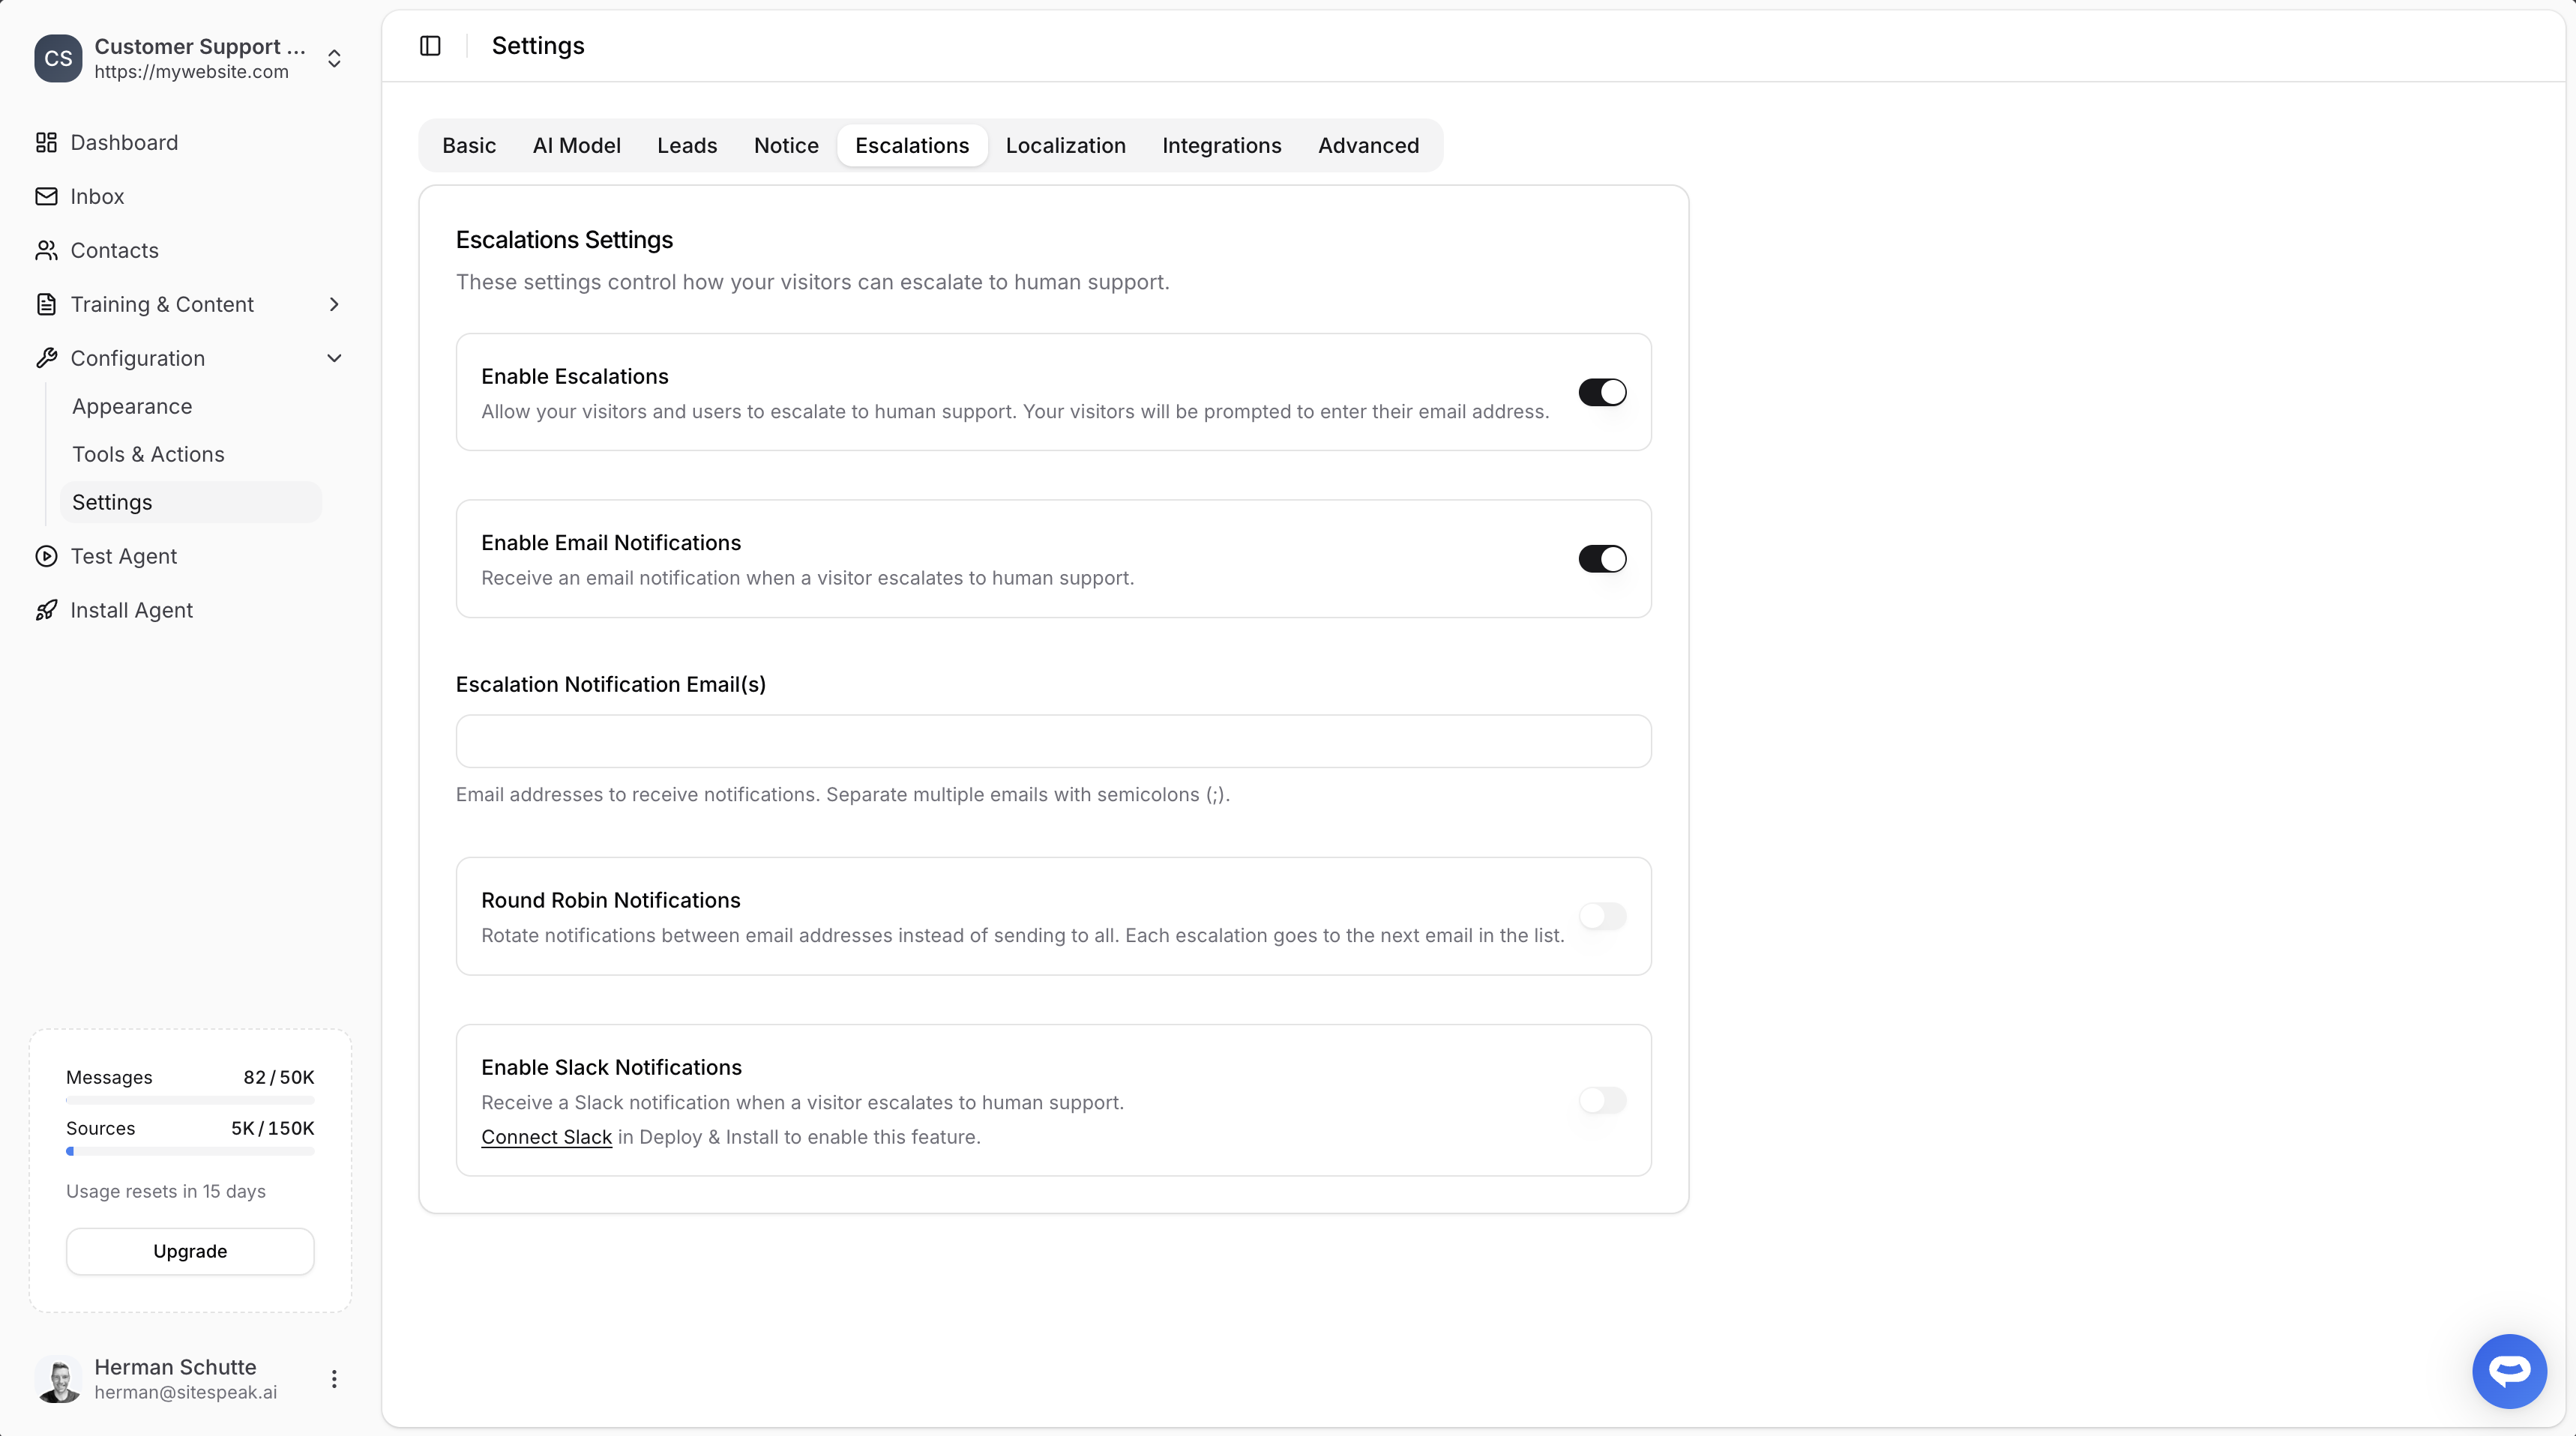
When enabled, visitors can request to speak with a human agent. They’ll be prompted to enter their email address, and your team receives a notification with the conversation details.Enable escalations
1
Go to Configuration
In your chatbot dashboard, click Configuration in the sidebar.
2
Select Settings
Click on Settings.
3
Go to Escalations tab
Click on the Escalations tab.
4
Enable Escalations
Toggle on Enable Escalations to allow visitors to escalate to human support.
Email notifications
Get notified via email when a visitor escalates:- Toggle on Enable Email Notifications
- Enter your email address(es) in the Escalation Notification Email(s) field
- Separate multiple emails with semicolons (
;)
Round robin notifications
If you have multiple team members handling support, enable Round Robin Notifications to rotate escalations between email addresses instead of sending to all. Each escalation goes to the next email in the list.Slack notifications
Receive escalation notifications directly in your Slack workspace:1
Connect Slack
Go to Install Agent → Slack and click Connect to Slack.
2
Install the app
Authorize SiteSpeakAI to access your Slack workspace.
3
Invite to a channel
Invite the SiteSpeakAI bot to the channel where you want to receive notifications.
4
Enable Slack notifications
Back in Settings → Escalations, toggle on Enable Slack Notifications.
You must connect Slack in Deploy & Install before the Slack notification option becomes available.
Webhook notifications
Send escalation data to any URL via a POST request. This is useful for integrating with tools like Zapier, Make, or your own CRM.1
Enable webhook notifications
In Settings → Escalations, toggle on Enable Webhook Notifications.
2
Enter your webhook URL
Paste the URL where you want to receive escalation data.
3
Add a signing secret (optional)
Enter a secret to sign webhook payloads with HMAC-SHA256 for verification. The signature is sent in the
X-Signature-256 header.Webhook payload
When a visitor escalates, SiteSpeakAI sends a POST request with a JSON body:Verifying webhook signatures
If you set a signing secret, each request includes anX-Signature-256 header. To verify the request is from SiteSpeakAI, compute the HMAC-SHA256 of the raw request body using your secret and compare it to the header value:
How visitors escalate
Once enabled, visitors can escalate to human support by:- Asking to speak with a human: The AI recognizes requests like “Can I talk to a person?” or “I need human help”
- The AI offering escalation: When the AI can’t confidently answer, it can offer to connect the visitor with a human
- A rule in your Instructions: If your Instructions say that certain situations should go to your team (for example bugs, outages, login problems, complaints or refund requests), the AI escalates those messages without waiting for the visitor to ask for a person
Instruction-driven escalation only works while Enable Escalations is on. With it off, the AI answers those messages as normal and never opens the escalation form on its own.
Responding via Live Chat
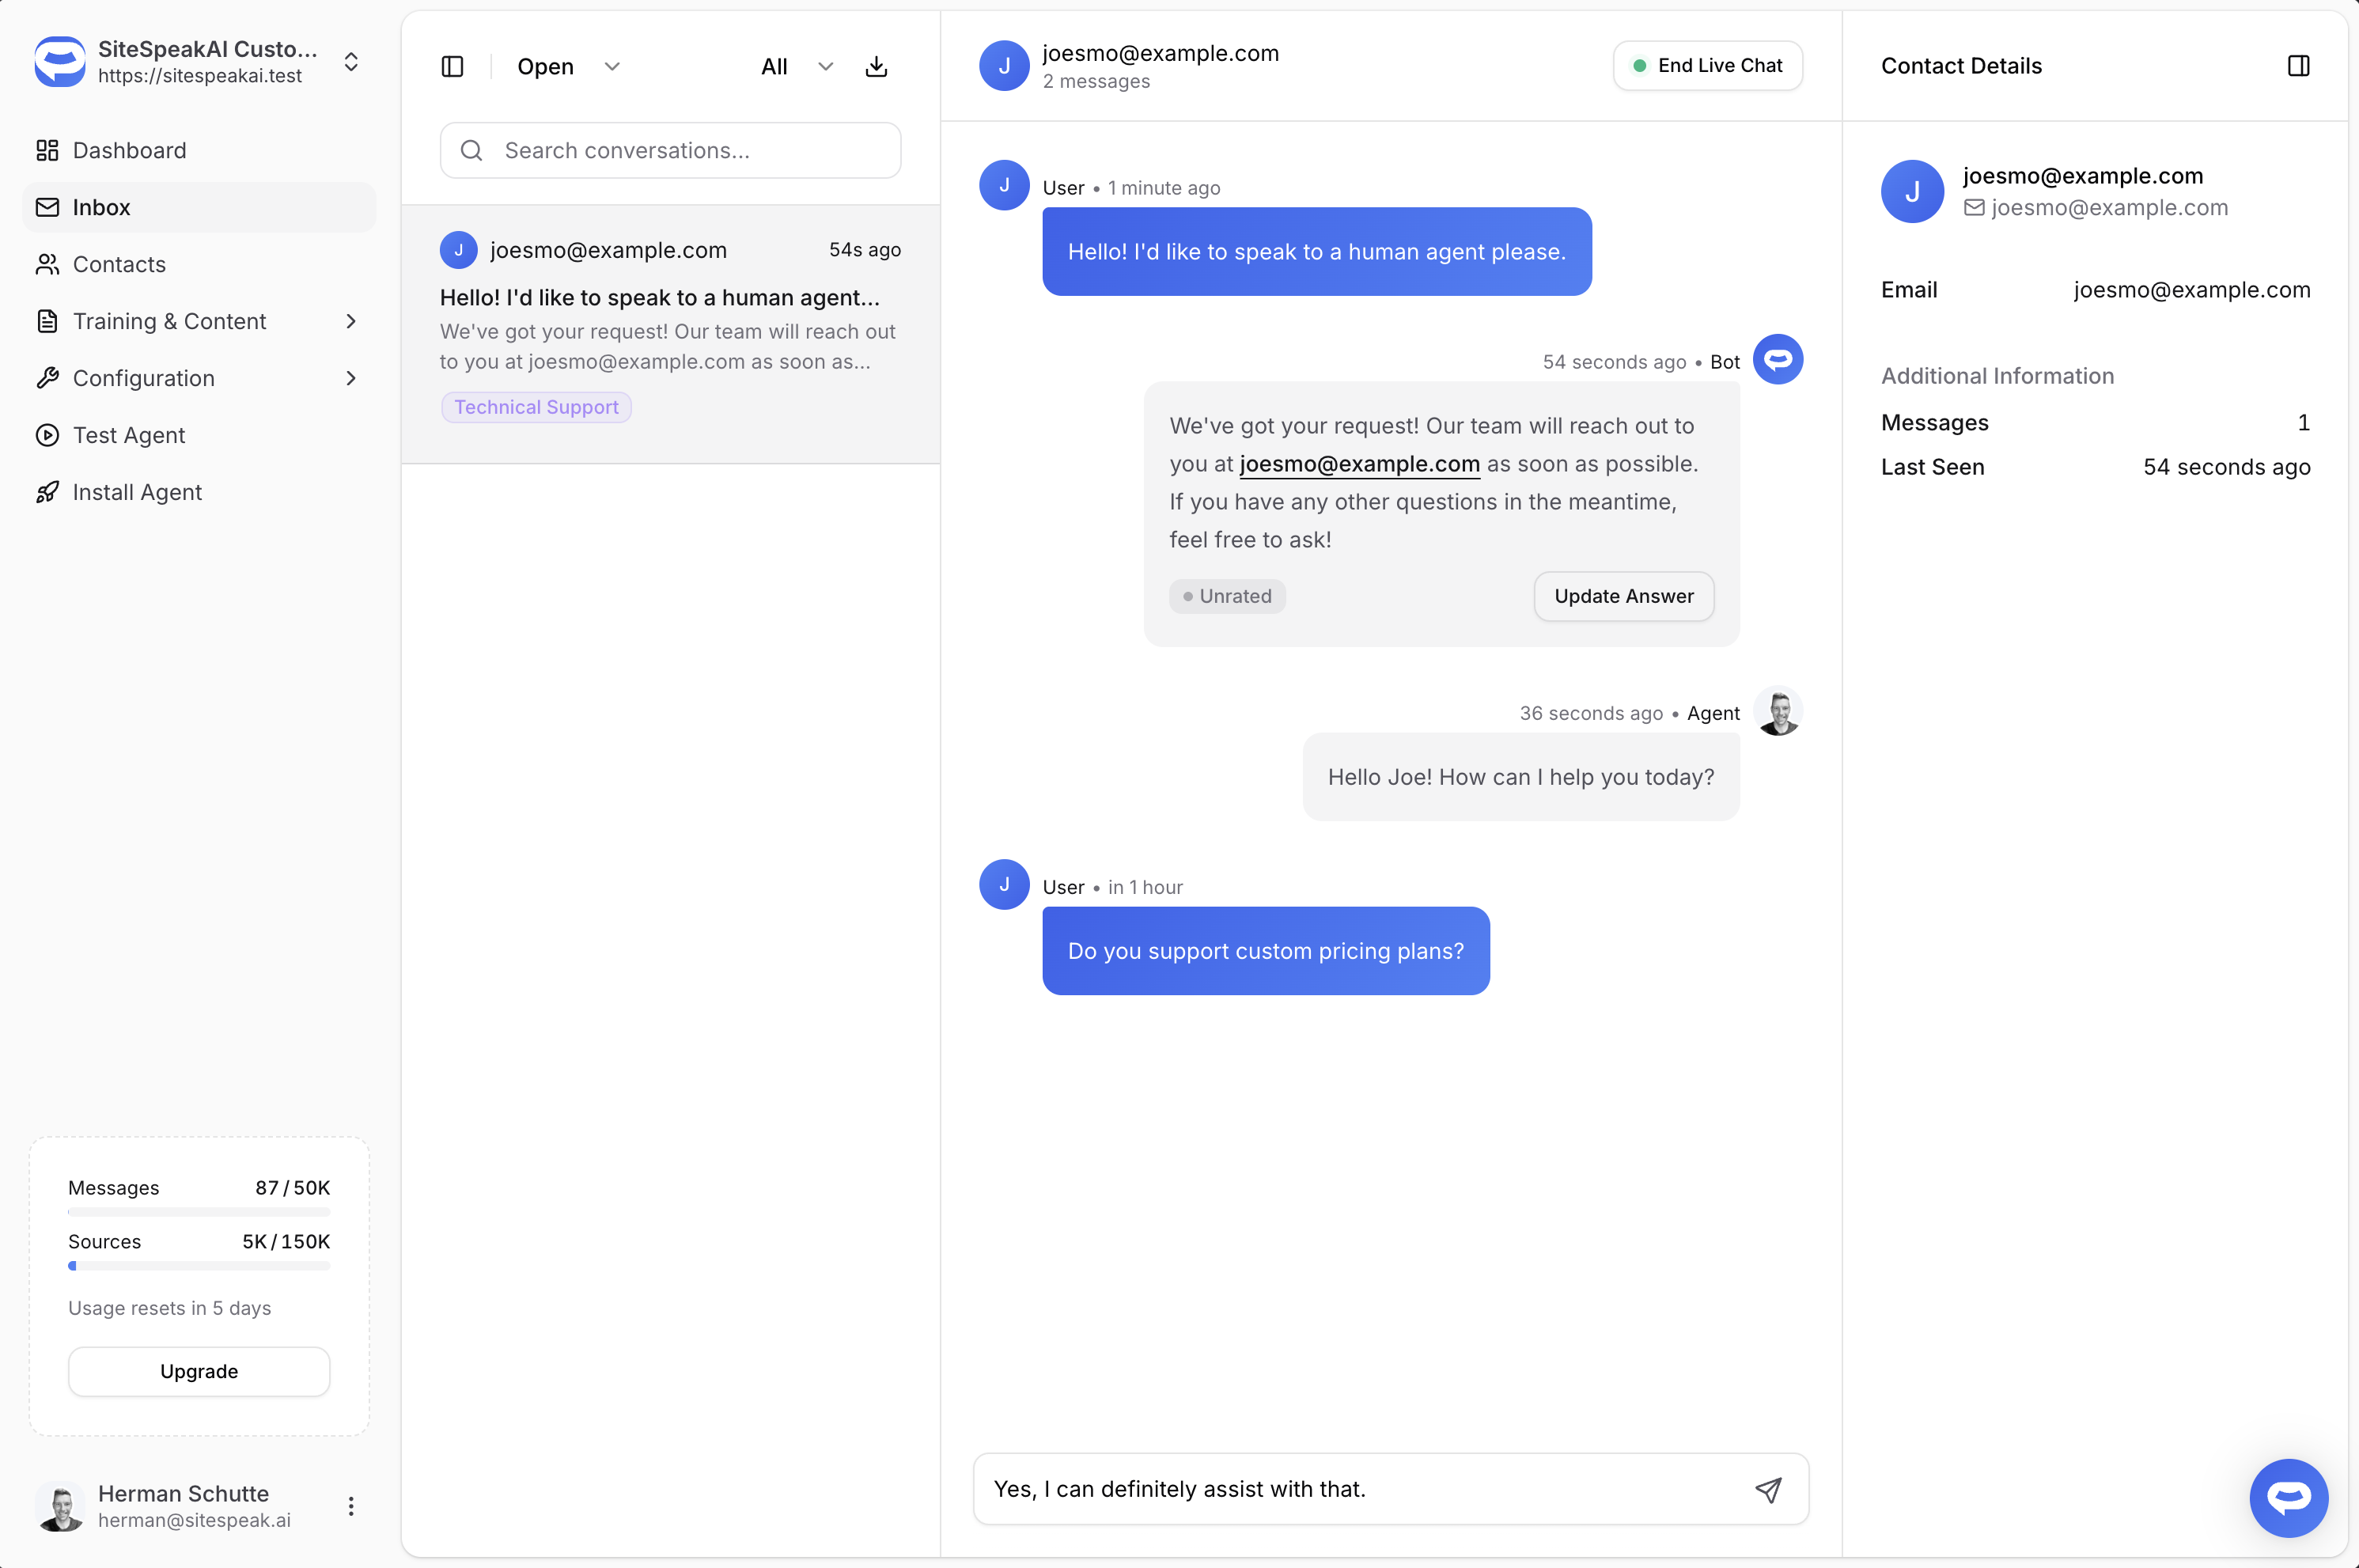
When you receive an escalation notification, you can respond to visitors in real-time through the Inbox (Conversation History).1
Open the Inbox
Click Inbox in the dashboard sidebar to see all conversations.
2
Select the conversation
Find the escalated conversation and click on it to open.
3
Start Live Chat
Type your message in the input field and send. This automatically starts a Live Chat session.
4
End Live Chat
When finished, click the End Live Chat button in the conversation header. This returns control to the AI assistant.
Email replies to visitors
Visitors often leave the chat before your team replies. With email replies on, your Inbox reply also goes to the visitor’s email address, and their answer comes back to the same conversation in your Inbox.Email replies are available on the Pro plan and higher.
1
Go to Settings
In your chatbot dashboard, click Configuration, then Settings.
2
Turn on email replies
On the Basic tab, toggle on Email Replies To Visitors and save.
How it works
- You reply to a visitor in the Inbox.
- If the visitor does not answer in the chat within 5 minutes, SiteSpeakAI emails your reply to them. If you send more than one message, they go out together in one email.
- The visitor answers the email. Their answer shows in the same conversation in your Inbox, with a mail icon.
- You reply in the Inbox as usual. Later emails stay in the same email thread.
When a reply is not emailed
A mail icon next to the send button in the Inbox shows if your reply can go by email. Hover over it to see why when it cannot. A reply is not emailed when:- The visitor has no email address, or the address is not valid
- An earlier email to the visitor bounced or was marked as spam
- The conversation came from WhatsApp or Google Chat, where the visitor gets your reply in that app
Customizing escalation messages
You can customize the messages shown to visitors during escalation in the Localization tab under Settings, including:- The message shown when escalating
- Email input placeholder text
- Confirmation messages
Best practices
- Set expectations: Let visitors know typical response times in your escalation confirmation message
- Use round robin: Distribute escalations evenly across your team
- Connect Slack: Get real-time notifications where your team already communicates
- Use webhooks: Connect escalations to your CRM or ticketing system via Zapier, Make, or a custom endpoint
- Review escalations: Regularly review why visitors escalate to improve your AI’s training
Ready to automate your customer service with AI?
Join over 1000+ businesses, websites and startups automating their customer service and other tasks with a custom trained AI agent.